

A clean small tattoo reads like a well-cut shirt. It does one thing and does it clearly. Pick a compact symbol, get the spacing right, and you get a piece that keeps shape as it heals and ages. This guide focuses on small, masculine designs that stay legible, placement tips that matter more than you think, and practical clothing advice so your new ink looks intentional from day one.
1. Tiny Triangle on Outer Forearm
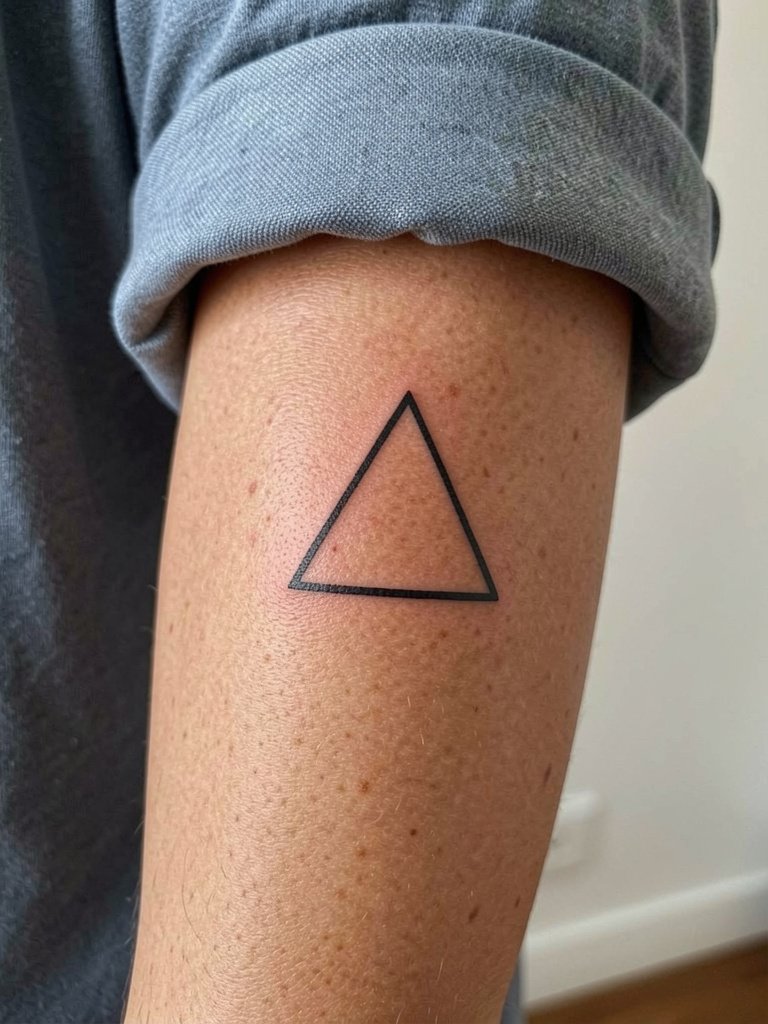
A small solid triangle reads clearly at thumb-to-elbow scale and resists blurring if the lines are not pushed too thin. For this placement request a slightly heavier line weight than your Pinterest reference so the three corners keep their shape over time. The common mistake is shrinking the design until the apexes merge after a year. Expect a short session under thirty minutes and low pain. Wear a rolled sleeve shirt to show it off when it is fresh.
2. Micro Arrow on Inner Forearm

An inner forearm arrow is low risk for blowout if you leave two to three millimeters between thin lines. Ask for a demonstration of how the artist scales the arrow up and down so you can see legibility at small sizes. The inner forearm ages well because it gets moderate sun exposure. For session comfort wear a short sleeve tee so the artist has clear access without you tugging at fabric.
3. Tiny Script Name on Wrist

Scripts on the wrist look neat when letter spacing gets a small boost. Tell the artist you want wider inter-letter gaps so the counters do not fill in over time. The wrist endures friction from watches and sleeves so expect a touch-up around year two if you keep the script narrow. Wrist tattoos show well with a thin bracelet or no accessories. Try a minimalist watch on the opposite wrist to balance the look.
4. Small Mountain Silhouette on Calf
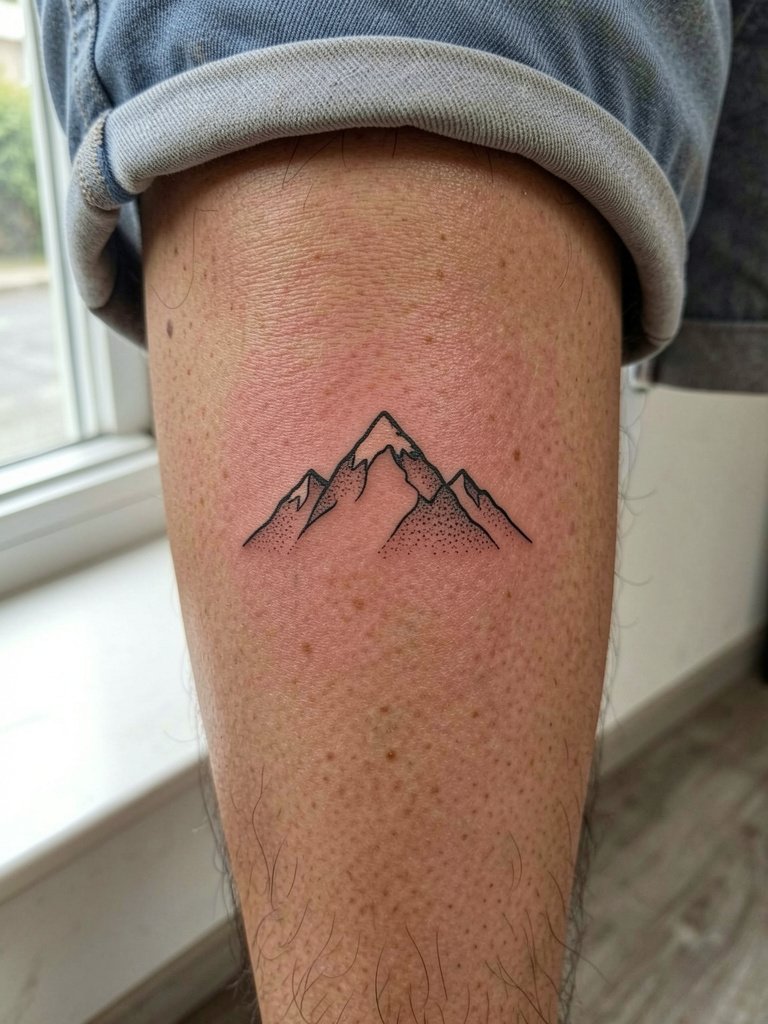
A calf silhouette survives movement if you keep the linework continuous rather than broken into tiny hatch marks that blur. Ask for a reference showing the design at three different widths so you can choose the scale that reads from five feet. Sessions run around forty minutes and pain level is low. The design pairs with cuffed pants or shorts. For showing off try tapered joggers and athletic shorts.
5. Mini Bird on Collarbone

Collarbone skin moves with breathing so thin artists must plan depth and slight spacing. Tell the artist to allow extra space between wing details to prevent merging as the skin settles. The sternoclavicular area can be ticklish and rates a moderate pain level. This placement looks deliberate with open collars or layered necklaces. Pair the piece with an open collar shirt that frames the line.
6. Micro Chevron on Wrist
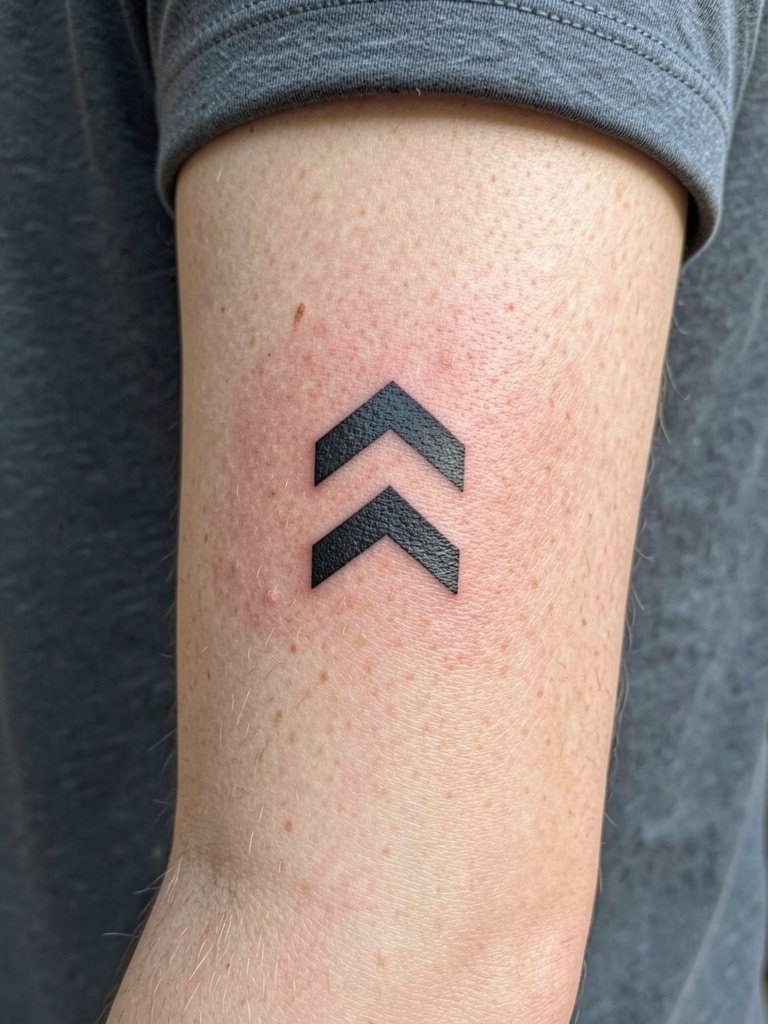
Chevron marks are forgiving for small scale because they rely on solid shape rather than delicate hairlines. Specify exact spacing between the two V shapes so the gap does not close as the wrist flexes. These heal fast and are easy to hide with a watch or bracelet. For a low profile accessory look try a thin chain bracelet.
Pre-Session Essentials
The wrist, collarbone, and inner forearm pieces above face different friction and visibility challenges, so a few small tools make the appointment and first week simpler.
-
Fine-line stencil transfer paper pack. Lets you preview exact placement and line weight on skin before the needle touches you, helpful for script and arrow work above.
-
Vegan benzocaine numbing cream. A topical numbing cream applied per artist instruction can ease wrist or collarbone sensitivity without altering linework.
-
Thin protective film roll for tattoos. Breathable film helps wrist and finger pieces avoid soap scum and friction in the first 48 hours.
-
Fragrance-free gentle body cleanser. A mild wash avoids irritation while keeping small designs clean during showers.
-
Aquaphor healing ointment. A widely used thin ointment layer for the initial day or two supports fine line healing without clogging pores.
7. Tiny Sunburst on Upper Arm

Sunburst motifs can be compact and still read from a distance if the rays are slightly thickened. Ask for a mockup showing the design at two sizes so you can see which reads better when the arm moves. Upper outer arm sessions are short and moderate in pain. This placement pairs with muscle tees or fitted shirts. Try a fitted t shirt to frame the piece.
8. Tiny Snake Curve on Inner Wrist
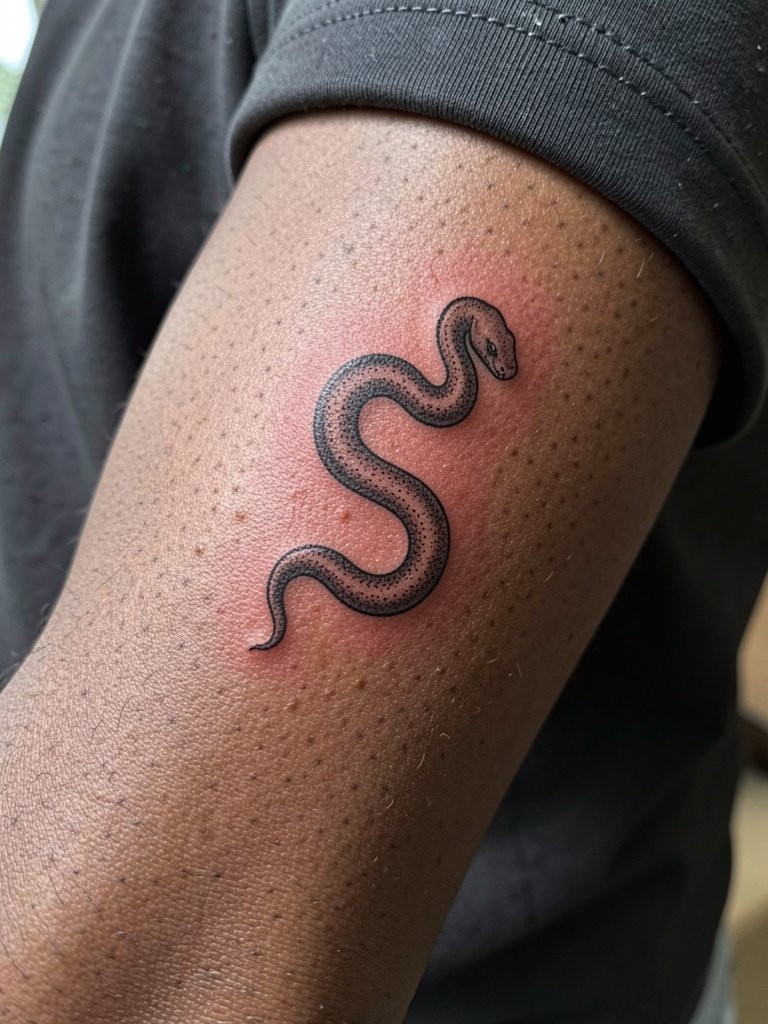
A slim snake reads well when the head and tail keep slight separation. The controversy over fine line versus bold line applies here. One camp favors single-needle fine line for its delicate look and modern feel. The other camp argues that slightly bolder line weight holds up better on high-movement spots like the wrist. Name the scale you prefer and have the artist show healed examples in similar placements.
9. Micro Compass on Back of Neck
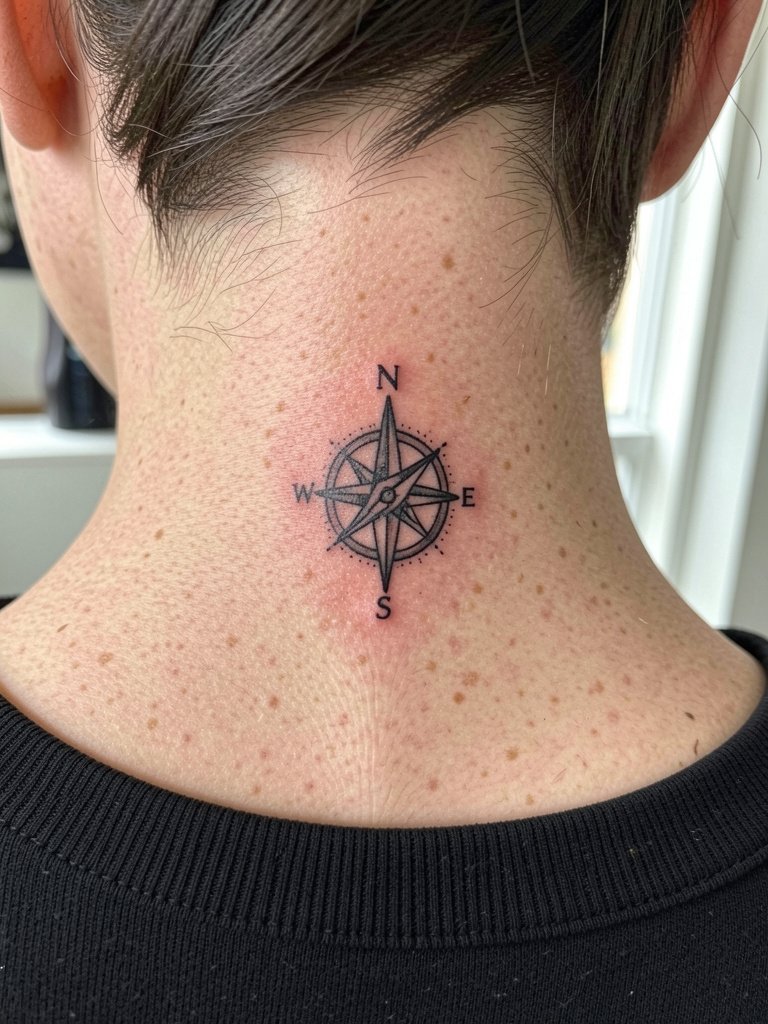
Neck skin can stretch and blur finer hairlines over time. Ask to see three-year healed photos of similar compass pieces before committing. The session is quick but the area is sensitive. For wardrobe choices, an open collar shirt with short hair shows the design cleanly.
10. Minimal Anchor on Ankle
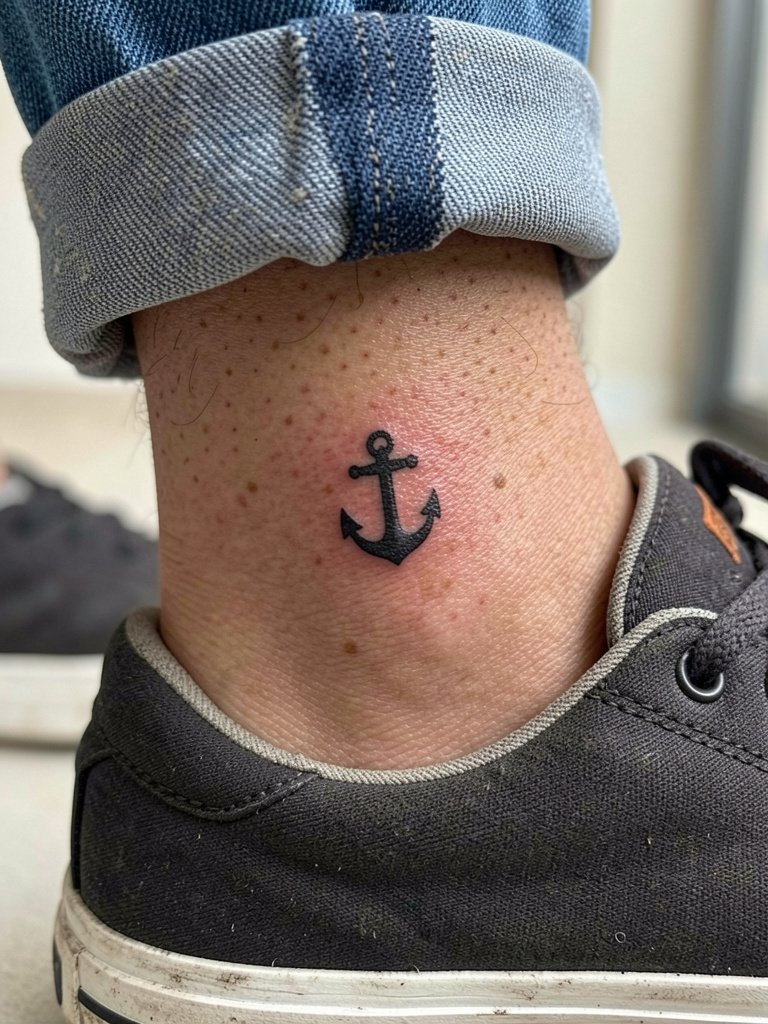
Ankle tattoos face rubbing from socks and shoes. Keep the anchor slightly bolder so small fills do not wash out. A common mistake is asking for pinprick detail low on the ankle that disappears after scuffing. To show the piece, wear low-profile sneakers or cuffed pants and try cropped pants.
11. Tiny Palm Tree on Outer Ankle
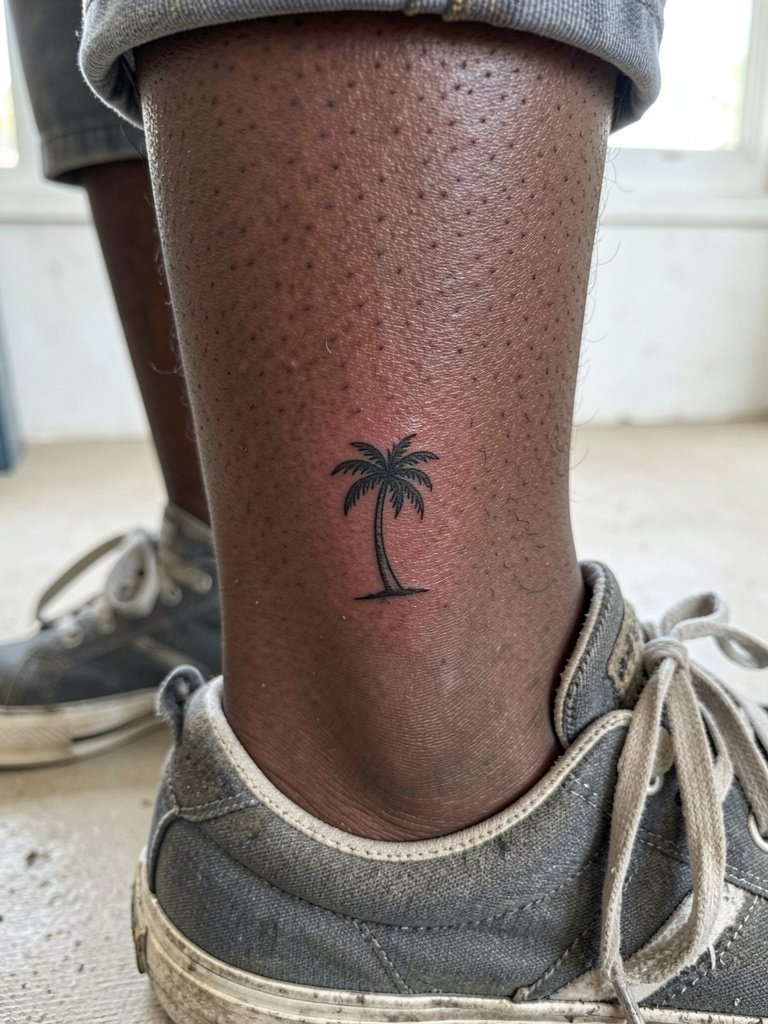
Ankle placements need protection during the first week because shoes can rub. Request a small revision session window with the artist at booking so you can correct early scabbing issues if needed. Pair the look with low-profile sneakers or shorts. Consider ankle socks that stay low to keep the piece visible.
12. Micro Dumbbell on Forearm
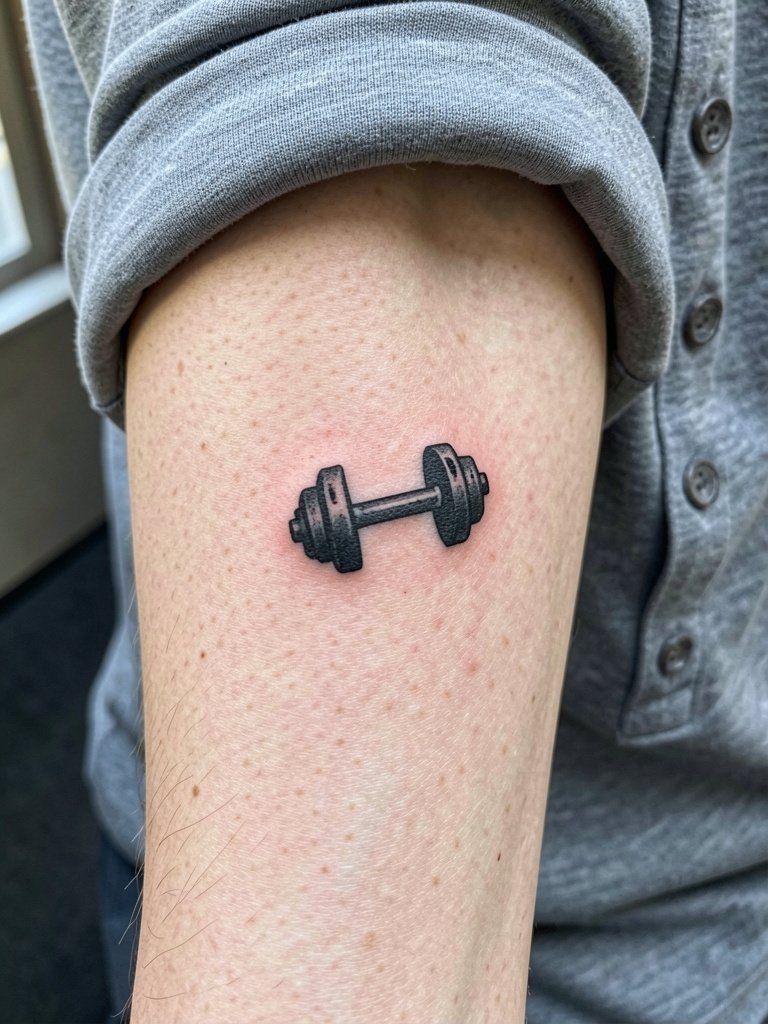
Fitness icons like a micro dumbbell work well on the forearm because the skin there handles thicker shapes. Specify a bold silhouette so the hub and bar remain clear after sweat and gym friction. Forearm heals predictably. For a casual showcase wear a fitted henley with the sleeves rolled.
13. Tiny Geometric Cube on Upper Chest

Chest skin moves with respiration so the cube needs a little breathing room between parallel lines. Ask the artist how they will space the edges to avoid the faces bleeding into one another over time. Expect moderate sensitivity. An open-neck tee or layered chains can frame the piece without covering it.
14. Micro Wave on Side Wrist

Side-wrist pieces flex constantly. The fine line versus bold line debate matters here. One camp prefers delicate single-needle lines for the aesthetic. The other camp favors slightly heavier strokes so the motif keeps its crest over years. View healed photos in this exact spot and pick the camp whose long-term samples you prefer. For session comfort remove wrist jewelry and wear a short sleeve tee.
15. Minimal Cross on Finger
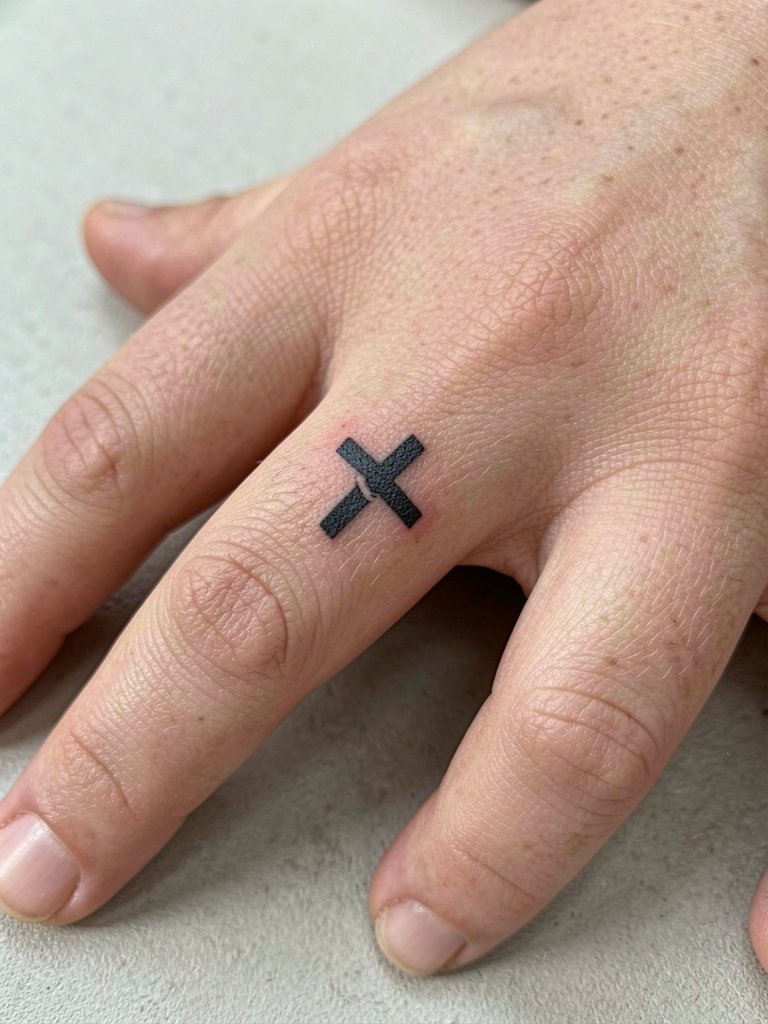
Finger ink fades faster due to washing and friction. Ask the artist about realistic touch-up schedules and understand you may need an annual refresh. The design should be bold rather than hairline thin. Fingers pair with low-profile rings if you want an accessory to match the scale.
16. Tiny Lion Outline on Shoulder

Animal outlines on the shoulder survive well because the area has less constant flex. Size up the mane detail slightly so the face reads cleanly after a few years. Shoulder sessions are easy to manage and usually short. Pair with a muscle tank to show the piece in warm weather.
17. Tiny Sun and Moon Duo on Chest
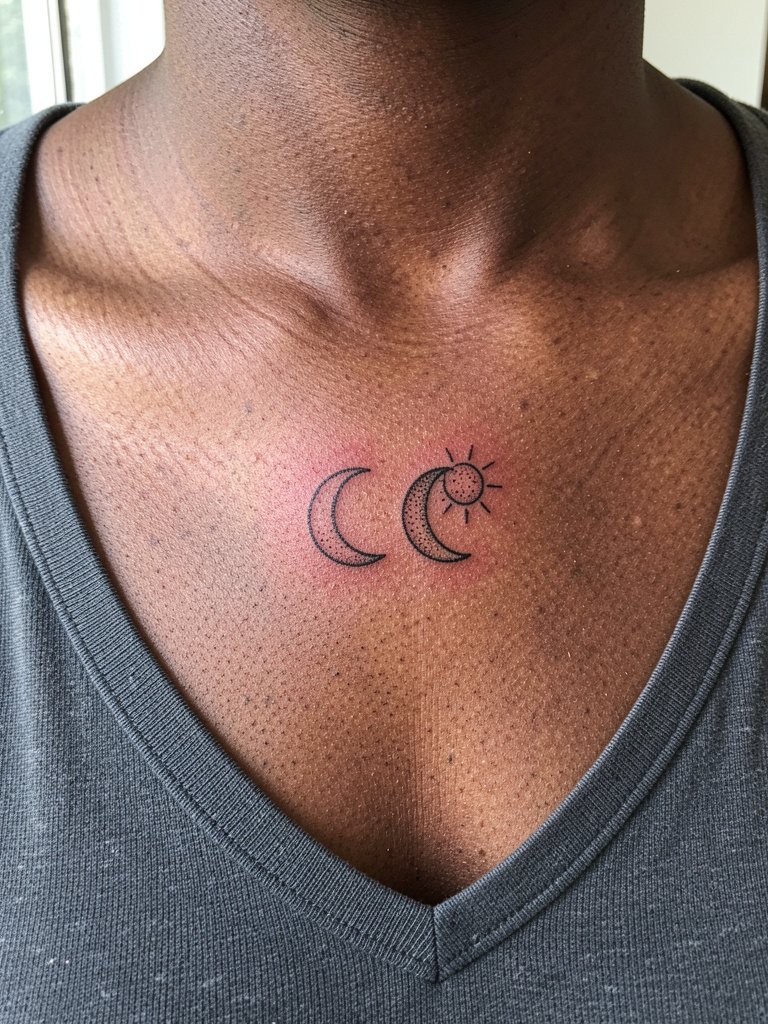
Pairs like sun and moon are versatile because each glyph is simple. Make sure the spacing between them stays consistent in the stencil so the duo does not read as one blob later. The chest area needs careful sun protection while healing. A lightweight open-neck top frames the design.
18. Minimalist Knot on Inner Arm
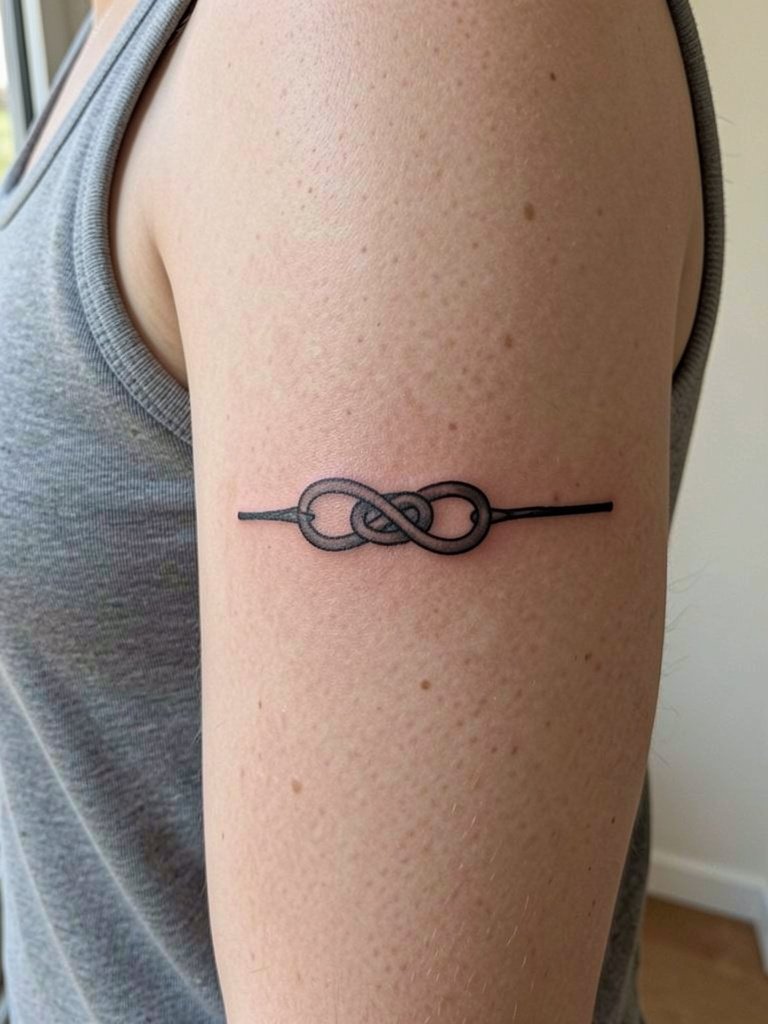
Inner arm pieces require the artist to account for the medial curvature. Request a stencil preview with the arm relaxed at the side so you see how the knot sits when you are standing naturally. This placement matches layered short sleeves or rolled cuffs. For the session wear a tank top so the artist has easy access without the fabric bunching.
19. Micro Palm Leaf on Calf
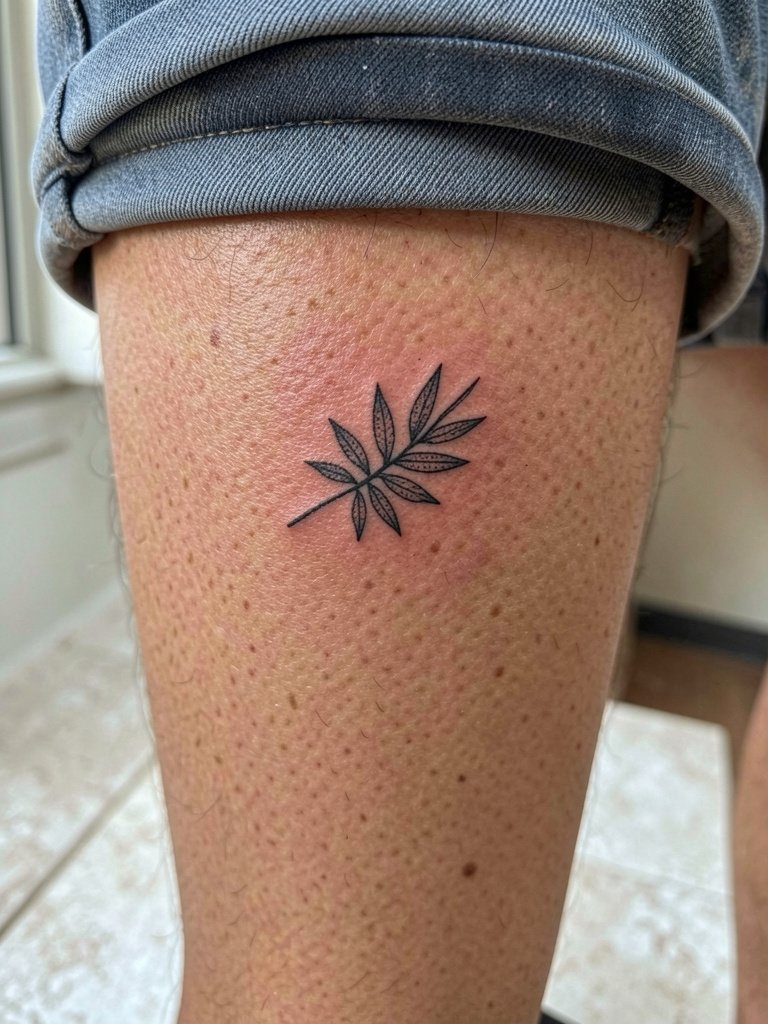
Leaves and botanical motifs work well on the calf because you can scale the veins slightly thicker for longevity. Ask for a healed shot of the same motif in calf placement before booking. Calf tattoos look natural with cuffed jeans or shorts.
20. Minimal Geometric Linework on Outer Thigh

Outer thigh is forgiving and keeps geometric lines sharp. Specify the desired spacing clearly since parallel lines can visually compress as the skin settles. This placement pairs with shorts and swimwear. For showing off try cropped shorts.
21. Micro Dot Constellation Behind Ear
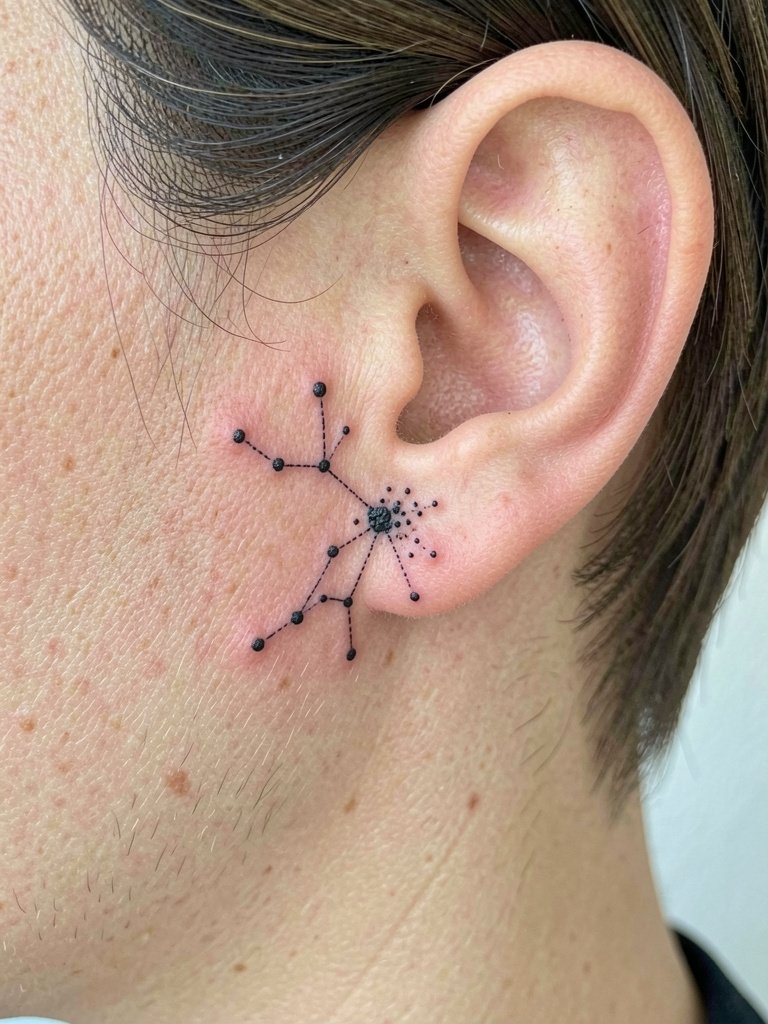
Behind-the-ear placements are subtle but require attention to dot density. Dense dots can blur into a smudge over time. Ask the artist to space the dots so the constellation pattern remains legible. This area looks intentional with short haircuts or hair tucked naturally away.
22. Small Wave Band on Wrist Outer Edge

Small repeating bands are decorative but they must be bold enough to survive constant wrist motion. A frequent error is requesting fine filigree that looks great fresh and disappears after months. For a balanced look consider pairing with a low-profile bracelet or watch and try a minimalist watch.
23. Micro Stipple Mountain on Outer Calf Near Ankle

Stipple shading reads beautifully in narrow bands but relies on consistent dot size. Ask the artist how they will space stipple to avoid patchy fading. Lower calf and ankle have different friction patterns so expect a slightly higher chance of early touch-ups. Wear cuffed pants or shorts to keep the scene visible.
Frequently Asked Questions
Q: How do I pick between fine line and slightly bolder linework for a small piece?
A: Two camps argue this out. One camp prefers fine single-needle linework for the understated modern look and will show you fresh, delicate pieces. The other camp favors slightly bolder lines because tiny hairs can merge over time, especially on wrists and fingers. Look at healed photos from the artist at the exact placement you want and pick the approach that matches the healed samples you like.
Q: Where can I find artists and healed examples for these small tattoo ideas?
A: Search hashtags like #smalltattooideas, #finelinetattoo, and #minimaltattoo while filtering by your city on Instagram and TikTok. Reddit communities such as r/tattoos and r/tattooadvice often include healed photos and discussion about shop minimums, pain, and touch-up frequency. Prioritize portfolios that show healed work from year one and later.
Q: Will a tiny tattoo blur or need touch-ups often?
A: It depends on placement and line weight. High-friction zones like fingers, wrists, and ankles typically need touch-ups sooner. Designs with bold negative shapes and slightly heavier line weight tend to require fewer corrections than hairline detail in the same spot. Plan for a possible touch-up around year one to two for most micro work.
Q: How should I dress for the session and to show the piece afterward?
A: For the session, wear clothing that gives the artist direct access without you tugging fabric. For a forearm piece bring a short sleeve tee or rolled sleeve shirt. For collarbone or chest pieces wear an open collar or scoop neck. To show a wrist, keep sleeves short and consider a minimalist watch on the opposite wrist. A few styling links above point to specific cuts that make small tattoos look intentional.
Q: How much should I budget for a small tattoo?
A: Shops commonly have minimum charges that cover setup and hygiene even for tiny pieces. Expect to pay a minimum and then tip fifteen to twenty five percent for good service. The exact number depends on the studio and city, so check the shop policies before booking.
Q: Are there cultural or sensitivity issues with certain small designs?
A: Yes. Designs with clear cultural origins require respect and context. If a motif comes from a cultural or religious tradition, name its origin in your briefing and ask about appropriate adaptation. A responsible artist will explain what is respectful and what should be avoided.
Q: How long does a typical small session take and what about pain?
A: Most small tattoos in this list take twenty to sixty minutes. Pain varies by placement. The inner wrist and collarbone are more sensitive. The outer calf and upper arm are generally low pain. Bring water, get a good night of sleep, and follow the simple session wear tips listed in the sections above.
