
The stencil sits on the forearm and the room is quiet while the artist steps back, rotates the arm, and points out where negative space will keep the mandala readable in ten years. Sleeve planning is that small decisions stacked over sessions. Think about flow, where pattern bands break for the elbow, and which pieces you want to remain crisp as the arm moves and suns.
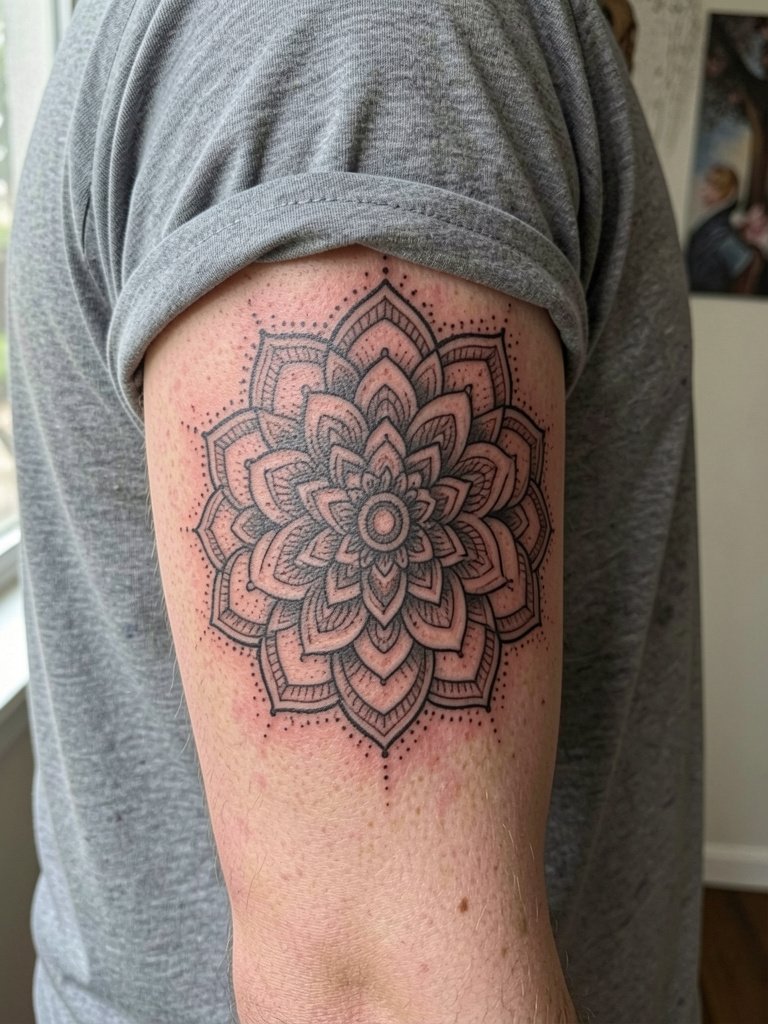
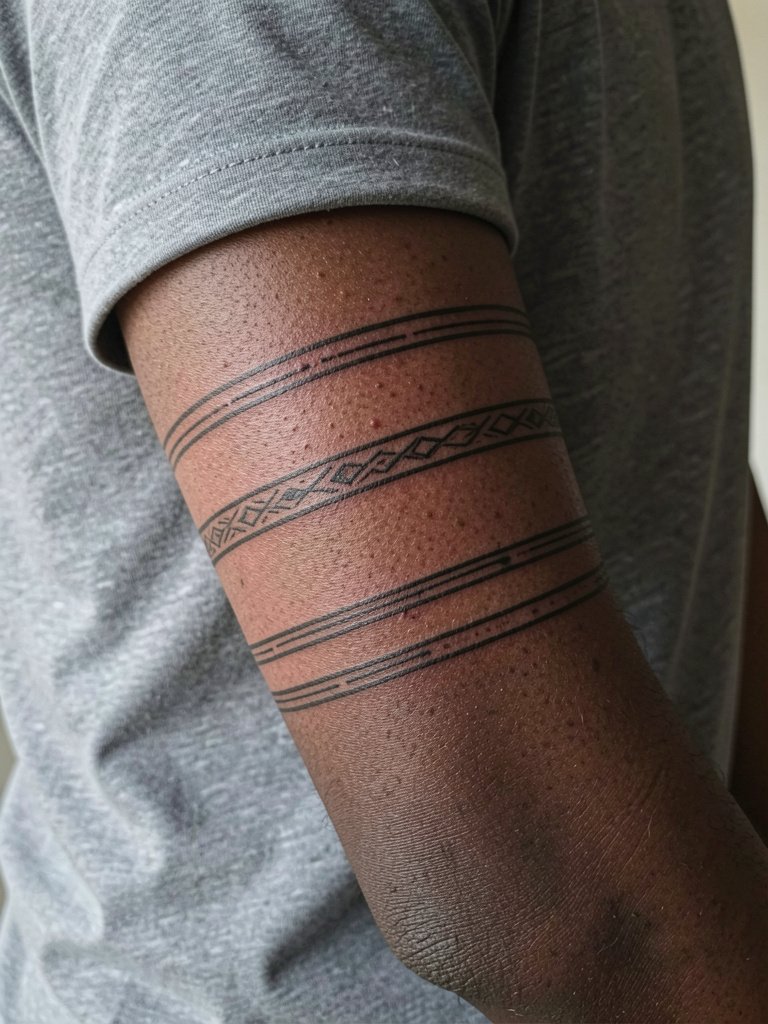
1. Mandala-Centered Blackwork Sleeve for Forearm Flow
This option is built around rhythm rather than imagery. Use three to five mandala centers spaced along the forearm so the eye travels instead of stopping. Ask for mockups at both three and five inches so you can compare how the negative space breathes at each scale. A common mistake is squeezing too many lace fills into the elbow crease, which blurs as the arm flexes. Expect longer sessions for saturation and crisp outer edges, and plan touch-ups around year two for any softened dot work. For showing it off, pull sleeves back with a rolled sleeve shirt that puts the mandalas in frame.
2. Botanical Ornamental Sleeve with Peonies and Negative Space

Floral shapes are excellent for bridging old pieces and creating flow. Specify which flowers matter to you and bring photos of exactly the petal count you like so the artist can scale those shapes. The inner forearm can be gentler with finer shading, so ask for slightly bolder outlines where the wrist meets the hand to prevent early softening. Roll-up shirt styling shows off the linework, so consider a linen button down for outings and wear a loose short-sleeve on session days for easy access.
3. Geometric Grid and Dotwork Sleeve That Solves Gaps
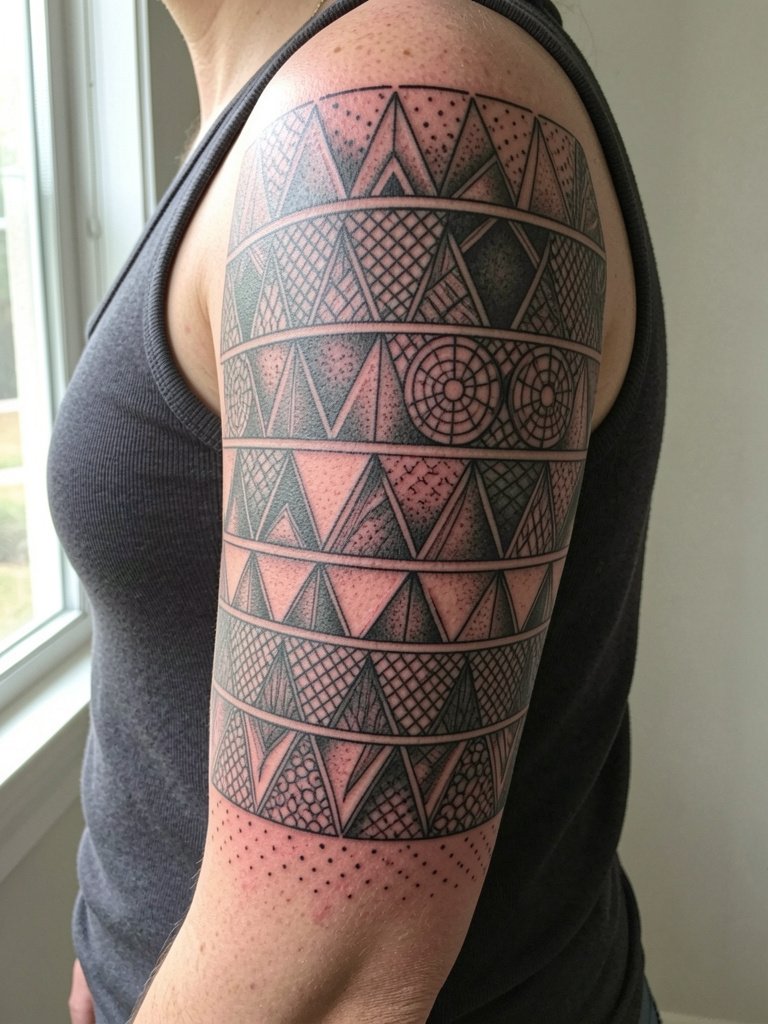
Geometric systems make a sleeve read cohesive even when pieces are added later. When you bring references, show the artist the exact repeat size you prefer so the grid logic stays consistent across joints. A common aging issue is going too small on repeat elements, which leads to pattern collapse at year three. The session feels vibration-heavy but lower on raw soreness because lines are crisp and efficient. For wardrobe, structured tanks and fitted tees up the clean contrast, try a fitted black t shirt to keep photos high-contrast.
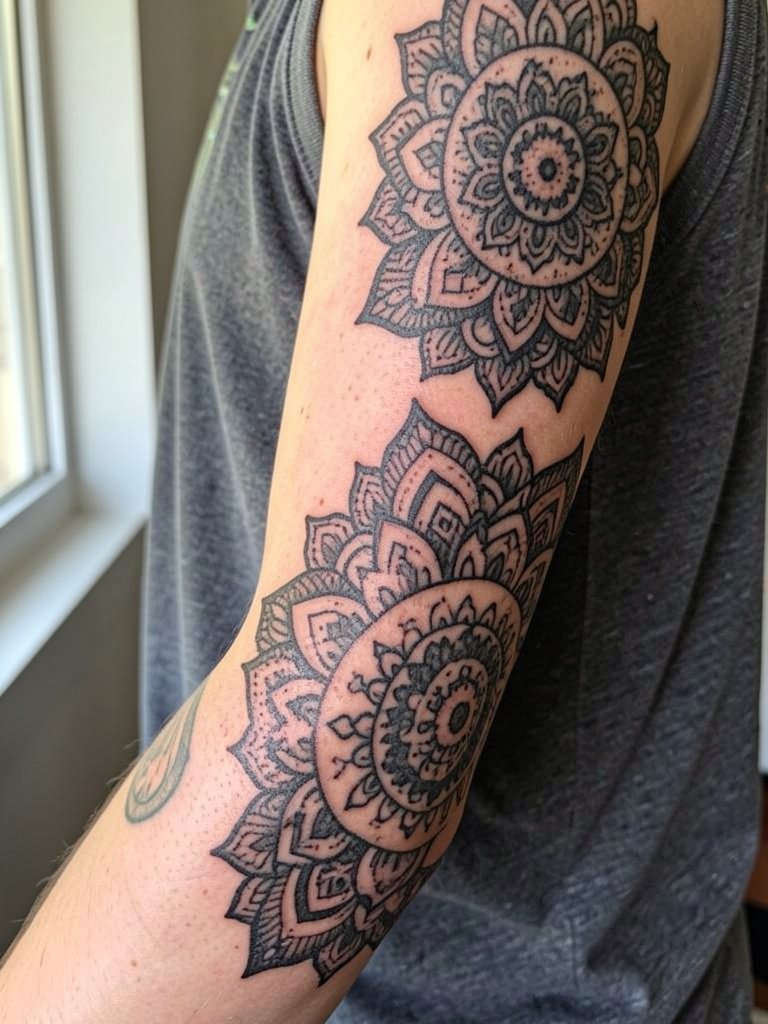
4. Stacked Mandalas as a Sleeve Backbone
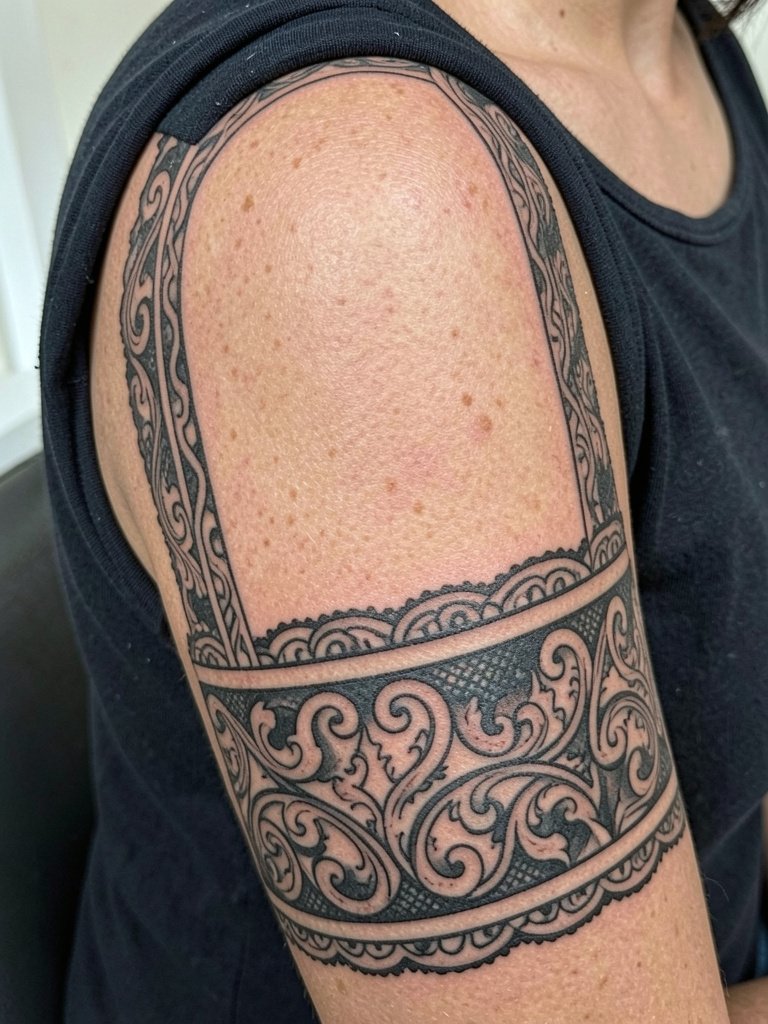
Stacked mandalas act like vertebrae on the arm and make future filler far easier. Bring a vertical mockup so you can see how symmetry holds when the arm is bent. The elbow transition is critical; specify that patterns should break before the crease to avoid distortion. Expect sessions to be precise and patient work, and ask about staging the center mandala first so your overall axis is set. For a polished outfit that complements the symmetry, try a sleeveless ribbed top that frames the upper stack without distraction.
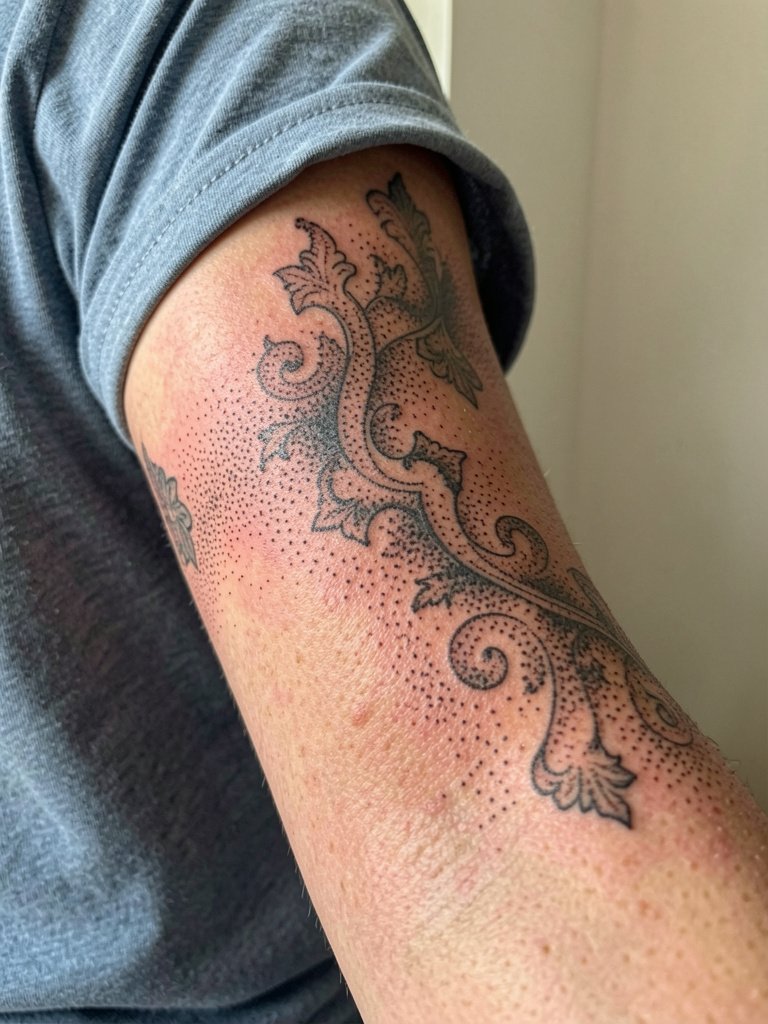
5. Paisley and Filigree That Follows Muscle Lines
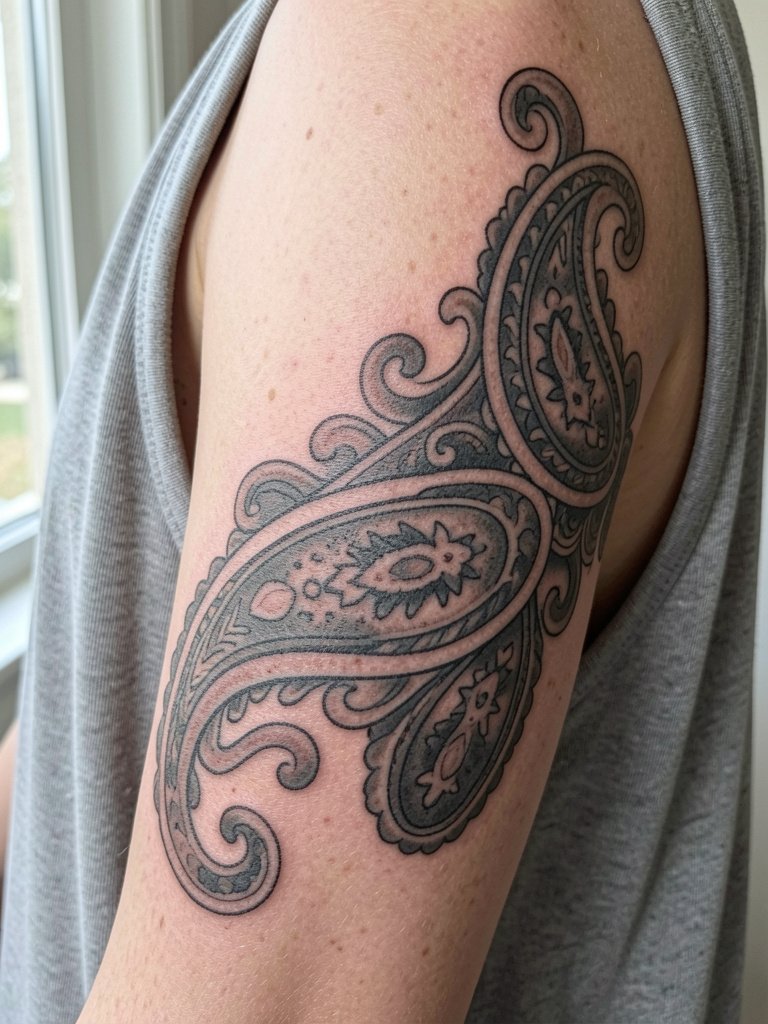
Paisley reads fluidly because the teardrop curves follow muscles. Specify which curves should sit along the longest muscle axis so the pattern looks intentional when you bend or flex. A mistake is forcing dense filigree into thin soft-skin areas, which can lose detail. Sessions are medium length and forgiving, but plan for a touch-up if you want the fine internal linework sharpened later. For session comfort, wear a loose sleeveless top or sports bra for easy upper-arm access.
6. Celestial Fillers: Stars, Moons, and Galaxy Swirls
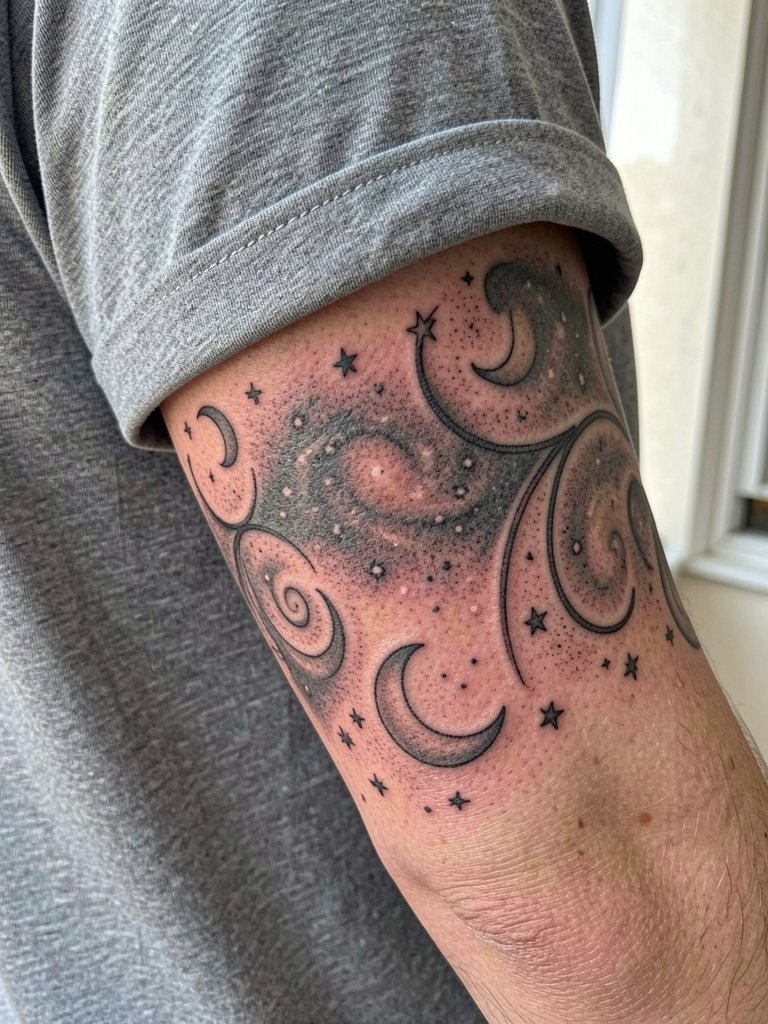
Celestial motifs break up dense patterning and add visual air. Ask for a scale test so tiny stars read as dots at arm distance instead of specks. Small moons near the elbow can blur if placed inside the crease, so have the artist map placements around joint movement. Sessions are quick for pins and dots, but stippled gradients take longer. To show these off, pair with rolled-up linen shirts in cream or olive, and consider a dainty bracelet set on the opposite wrist to balance the look.
Pack Smart
Those first six ornamental ideas cover heavy blackwork, floral wraps, and delicate fill, so a few small items smooth the session day and early healing.
- Tattoo-specific cleansing foam. A gentle foam helps rinse soot and ink without stripping the fresh linework, which is useful after large-stencil sessions.
- Fragrance-free barrier cream. Lightweight creams calm irritated skin during sweaty phases and avoid clogging dot work channels.
- Light compression arm sleeve. Covers healed areas for sun protection and keeps fabric from rubbing during manual work in the first weeks.
- Saniderm second-skin bandage. Useful when an artist prefers low-friction protection after a dense blackwork session, but check adhesive sensitivity first.
- Unscented gentle body moisturizer. Keeps fine-line and stipple shading from flaking during the longer healing window.
7. Patchwork Ornamental Sleeve with Connector Fill

Patchwork sleeves let you add pieces over time while keeping the arm coherent. One camp argues a single theme keeps a sleeve cleaner. The other camp prefers the lived-in look of distinct motifs united by tasteful filler. If you plan to build across years, ask for a unifying connector system such as repeating dot bands or filigree panels so later tattoos slot in without looking pasted on. An error is asking for identical scales for every piece; varying sizes helps rhythm. For session wear, a loose short sleeve that can be pushed up is easiest for upper-arm work.
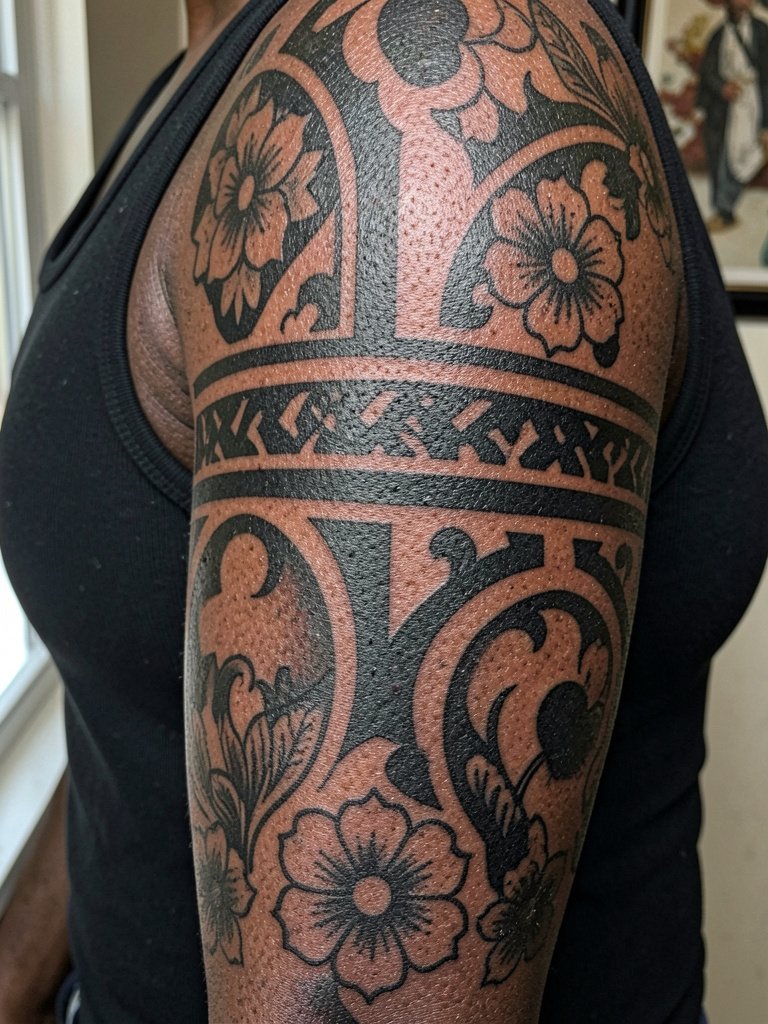
8. Traditional Ornamental with Bold Roses and Scrolls
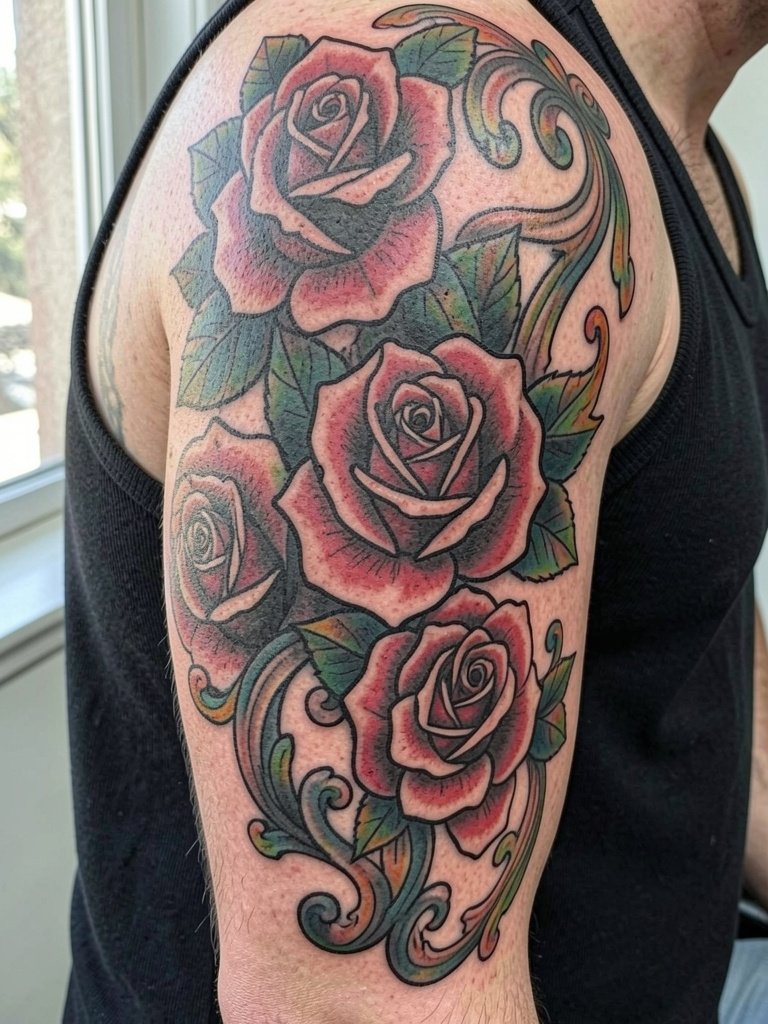
Classic lines age predictably and keep a sleeve readable from a distance. Make sure the artist sets bold anchor outlines around focal blooms so the piece keeps structure as it ages. A mistake is asking for very thin inner details inside large roses, which can soften quickly. Expect moderate pain on the outer arm and medium-length sessions. For a show-off outfit, structured sleeveless tops and a simple silver chain create a balanced, vintage look, try a silver chain bracelet set on the opposite wrist.
9. Fine Line Lace and Jewelry-Inspired Sleeve
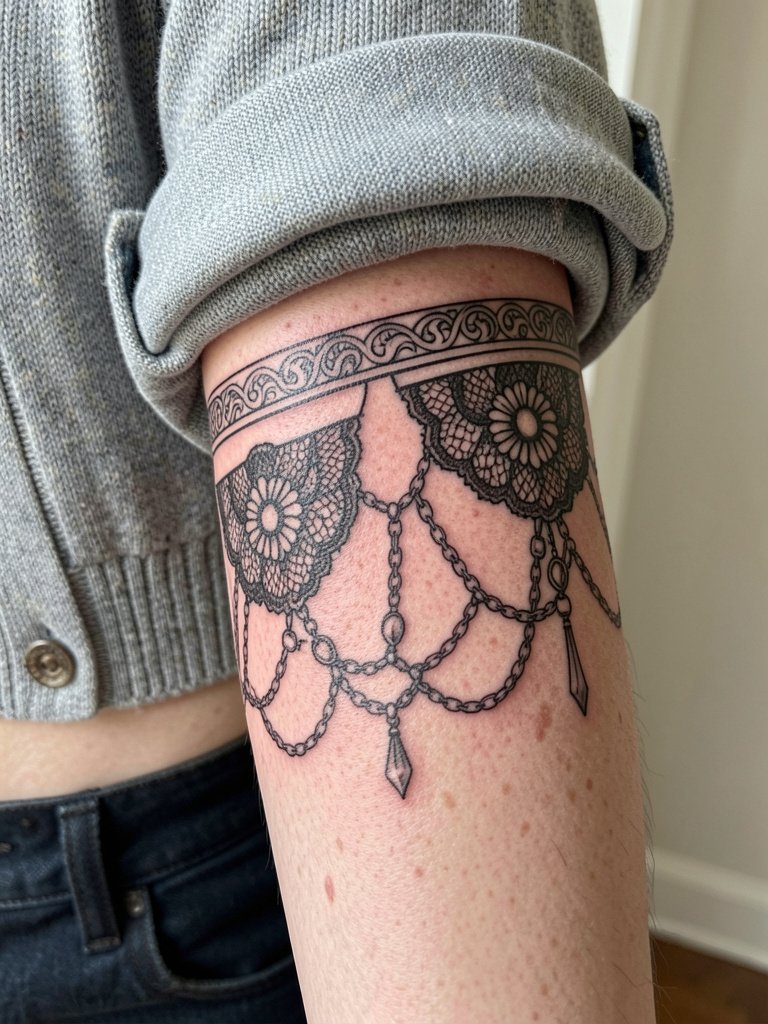
Fine line jewelry motifs look editorial but demand planning for longevity. One group favors this single-needle work for the wearable, dainty look. Another group warns that fine line on high-movement spots fades or blurs faster than expected. If you choose fine line here, ask for slightly heavier contour lines where the design crosses the wrist and elbow. Bring healed photos on similar skin tones so you can judge real-world aging. For outfits, cropped cardigans and delicate rings highlight the lace effect, and a dainty ring set works well with inner-arm placement.
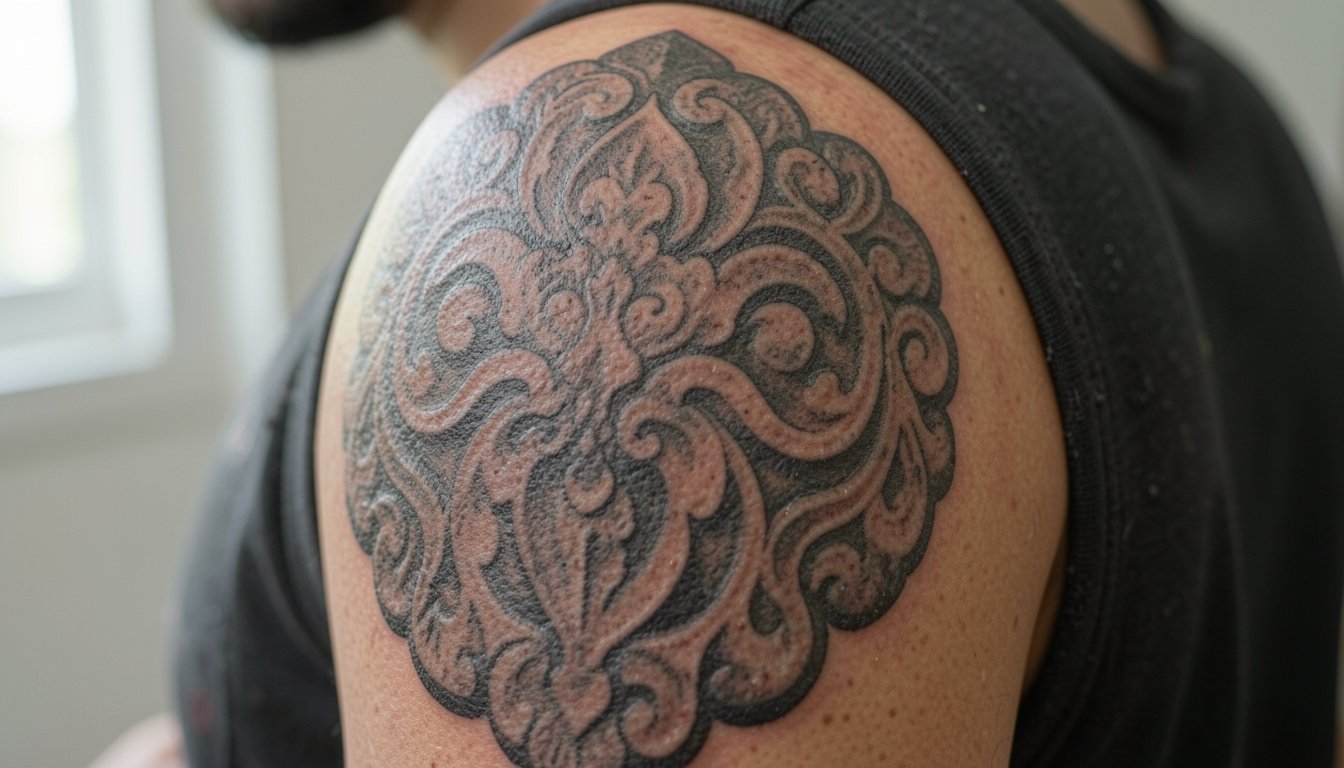
10. Balinese Carved-Stone Texture on the Shoulder
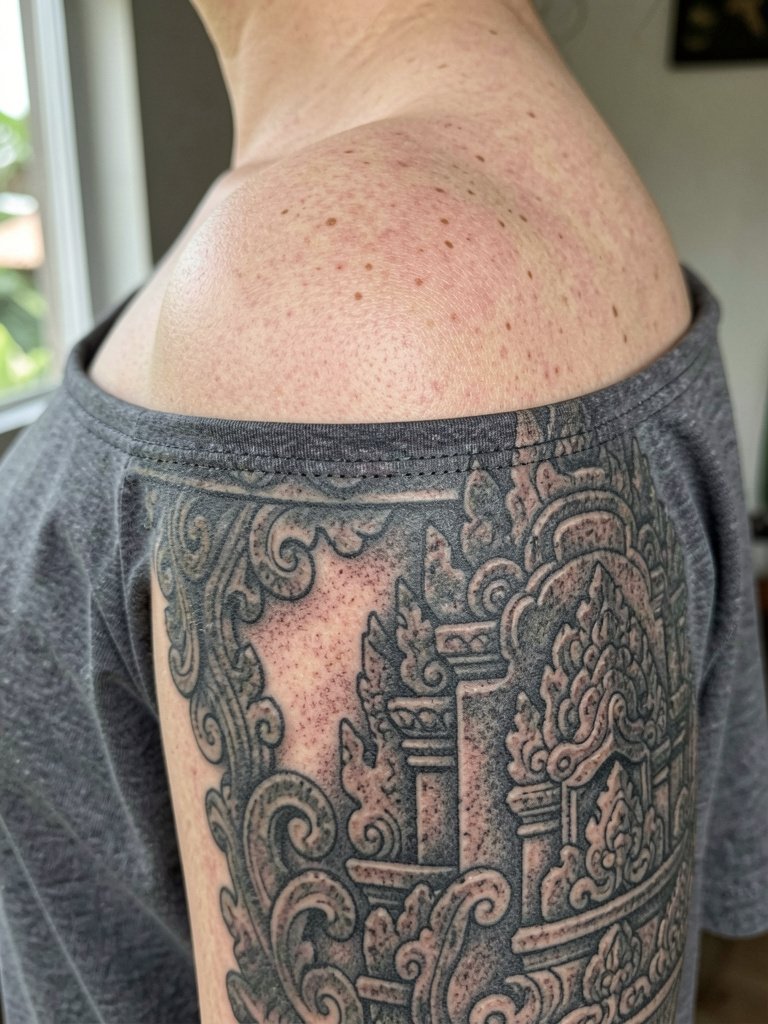
Balinese motifs borrow from stone carving and temple ornament, so plan respectfully. Note that these designs come from cultural traditions and should be approached with sensitivity. The shoulder takes larger, textural elements well, and the piece will continue to read in motion. A frequent mistake is shrinking carved details too small for texture to read from a distance. Sessions are moderate to long, and you may want a staged plan for saturation. For showing off, off-shoulder sweaters frame carved highlights without excess exposure.
11. Graphic Blackwork Bands with High Negative Space
High-contrast bands keep an ornamental sleeve readable at distance and resist the "muddy" look that tiny detail can create. For longevity, ask that large black fills be blocked in with clean edges rather than heavy stipple that can soften. A mistake is letting small dotwork sit too close to large fills, which makes the dots vanish next to saturated black. This approach usually needs fewer touch-ups because shapes remain graphic. Pair with monochrome outfits for photos and try a muscle tank top to show the wrap.
12. Arabesque Lace Panels That Frame the Arm
Lace-panel framing creates a tailored, textile-like look. For cultural patterns that resemble traditional arabesque work, discuss references and avoid direct copies of culturally specific religious motifs. Ask the artist to map repeating panels so they align with the arm's curve and avoid visual breaks at joints. Aging tends to be kinder to panels that keep some negative space around the edges. Off-shoulder tops or wide straps show this framing best.
13. Dragon Focal with Ornamental Background
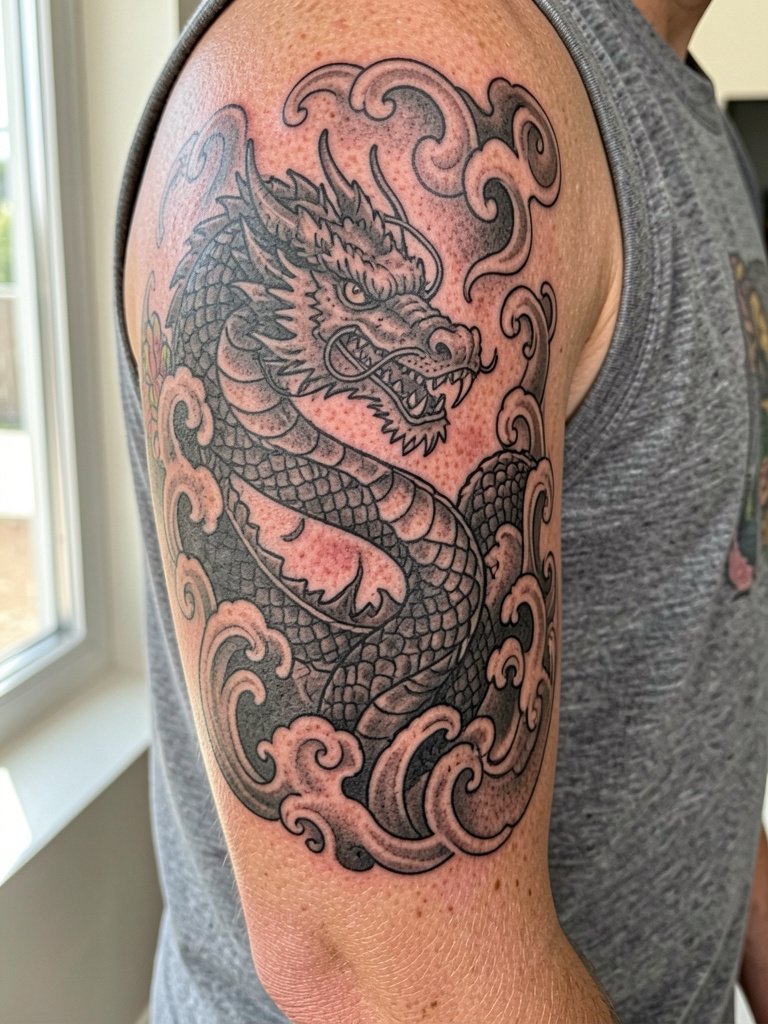
When a large subject sits inside ornamental filler, balance is crucial. Specify how much background you want and where the focal image should breathe. The common error is packing ornamental detail too tightly around the subject, which makes both elements compete. Expect longer sessions for the focal creature and a few separate sessions for background filler. For a refined look, wear a relaxed fit tank that follows the arm curve without distraction.
14. Classical Portraits with Decorative Borders
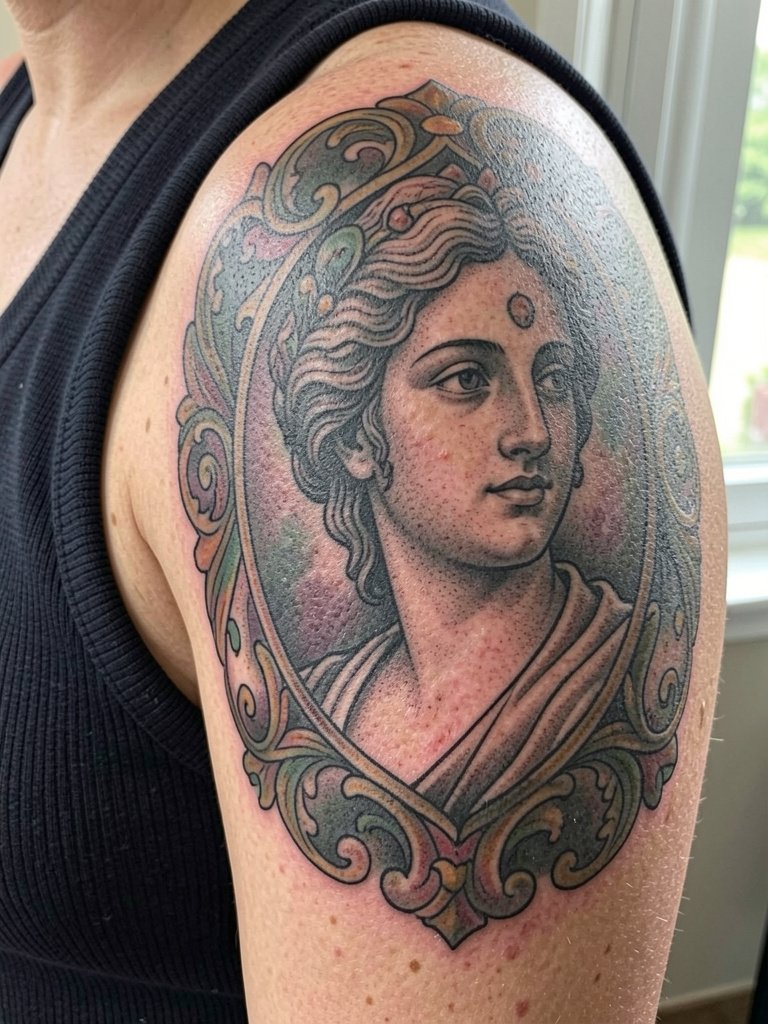
Portraiture needs a confident hand and clear plan for borders so the face remains the focal point. If you want a mythic reference, describe the facial proportions, gaze angle, and border motifs instead of handing over a single image to be copied. A common mistake is forcing portrait scale too small, which causes loss of facial detail with time. Sessions are longer and often spaced to let shading settle. Off-shoulder or wide-strapped tops frame the portrait without competing with the border.
15. Mixed-Filler Full-Arm Sleeve to Solve Gaps

When a sleeve is assembled from many small elements, a unifying filler system is the difference between cohesive and cluttered. Specify a limited set of repeating filler shapes so the eye reads a single visual language. A common mistake is introducing too many unmatched motifs, which makes the arm look busy. Touch-ups for micro-shapes are expected at two to three years. For everyday style, monochrome outfits keep the sleeve as the visual anchor.
16. Micro Dotwork and Stipple Shading Sleeve
Dotwork creates soft gradients that sit well next to strong shapes. The technique requires spacing discipline though, because too dense a stipple can fade into a grey mass on warm, oily skin. Specify a dot size sample during consultation and ask for a healed photo of a three-year stipple from the artist. Sessions are slow and repetitive, so plan for shorter, focused bookings. For a polished day look, wear rolled sleeves or a short sleeve tee to let the stippling show.
17. Architectural Frieze and Column Ornament Sleeve
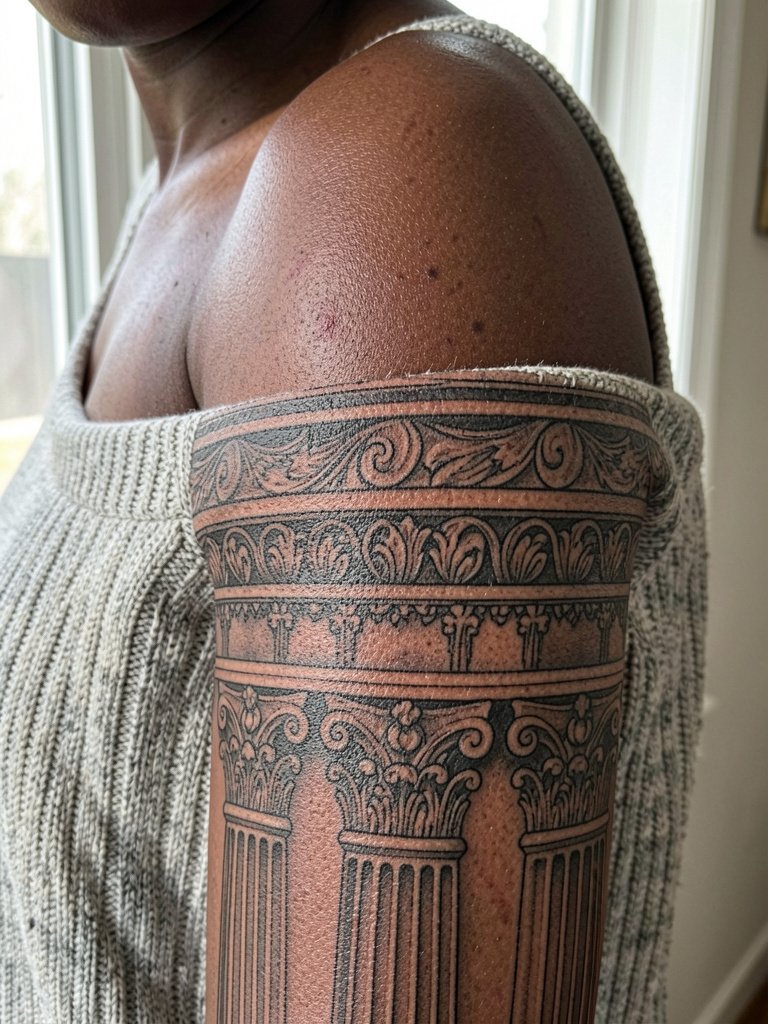
Architectural ornamentation reads well on broader canvases like the upper arm. Map where the arm's natural bulges will fall so columns and frieze panels do not distort. A frequent mistake is forcing architectural symmetry across a curved surface without allowance for perspective. Sessions are medium to long depending on texture work. For outfits, structured tops with wide straps emphasize the carved look.
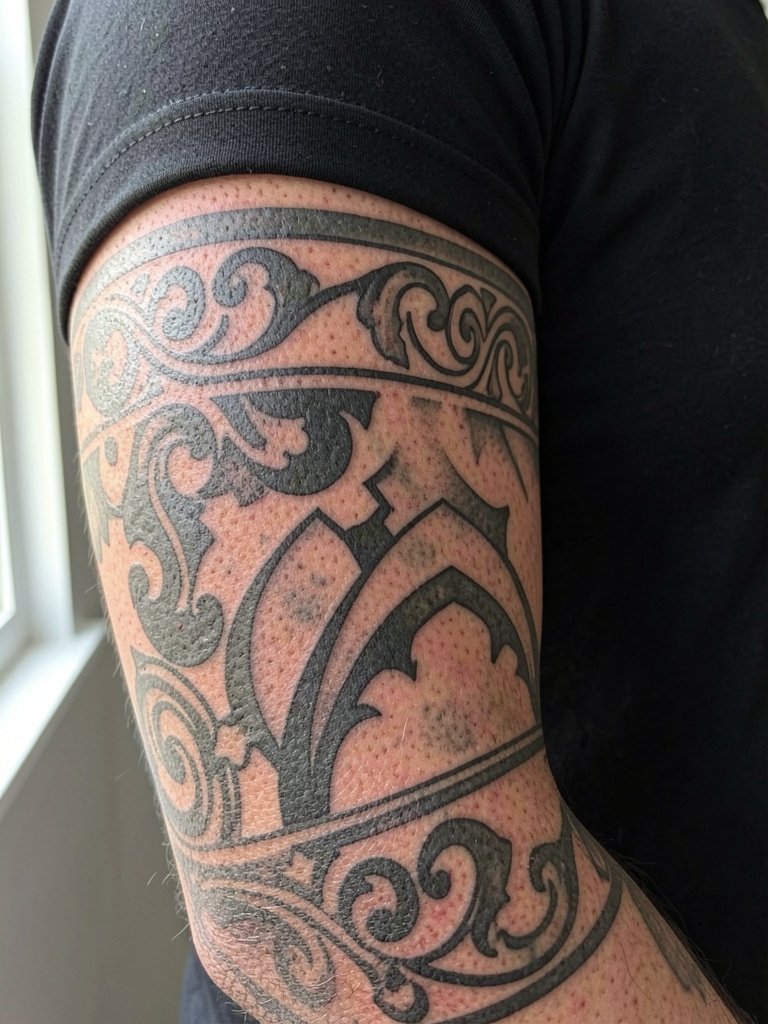
18. Celtic Interlace and Knotwork Sleeve
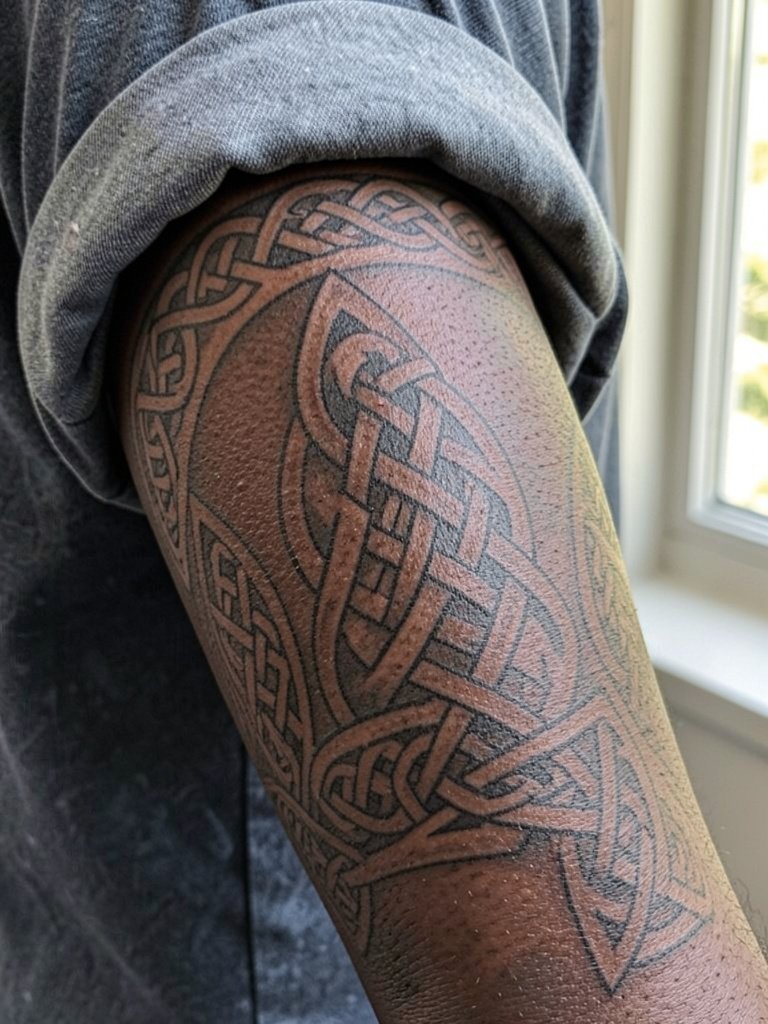
Knotwork depends on clean, predictable linework. Make sure the artist provides a continuous mockup so you can see how knots flow across seams and around the elbow. A common error is small-scale knotwork that loses definition when the skin moves. Expect a methodical session with a focus on consistent line tension. For daily wear, rolled sleeves and minimalist rings show the repeating geometry, try a minimalist ring set if you like accessories.
19. Compass and Map Ornamental Sleeve for Travelers

A travel-themed ornamental sleeve gives you focal anchors like a compass and borders that read like maps. Specify exact coordinate text if you want real numbers so the artist can stencil cleanly. Small script near the wrist should be slightly bolder than you think to avoid blurring. Sessions vary by anchor scale and map shading. For showing off, monochrome tops keep the directional motifs prominent.
20. Heraldic Crest and Shield Ornamental Sleeve

Heraldic work needs clear fields and solid contrast so each symbol remains legible. Ask for a mockup that shows the crest at arm distance and at close-up scale so you can confirm legibility. Avoid tiny crest details that will age into mush. Sessions are typically multiple, with the shield block-in first followed by border detail. For a curated look, wear monochrome outfits and a classic watch on the opposite wrist.
21. Minimal Bandwork Sleeve for Subtle Ornamental Rhythm
Thin ornamental bands can be striking but are unforgiving when placed too close together. Request a spacing diagram and a healed photo sample at two years so you can see the practical spacing needs. The wrist and lower forearm are higher-risk for early softening, so slightly bolder band edges are wise. Sessions are short per band but expect multiple visits for a full wrap. Stackable thin bracelets echo bandwork without hiding it.
22. Mosaic Repeat Motif Sleeve Inspired by Tiles
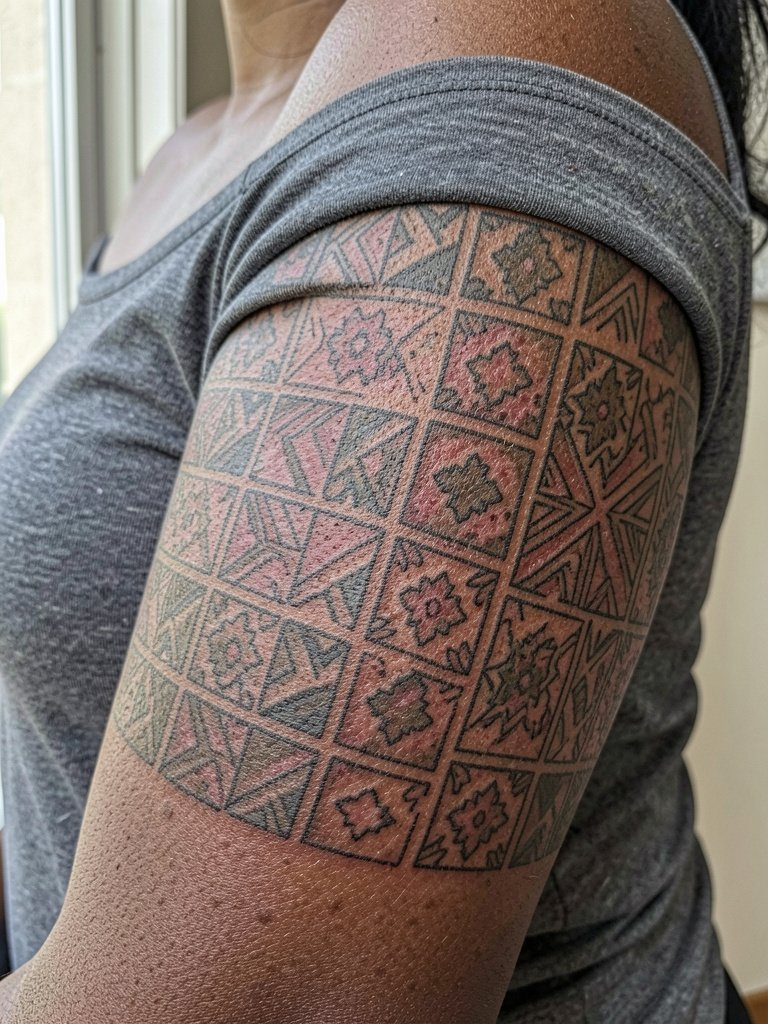
Tile mosaics bring order to a sleeve and let the eye read repeated geometry. Ask the artist to map how a single tile repeats across curved anatomy so you do not get distorted motifs at the elbow. Tiny tiles tend to merge with time, so plan moderate tile sizes with clear grout lines. Sessions are modular and suited to staged builds. For evenings out, open-back or off-shoulder pieces show the mosaic rhythm without competing patterns.
23. High-Contrast Ornamental Sleeve Designed for Darker Skin Tones
Many ornamental portfolios underrepresent darker skin tones, so ask to see healed work on similar tones before committing. Higher contrast and slightly bolder line weight tend to read best long term on darker skin. A common mistake is trying to replicate ultra-fine detail that simply does not translate at scale, which leads to disappointment later. Plan for larger focal shapes and crisp negative space, and expect touch-ups targeted to contrast preservation rather than line repair. For showing off, monochrome outfits or structured sleeveless tops keep focus on the bold pattern.
Frequently Asked Questions
Q: How much should I expect to pay for an ornamental sleeve staged over multiple sessions?
A: Pricing depends on your region and the artist's hourly rate, but think of a sleeve as a project paid session by session rather than a single sticker price. People commonly set aside a staged budget range that covers three to six sessions, and then add a small cushion for touch-ups after healing.
Q: Where can I find healed ornamental sleeve photos and local artists who post them?
A: Search hashtags like #ornamentaltattoo, #blackworktattoo, #finelinetattoo, and #mandalatattoo on Instagram and TikTok, then use location filters to find portfolios near you. Tattoodo and Reddit threads in r/tattoos or r/tattooadvice are useful for comparing healed results and scheduling tips.
Q: Does fine line or bold blackwork hold up better for ornamentals?
A: There are two clear camps on this. One camp prefers fine line ornamental work for its jewelry-like, editorial look and points to healed photos at one and three years that show delicate detail. The other camp argues bold blackwork ages more predictably across joints and sun exposure, and they show long-term photos where heavier lines retain readability. Choose based on the placement and your willingness to schedule periodic touch-ups.
Q: What should I wear to a long sleeve session that covers shoulder to wrist?
A: For full-arm work, wear a loose zip hoodie or a button-down over a tank so you can expose the working area without repeatedly taking off a tight top. A zip hoodie is handy for changing between chill and exposed without rubbing fresh ink.
Q: How do I avoid a sleeve looking crowded if I plan to add pieces over time?
A: Pick a unifying filler system early, such as repeating filigree panels, dot bands, or a consistent line weight palette, so future pieces can plug into the existing visual language. Bringing two reference photos showing scale and placement helps the artist design connectors that prevent crowding.
Q: What aftercare approach suits large ornamental sleeves during the first week?
A: Some artists prefer a second-skin method for dense blackwork because it reduces friction, while others recommend light cleansing and a thin moisturizer to monitor scabbing. Discuss adhesive sensitivity and healing history with your artist and follow the plan they tailor to the sleeve density.
Q: How often will I need touch-ups on ornamental dotwork and fine-line elements?
A: Fine dotwork and single-needle details typically need the most attention and often get a targeted touch-up at the one-to-three-year mark depending on sun exposure and placement. Bold shapes and large black fills usually require fewer corrections.
