
A lot of the angel wing back pieces you see on reels are built for a single camera angle, not for fifty thousand steps of daily life. Small, single-needle feathers look ethereal in short clips but they often blur on the back unless the spacing and contrast are planned from the start. Choose anatomy-aware composition and deliberate negative space and the wings will read clearly in photos and in real life for years.
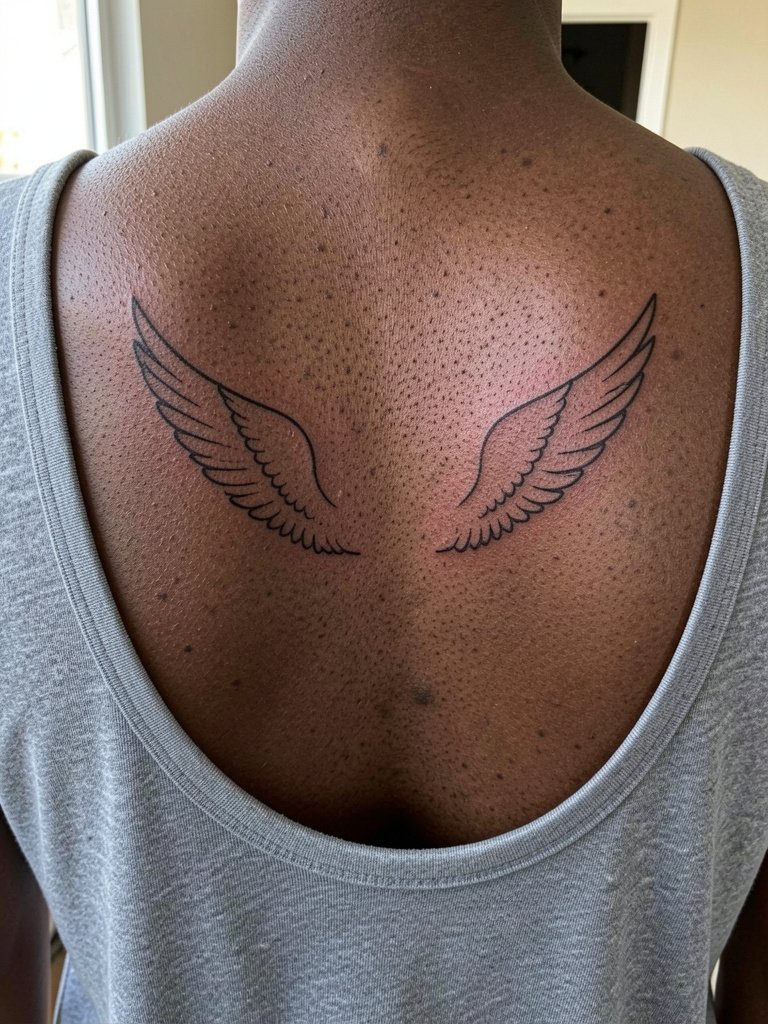
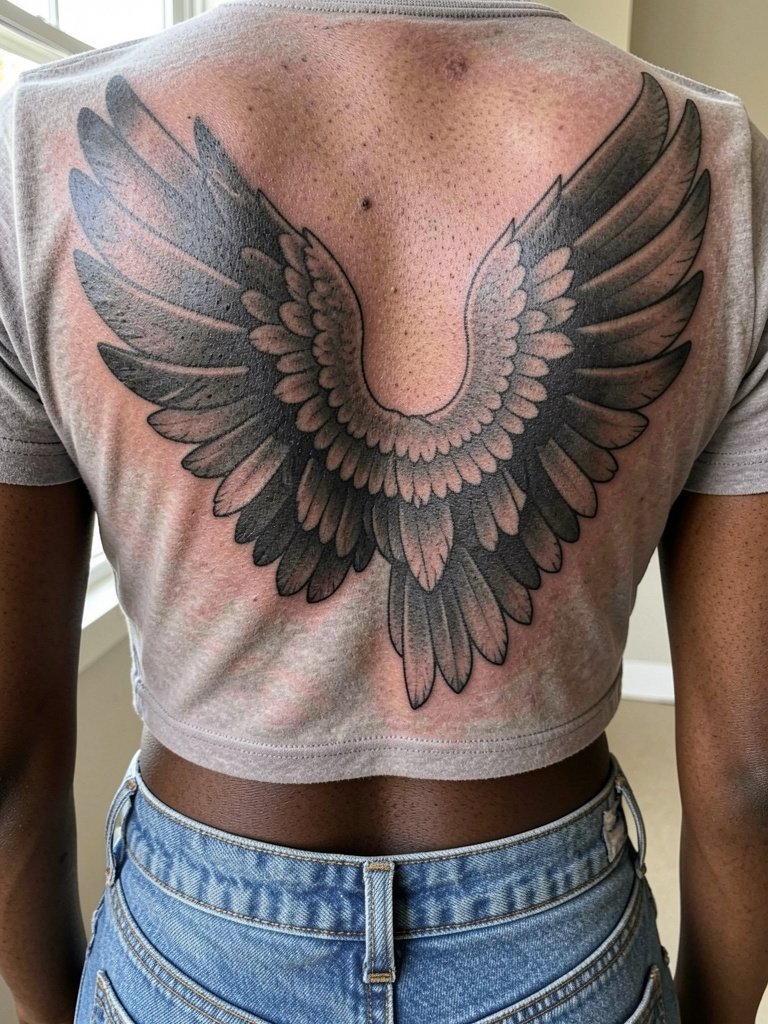
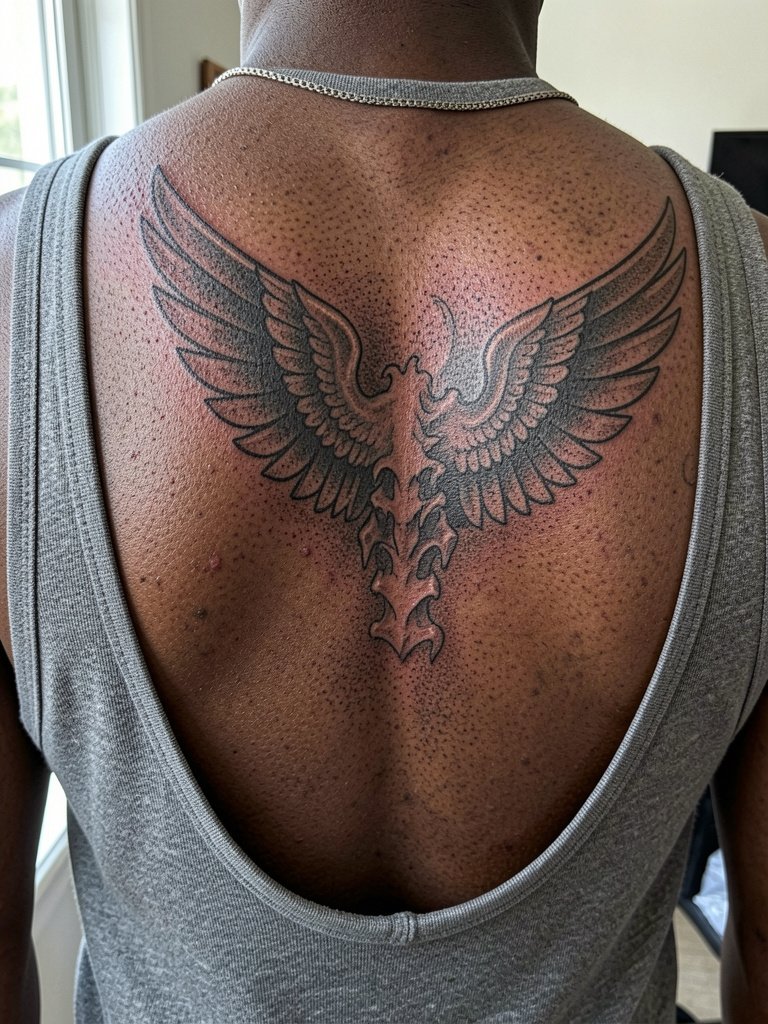
1. Full Symmetrical Wings Across the Shoulder Blades
A full symmetrical spread uses the back like a canvas and it creates an instant silhouette. One camp favors full wings for the dramatic silhouette and long-term photo impact. The other camp prefers partial or accent wings for lower commitment, easier healing, and less cost. If you want longevity, specify bold feather edges and staggered negative space so the wings read from a distance and keep detail close-up. Expect multiple sessions for saturation and layering. For the session, wear a loose button-down shirt you can slide off one shoulder so the artist has full access without fabric rubbing the fresh ink.
2. Clean Negative-Space Wings That Breathe
Negative-space wings keep the back from feeling overworked. Choose slightly wider feather separators so the open skin pockets stay crisp as the tattoo heals and ages. A common mistake is packing too many tiny feather lines into the negative zones, which can blur together after a touch-up. Bring reference photos that show the exact amount of open skin you want and request slightly heavier linework than a micro single-line to prevent loss of detail. For showing it off, pair this placement with racerback tanks that reveal the central composition without interfering with shoulder straps.
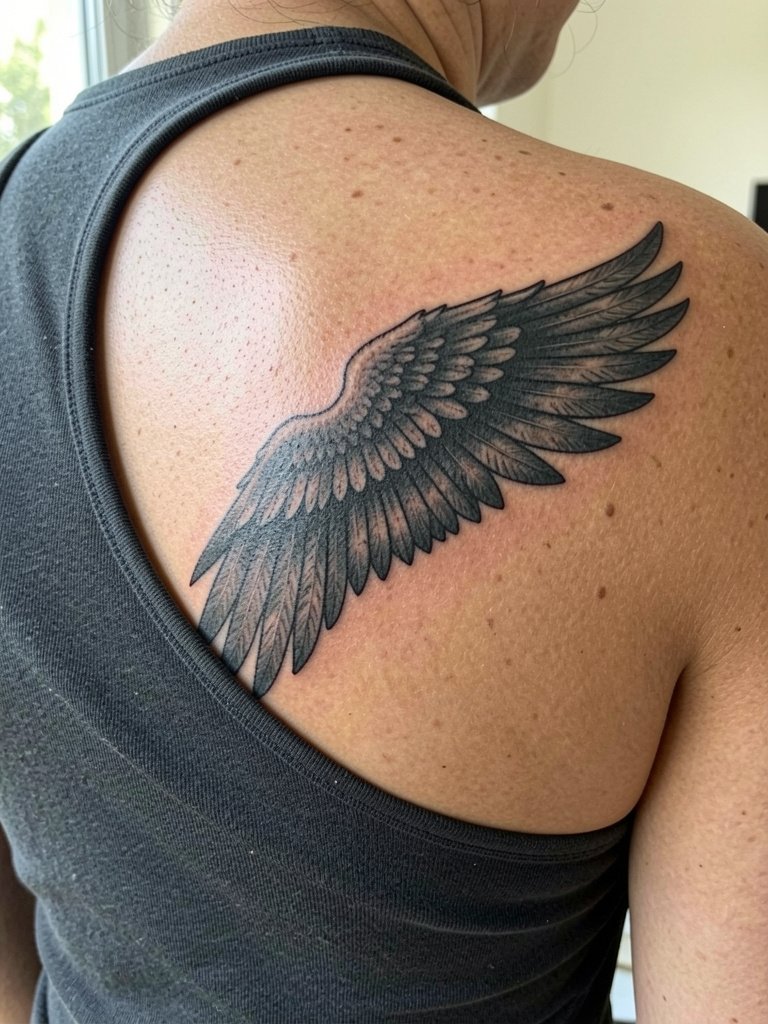
3. Half-Wing, One-Side Back Placement

Half wings give the symbolism without the full commit or cost of a back piece. Expect a shorter session than full-symmetry work, but still plan for two passes if you want depth. A frequent error is centering the half-wing too close to shoulder straps, which creates rubbing soreness while healing. When you consult, request the wing start an inch or two from typical strap lines and ask for reference mockups on the client’s own back to confirm flow. For wardrobe, an asymmetrical one-shoulder blouse makes this offset composition read like intentional styling and complements the negative space.
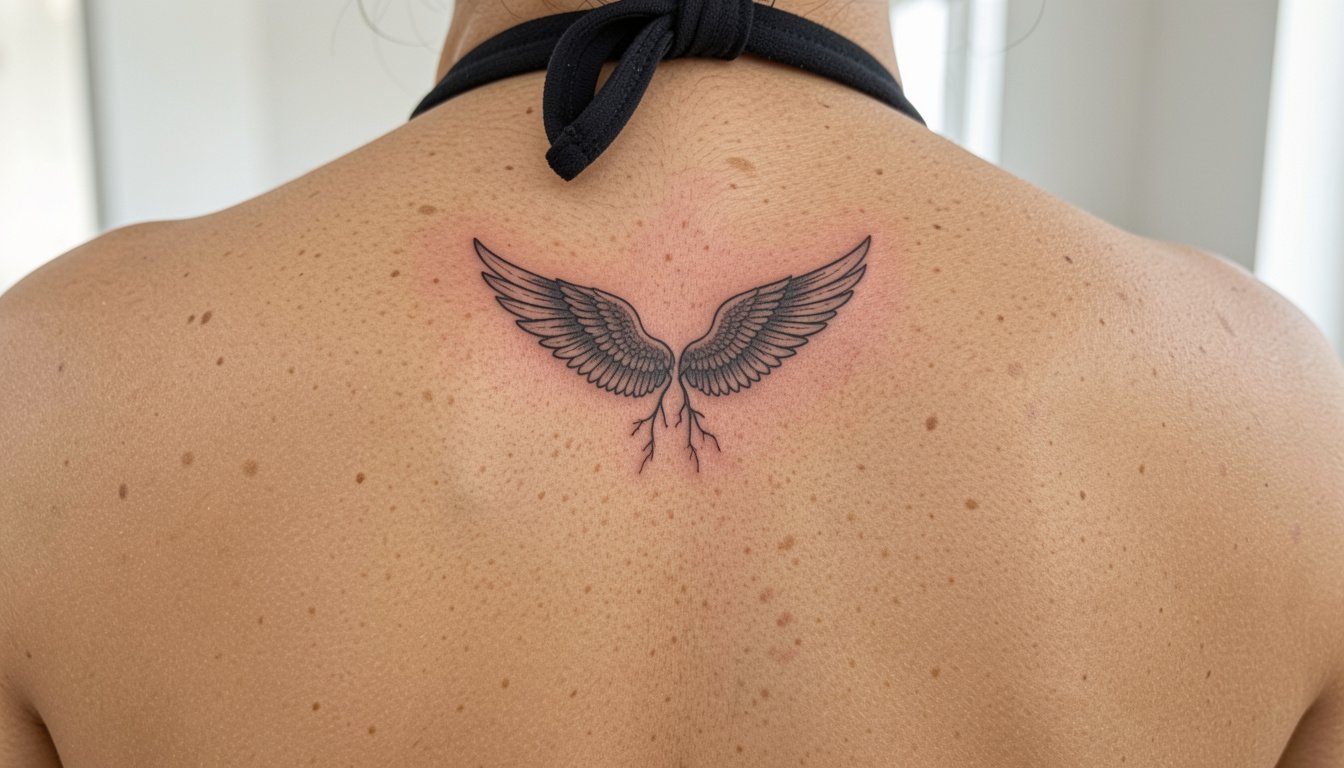
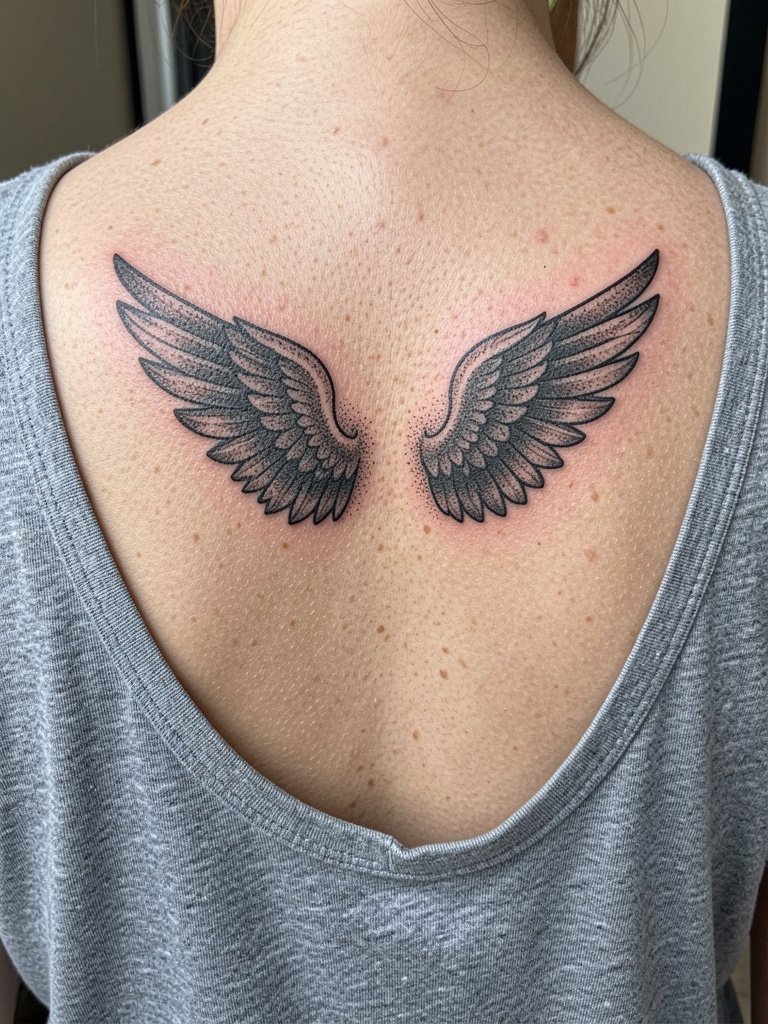
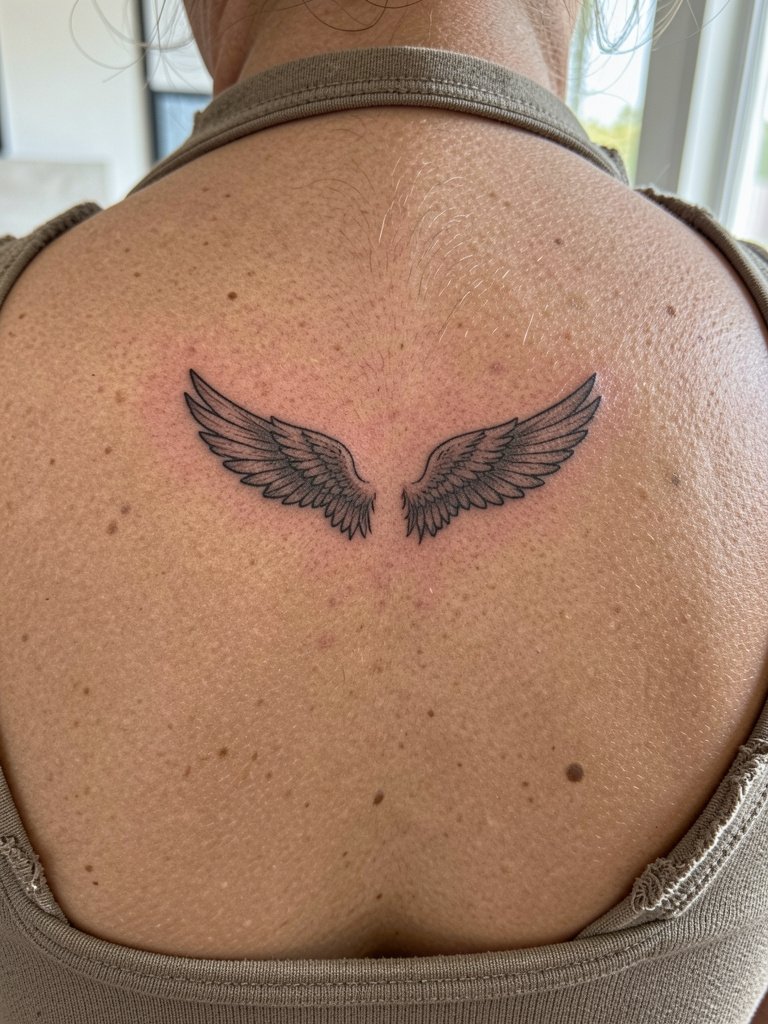
4. Small High Wings Below the Nape

Tiny wings at the nape are low-commitment and picture-friendly when hair is up. Fine line looks great at first and a lot of people pick this exactly for that ephemeral look. The aging reality is that single-needle details can blur if placed too small, especially where skin creases at the neck. Ask for slightly heavier anchor lines in the feather base so the piece reads after the first year. Session wear is simple, pull hair into a loose bun and wear a halter or racerback so the artist can reach the area easily.
5. Ornamental Wings with Floral Framing
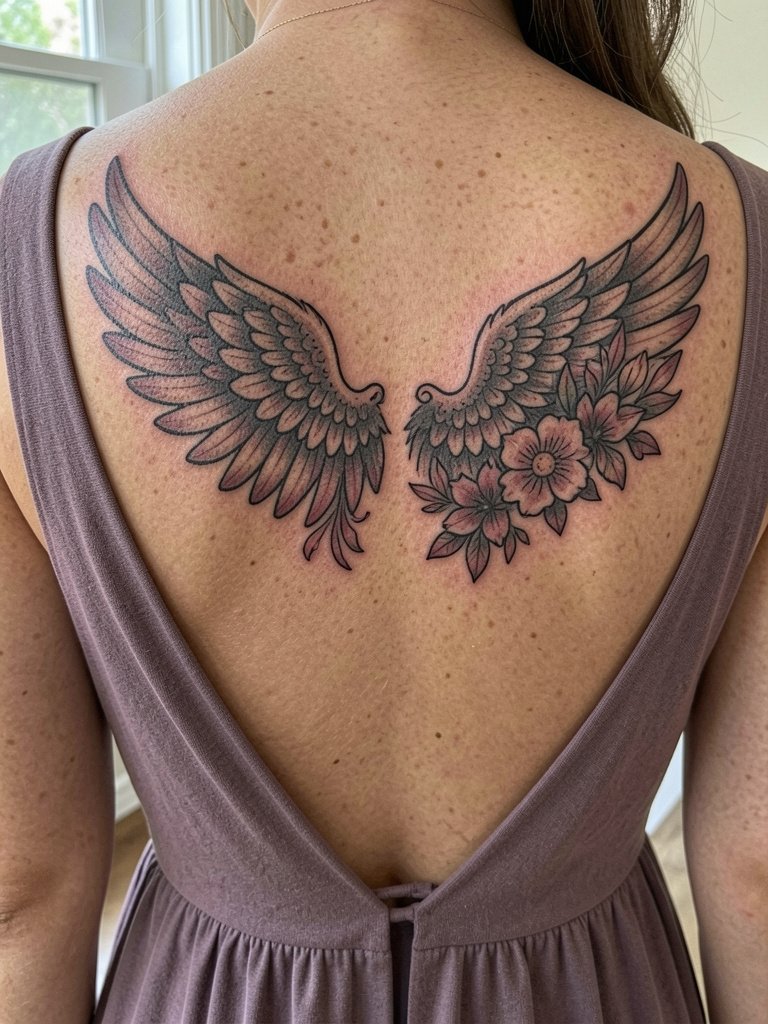
Framed wings that add floral or halo elements feel ornate without getting fussy if spacing is clean. A mistake is overloading the wings with tiny blossoms that compete with feather structure. When you consult, bring examples showing the exact balance of ornament to wing so the artist can scale elements properly. For events, open-back midi dresses highlight the framing while keeping the wings the visual focus. Ask about touch-up timelines for selective color accents, because color may need a refresher faster than black and grey.
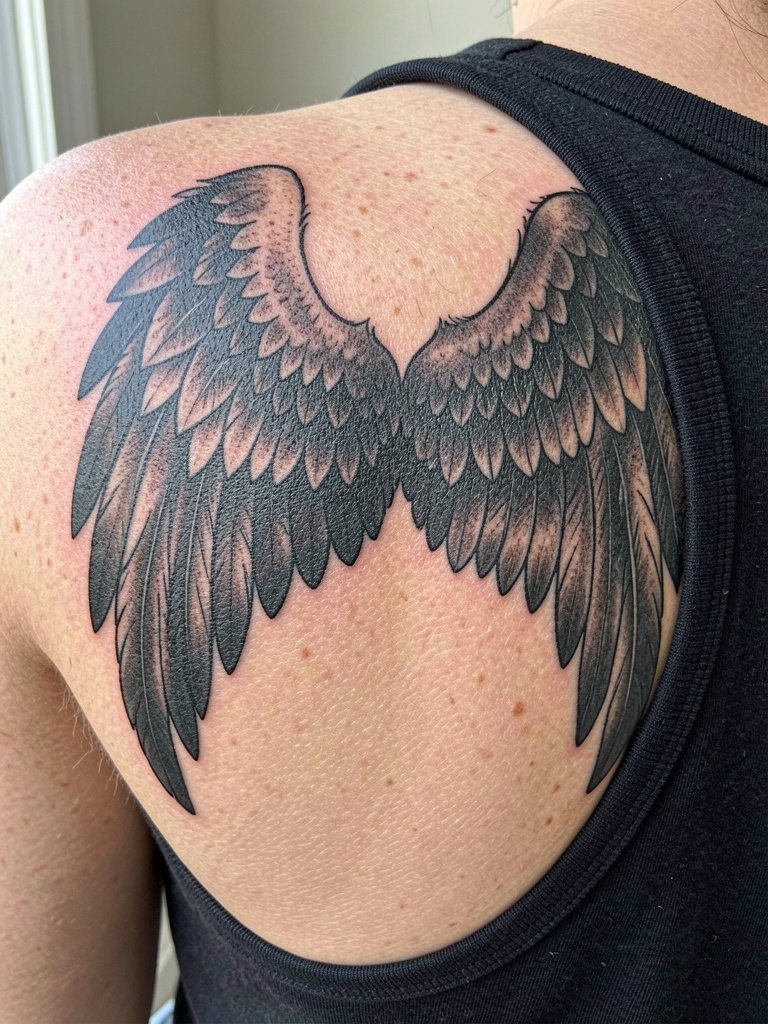
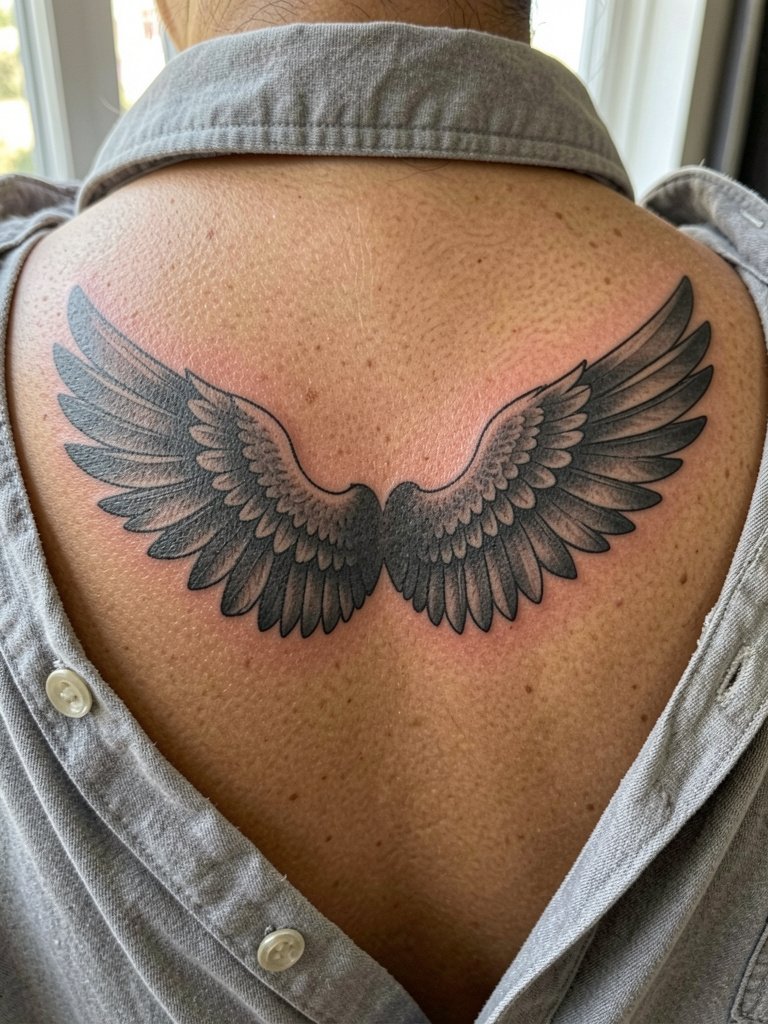
6. Bold, High-Contrast Wings That Read From Afar
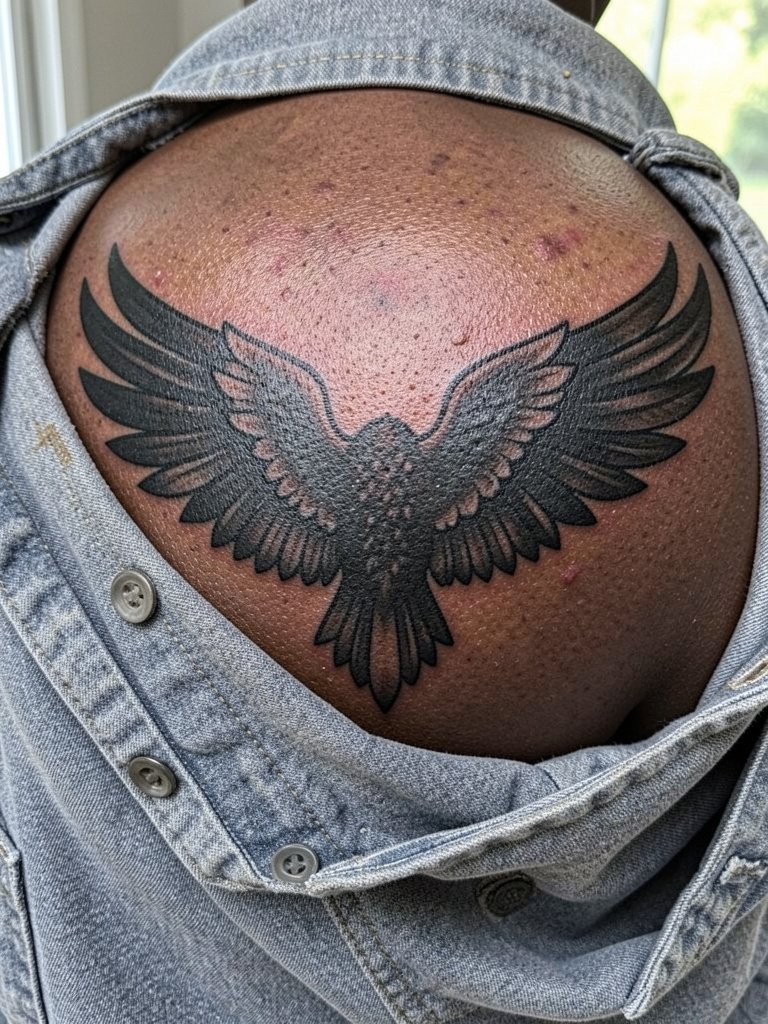
Bold blackwork is the go-to for longevity on wide flat areas like the upper back. One camp argues heavy blackwork holds its shape and ages reliably, especially on larger canvases. The other camp prefers softer fine line wings for an ethereal look and worries that blackwork feels heavy or dated. If you want readable impact, specify strong contour lines and leave internal feather detail sparse so the main shapes stay distinct. For the session, wear a loose button-down you can remove easily, and plan for two to three hours per session depending on scale.
Session Day Essentials
Those first six ideas can all benefit from a few practical items that make the chair day and the first week smoother.
-
Second-skin protective film roll. Covers large back areas securely and reduces friction from clothing during initial healing.
-
Fragrance-free gentle body lotion. Lightweight hydration that won’t irritate fresh black and grey work once the film comes off.
-
Long-handled lotion applicator. Lets you apply moisturizer to the mid and lower back without straining or contaminating the site.
-
Breathable compression wrap or soft back band. Helpful if the tattoo sits low and you need gentle protection in the first week.
-
Aquaphor healing ointment. A commonly used option for short-term surface moisture during the earliest healing phase.
7. Scaled Back Accent Wings That Don’t Overtake
Accent wings give the back interest without becoming a full canvas project. The main risk is a mismatch between wing size and torso width, which can look cramped on broader or narrower frames. Bring photos of your shoulders and ask the artist to mock up the scale directly on your back. For show-off outfits, a scoop-back tee or an open cardigan frames the wings while keeping them wearable every day. Expect a single longer session or two shorter ones depending on shading density.
8. Y2K-Influenced Angel Wings with Sparkle Motifs
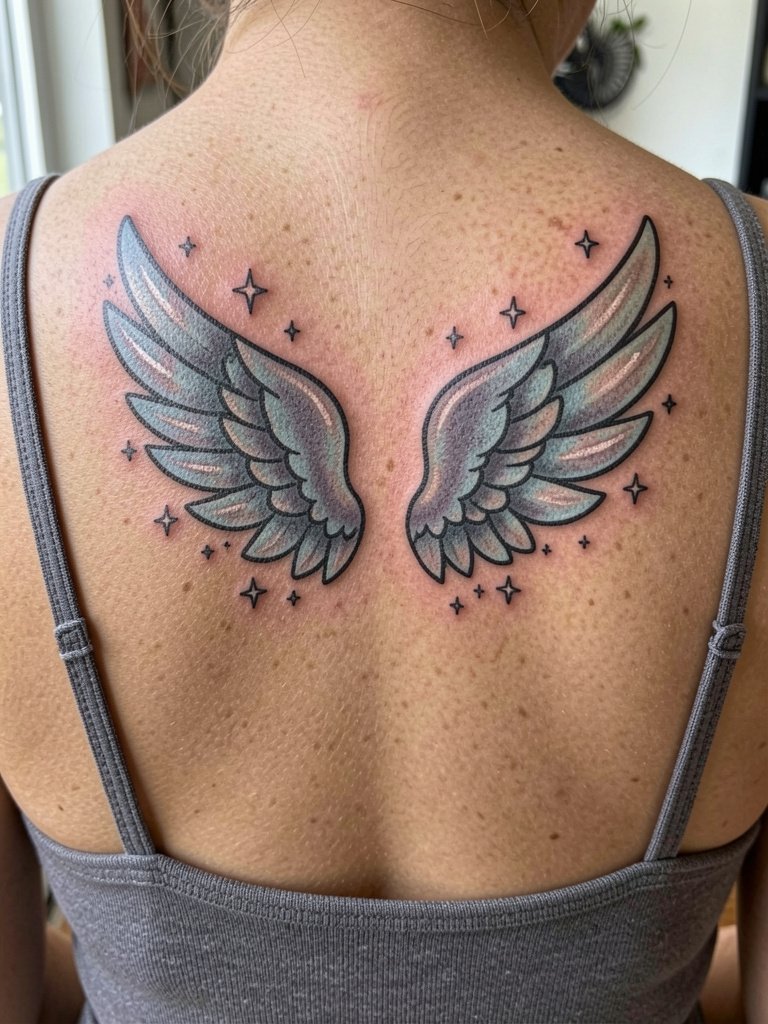
Nostalgic Y2K details can make wings feel contemporary if the artist balances the sparkles and stars with solid feather anatomy. A common mistake is overusing pale metallic tones that fade and require frequent touch-ups. Ask the artist which color pigments hold best on your skin tone and request a healed example featuring similar hues. For nights out, pair this style with low-back camisoles or sheer-back layering pieces to let the subtle accents catch the light.
9. Feather-Edge Wings That Follow the Scapula
Designing wings to follow the scapula reduces stiffness and makes movement look natural. A rookie error is forcing a perfectly symmetrical template onto asymmetrical shoulder blades, which creates awkward feather fall. During consultation, have the artist mark scapula landmarks on your back so the feathers flow with the anatomy. For daily wear, racerback tanks and open-back tops showcase the flow without covering the wing tips. This placement tends to need a touch-up earlier if feather edges are rendered with very fine detail.
10. Split Wings with a Spine-Centered Gap

A spine-centered gap creates a striking visual corridor and lets the vertebrae act as natural dividing negative space. A common issue is placing too much detail close to the spine where movement and curvature can make lines look uneven later. Ask for slightly wider spacing adjacent to the spine and request mockup photos from multiple angles. For sessions, pick a loose, wide-neck top so the artist can reach the spine without fabric friction. Touch-ups for central gaps are typically straightforward because the negative space helps preserve contrast.
11. Torn-Edge or Distressed Wing Look

Ragged or torn-edge wings feel edgier and hide small inconsistencies that might bother a perfectionist. One mistake is making the distressed detailing too tight and tiny, which can turn into a muddy patch. When you consult, request coarse texture at a scale that reads from arm’s length. This style pairs well with casual open-back tees or leather jacket styling for contrast. Expect touch-ups along the distressed edges after the first year if the stipple shading sits shallow.
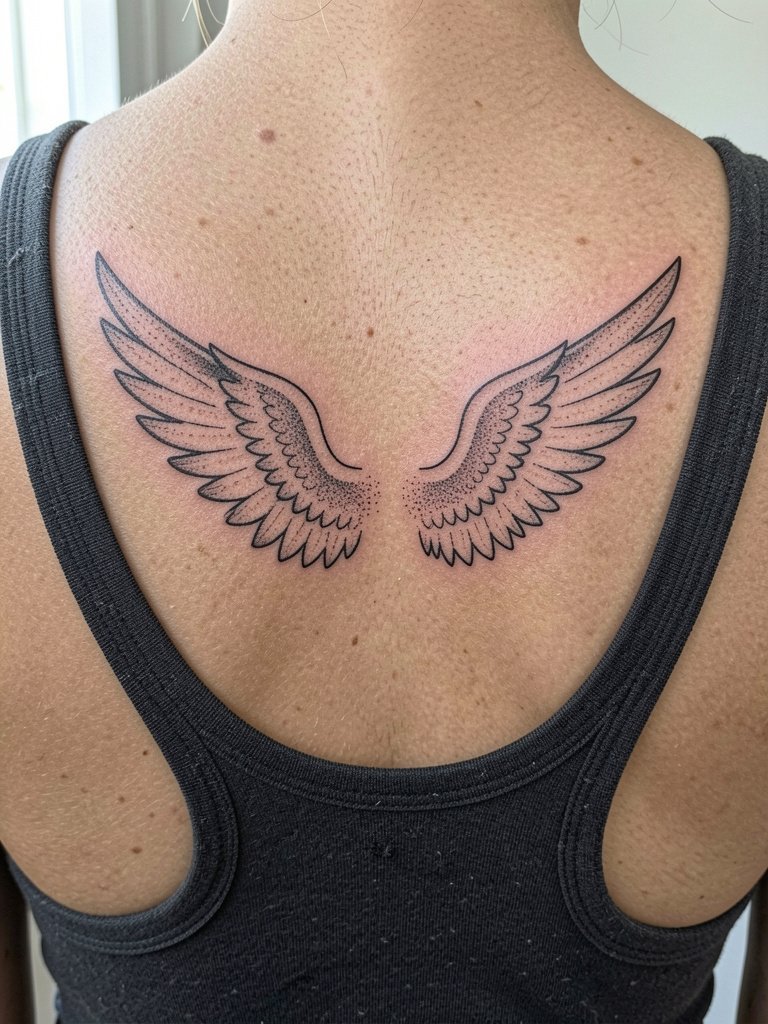
12. Minimalist Outline Wings for a Subtle Effect
Minimal outlines read as discreet and chic at first. The common issue is rendering them too thin for a back placement, which increases blowout risk and causes early softening. Specify a slightly heavier outline and ask for a healed photo in similar scale from the artist to confirm how the line weight settles. Session wear is easy, just choose a halter or racerback so the artist has direct access. These often need a touch-up earlier than thicker blackwork because negative space relies on crisp contour integrity.
13. Combined Back Piece: Wings and Script
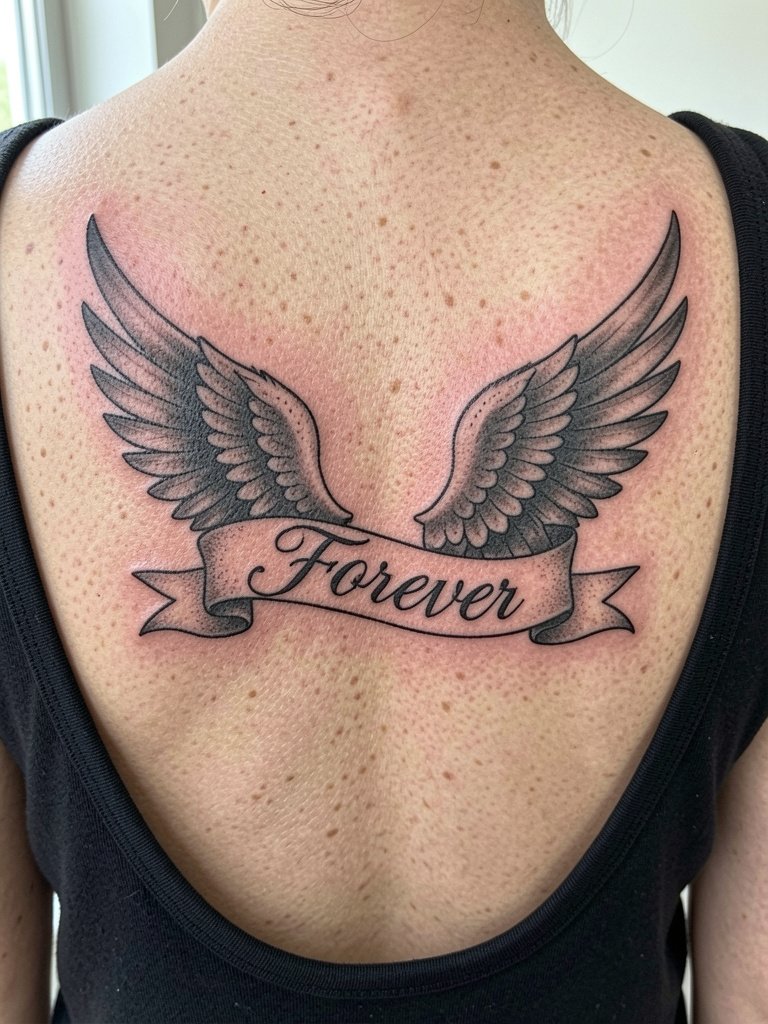
Adding script into a winged back piece can anchor the design, but lettering requires space and boldness to remain legible over time. Tiny cursive inside featherwork tends to blur, so request a separate banner or slightly larger letter sizing. When you consult, bring the exact text and font sample so the artist can place the script where it will age well. For showing off, low-back camisoles or open-back dresses keep the script visible without competing jewelry. If the word has strong meaning to you, double-check spelling with the artist before the first pass.
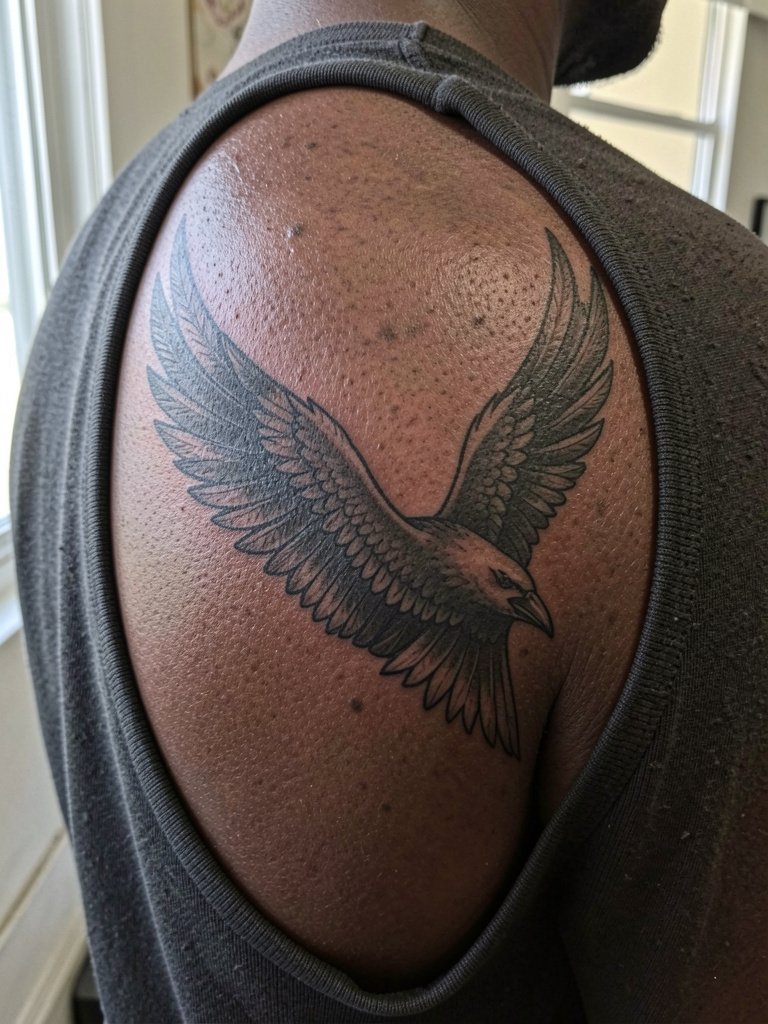
14. Black-and-Gray Realism Wings
Realism provides depth and a sculptural look when executed at large scale. The trade-off is that micro-shading inside feathers requires a very experienced hand and may need touch-ups earlier than bolder shapes. Discuss the shading density you want and ask the artist to show healed photos of similar work on backs. For session wear, loose button-downs are practical because they protect the area post-session if you must travel home. Expect longer session times for realistic texture versus flat black shapes.
15. Wings With Geometric Frames
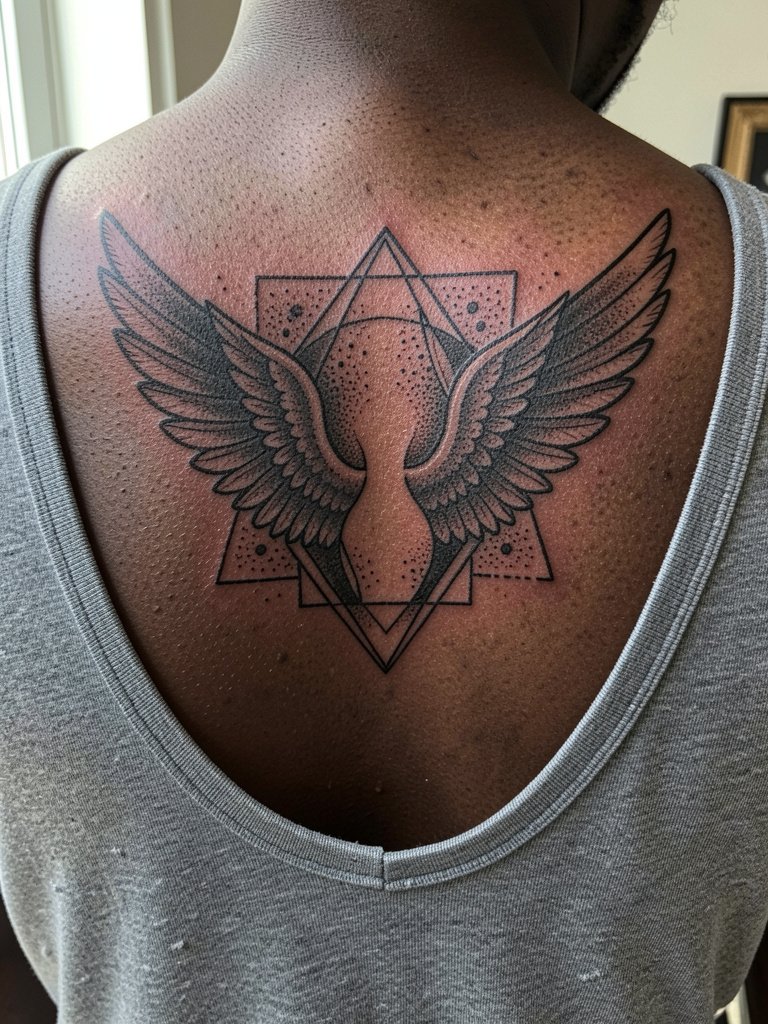
Geometric framing modernizes wings and clarifies composition. A frequent mistake is cramming fine geometry too close to feather edges, which competes visually as the tattoo ages. Ask for breathing room between the feather mass and the frame and request mockups at full scale so the geometry feels intentional. For outfits, open-back midi dresses or fitted scoop-back tops complement the framed silhouette. Dot-work may soften faster than bold outlines, so plan a realistic touch-up window with your artist.
16. Low-Back Feathered Wings
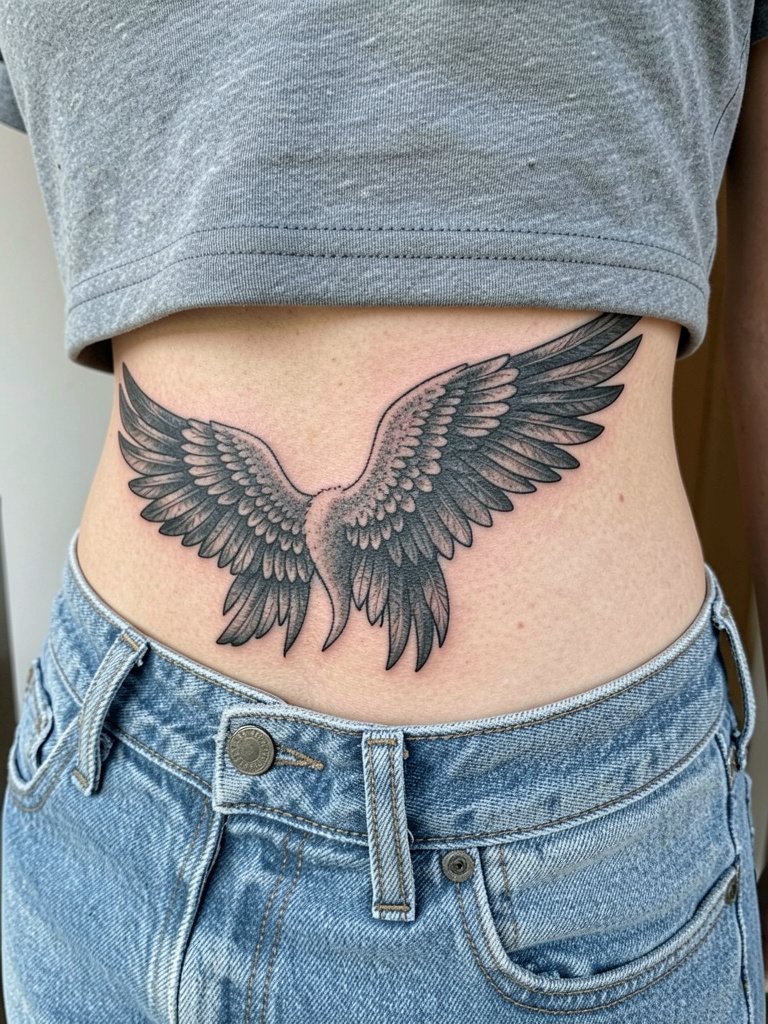
Lower back wings can be very flattering on the right body types but they sit where waistbands and belts rub. A common error is placing the lowest feather tips directly at the waistband, which causes irritation while healing. When you consult, specify that the artist position the lowest tip above typical waistband lines and bring the clothing you plan to wear after the session. For show-off wearing, low-rise jeans and cropped tees reveal the art without stretching it. Note that movement and belt friction can increase chances of scabbing in the first week.
17. Asymmetrical Wings for an Artistic Twist
Asymmetry can make wings feel handcrafted and modern. The critical mistake is inconsistent scale that reads accidental instead of intentional. Ask the artist to show mirrored and skewed mockups so you can confirm the directionality and overall balance. For clothing, an asymmetrical neckline or one-shoulder top highlights the deliberate off-center composition. Asymmetrical pieces often require fewer touch-ups in areas with lower movement, so place bigger detail where skin is flatter if you want longevity.
18. Stippling and Dot-Work Wings

Dot-work wings provide texture without solid fills, and they photograph beautifully. The downside is that very fine dots can fade and blur faster than solid lines if the shading is too sparse. When you consult, ask for graded dot density that reads well at a distance. For sessions, wear a loose tee or a zip-up hoodie you can unzip without rubbing the fresh ink. Dot-work often shows healing progress clearly, so plan a follow-up appointment to assess whether additional density is needed.
19. Wings With Celestial Accents
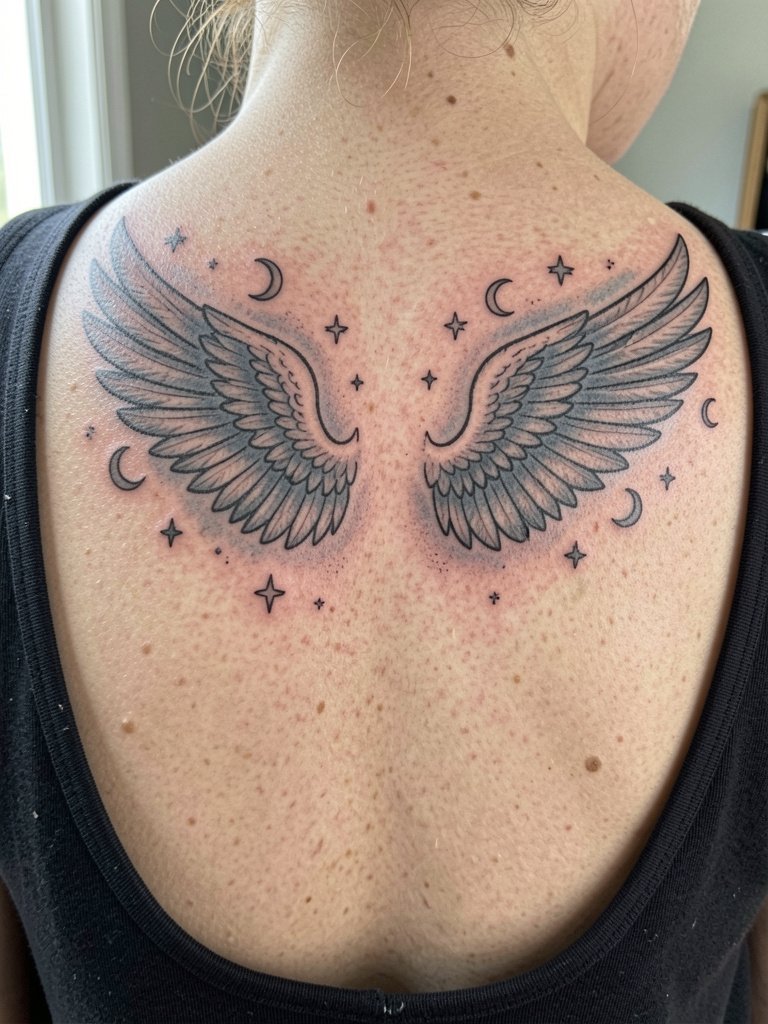
Adding moons and tiny stars gives a celestial mood without heavy color. Tiny accents should be scaled to the wings so they do not read like scattered filler. A common misstep is using pale inks for tiny stars that fade faster than intended. Ask for slightly bolder dot sizes for stars so they remain visible in photos. For styling, low-back camisoles and sheer-back layers let the small details show up in silhouette shots. Celestial accents typically require minimal touch-up if placed in low-friction zones.
20. Etched Linework Wings with Subtle Color Pops
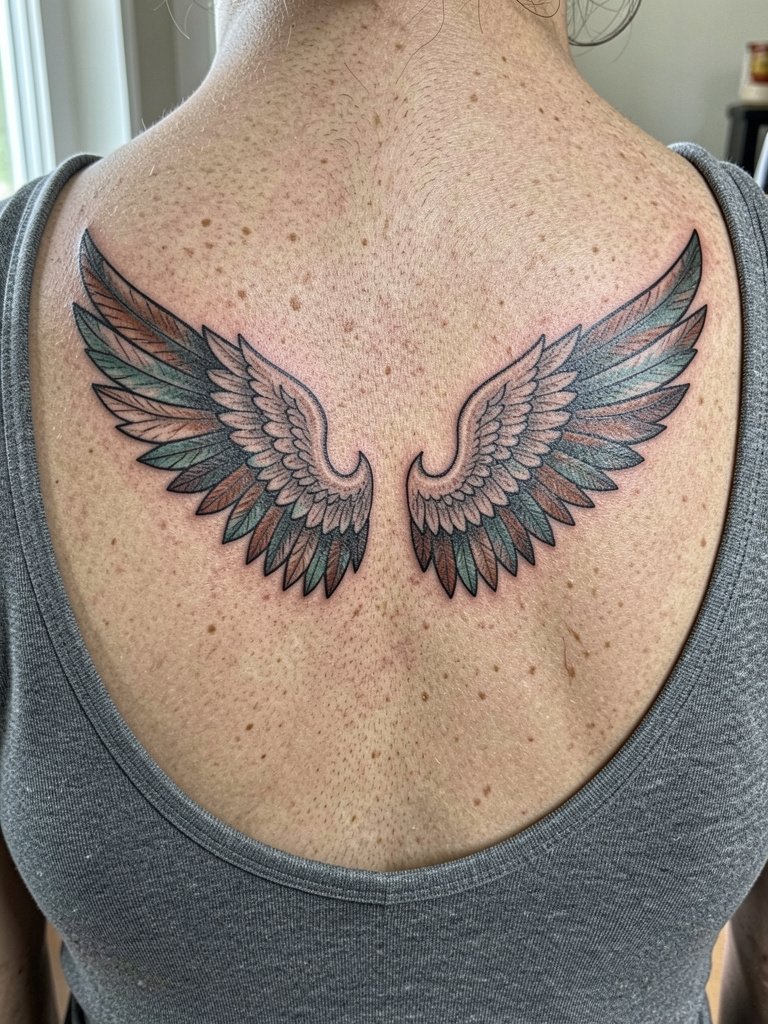
Selective color can animate etched wings without dominating the composition. The mistake is placing color too thinly, which causes patchy fading. Ask the artist which pigments hold on your skin tone and request healed examples showing similar placement. For showing off, racerback tanks and open-back dresses make color pops visible. Plan for a color-top-up one to two years down the line if you want the accents to stay vivid.
21. Layered Wings That Stack Into a Back Piece
Layering wings makes a complex back piece that reads as a single statement. The main error is overcrowding fine detail across layers, which makes the whole piece look muddy after healing. When you consult, ask the artist to map the layers and prioritize strong silhouette first. Session wear should be comfortable and loose because multiple sessions may be required. Large stacked work benefits from staged photos so you can assess how each layer settles before the next pass.
22. Stylized Neo-Traditional Wings
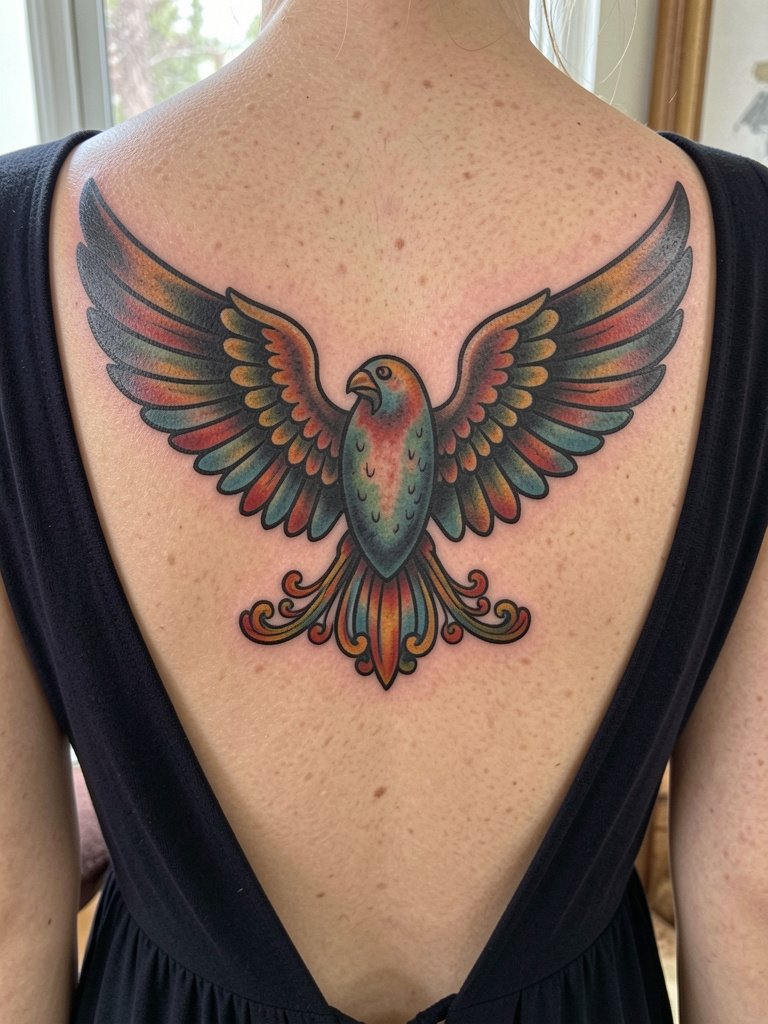
Neo-traditional wings bring pop and strong line language to the back canvas. Too many color fills close together will need touch-ups at different intervals depending on pigment. Request a healed photo portfolio piece with the same color palette to judge longevity. For evening wear, open-back midi dresses put the neo-traditional palette on display. Expect longer session times per color and plan clothing that will not rub the fresh colored areas during the initial healing.
23. Micro-Feather Wings for a Very Subtle Look
Micro-feather wings are discreet, but they require careful sizing to avoid fast softening. A common error is making them smaller than two inches across on the back where movement and skin texture accelerate blur. When you consult, ask for a slightly larger scale than your initial impulse so the detail survives. For session wear, choose a halter or racerback that gives the artist clear access to the nape area. Micro pieces sometimes need a one-year touch-up to retain crispness.
24. Tribal-Inspired Wing Motifs
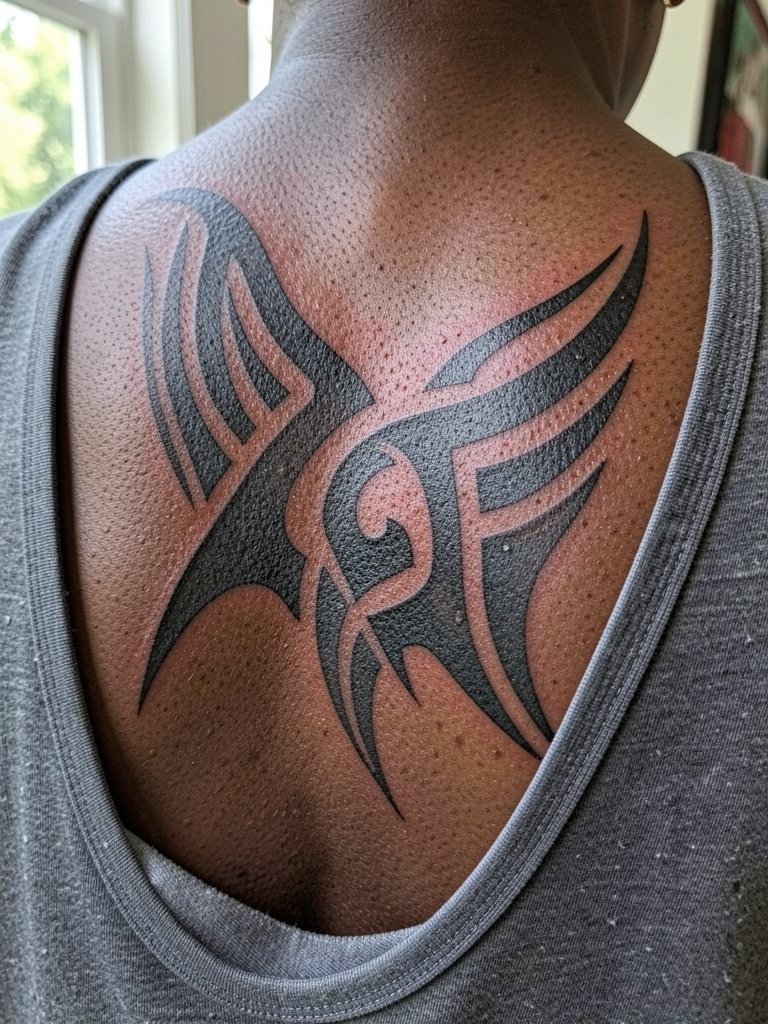
Tribal motifs can translate the wing idea into bold symbolic shapes. Be careful with cultural sensitivity and origin; choose motifs that respect the source and avoid direct appropriation. One common problem is copying generic tribal clip art that lacks meaning. When you consult, ask the artist to design original shapes inspired by traditional techniques rather than copying a cultural emblem. For styling, fitted scoop-back tops or cropped tees make the bold curves read clearly. Solid blackwork like this tends to age well with less frequent touch-ups.
25. Wing Mandala Hybrid Over the Spine

Combining mandala elements with wings creates a focal center and balanced expansion. The challenge is scale; mandala detail needs room to breathe or it will merge. Ask the artist to scale the mandala so it retains open negative space between rings. For outfits, low-back camisoles and open-back dresses make the centered bloom the centerpiece. Because mandalas often use dot-work, expect a conservative touch-up schedule to reinforce fine points after healing.
26. Skeletonized or Bone-Structure Wings

Skeletonized wings give an architectural, modern look that emphasizes structure over fluff. The risk is that interior negative spaces can read as sparse if the contour is not bold enough. When you consult, request stronger outer contours and measured interior negatives so the skeletal effect stays intentional. For styling, one-shoulder tops highlight the structural side and create visual tension. This approach often needs fewer touch-ups on the outer contours and a possible refresh on inner texture after time.
27. Custom Hybrid That Fits Your Back Anatomy
A truly custom hybrid takes into account your frame, shoulder asymmetry, and how you move. One common mistake is bringing in too many reference elements and asking for them all at the same scale. When you sit for a consult, bring two or three references and ask the artist to sketch how those pieces combine at the actual size of your back. For the session, wear a loose button-down or a zip-up hoodie you can remove easily. A phased plan with staged sessions helps the artist refine proportions as the work progresses.
Frequently Asked Questions
Q: Will a large back wing tattoo hurt more than a small one, and which areas are the most sensitive?
A: Pain varies by placement and personal tolerance, but generally broad flat regions over the shoulder blades are moderate on most pain charts. Areas closer to bone, like the spine or ribs, feel sharper. Plan for breaks, choose numbing options if that helps you, and wear a loose shirt the artist can remove without rubbing fresh ink.
Q: How long should I expect sessions to last for a full back angel wings piece?
A: Large wings usually require multiple sessions of two to five hours each depending on shading and complexity. Realism and dense blackwork take longer than simple outlines. Talk with the artist about staging the work in logical passes so healing and touch-up windows fit your schedule.
Q: Where can I find portfolios, healed photos, and local artists who specialize in back pieces without relying on specific names?
A: Search location-filtered hashtags like #angelwingsbacktattoo and #backpiecetattoo on Instagram and TikTok to see portfolios near you. Pinterest boards help compare compositions side by side. Reddit threads in r/tattoos and r/tattooadvice often include user-shot healed photos and process notes. Use those filtered searches to shortlist artists and then ask to see healed shots at the in-person consult.
Q: What should I wear to a back tattoo appointment so the artist has easy access and my clothes stay clean?
A: Choose clothing that exposes the area without being pulled or adjusted during the session. For upper back work, open-back tanks, racerback tops, or a loose button-down you can slide off one shoulder work well. For lower back pieces, high-waisted jeans with a cropped top create a clear exposed strip without fabric rubbing the fresh ink.
Q: How do styling choices affect how the wings look after healing?
A: Clothing that consistently rubs the fresh area, like tight waistbands or strap lines, can irritate healing and affect how the ink settles. For the first two weeks, favor loose, breathable clothing that leaves the tattoo visible and avoids constant friction. For showing off healed work, open-back dresses and racerback tops frame wings cleanly.
Q: Do different skin tones affect design choices for wing details or color accents?
A: Yes, skin tone influences how line weight and color show. On medium to dark skin, stronger contrast and slightly heavier linework help small details read longer. Ask the artist to show healed examples on similar skin tones and request color tests or muted accents that will remain visible without frequent touch-ups.
