
Realistic horse tattoos that still read clearly after years are often built on choices people skip when they save for the appointment. Bigger scale, controlled contrast, and hair-direction linework matter more than single-needle prettiness. If you want a horse that keeps expression, plan spacing, think about placement movement, and bring healed-photo examples. The first idea below shows how to get a portrait that holds up without looking overworked.
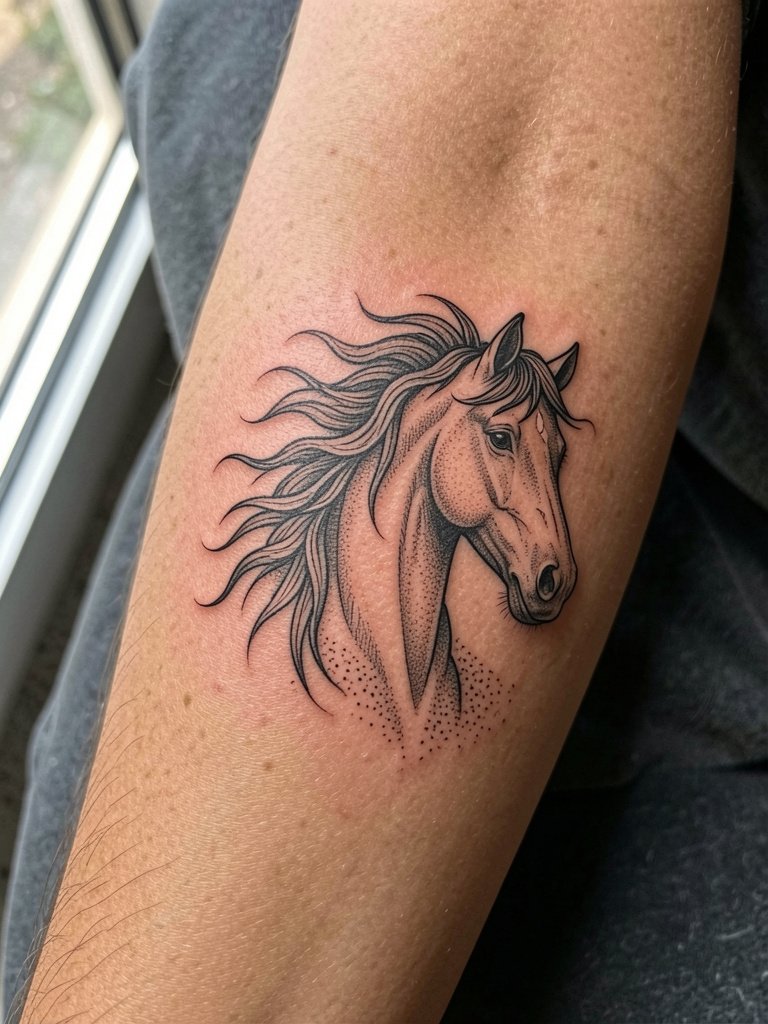
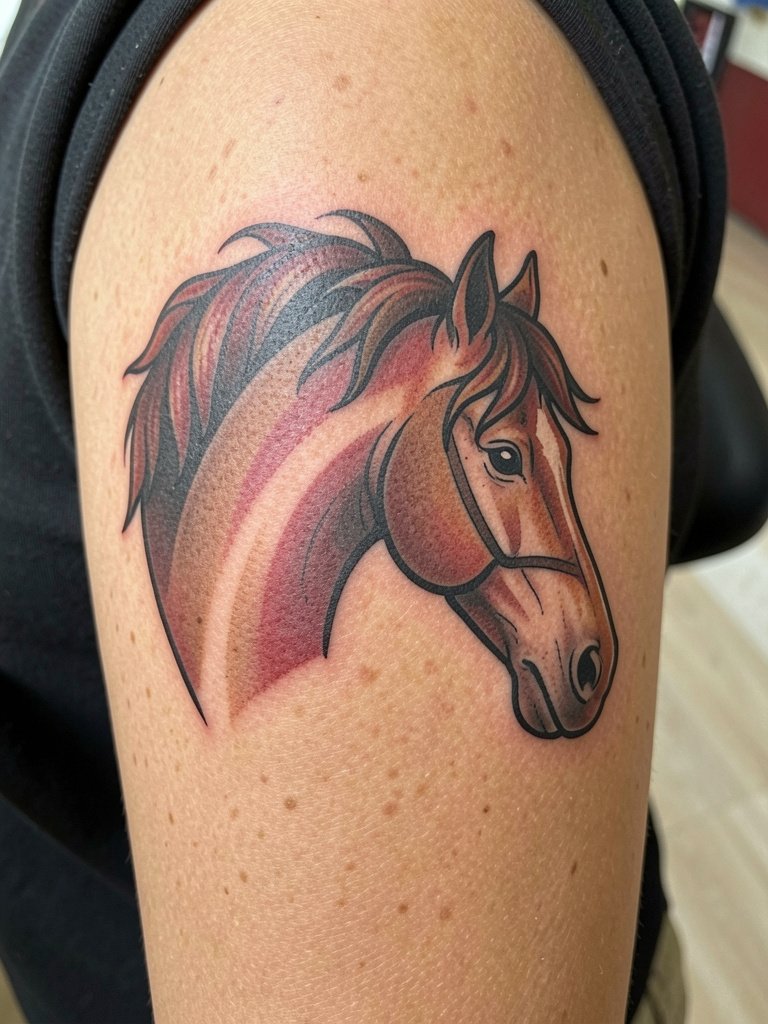
1. Black and Gray Horse Head Portrait on Outer Upper Arm
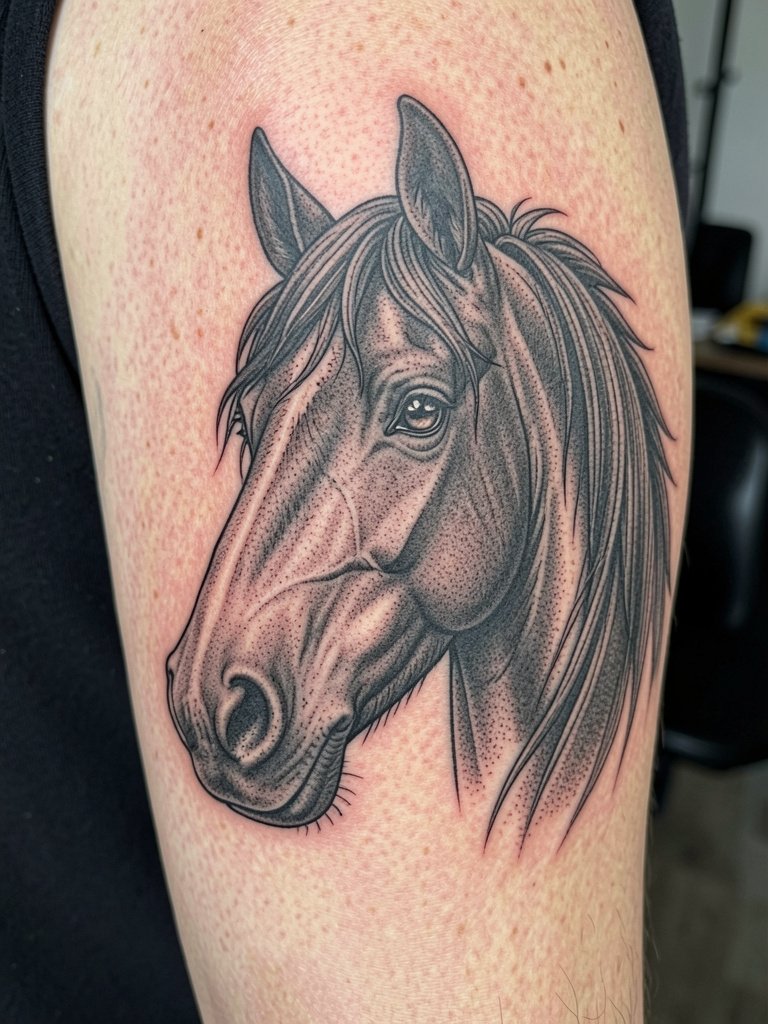
A classic portrait reads best at medium to large scale because the eye, nostril, and mane detail need room to age. For this placement plan for a one to two session booking and ask your artist to show healed shots at similar scale so you can compare contrast and saturation. The common mistake is requesting ultra-thin single-needle detail on a three-inch patch; those facial lines blur by year three. Expect moderate session discomfort on the outer arm and a touch-up at 12 to 24 months if you want the eye highlights crisp. For showing this off, sleeveless tanks or rolled short sleeves work best, try pairing with fitted tank tops so the portrait sits unobstructed.
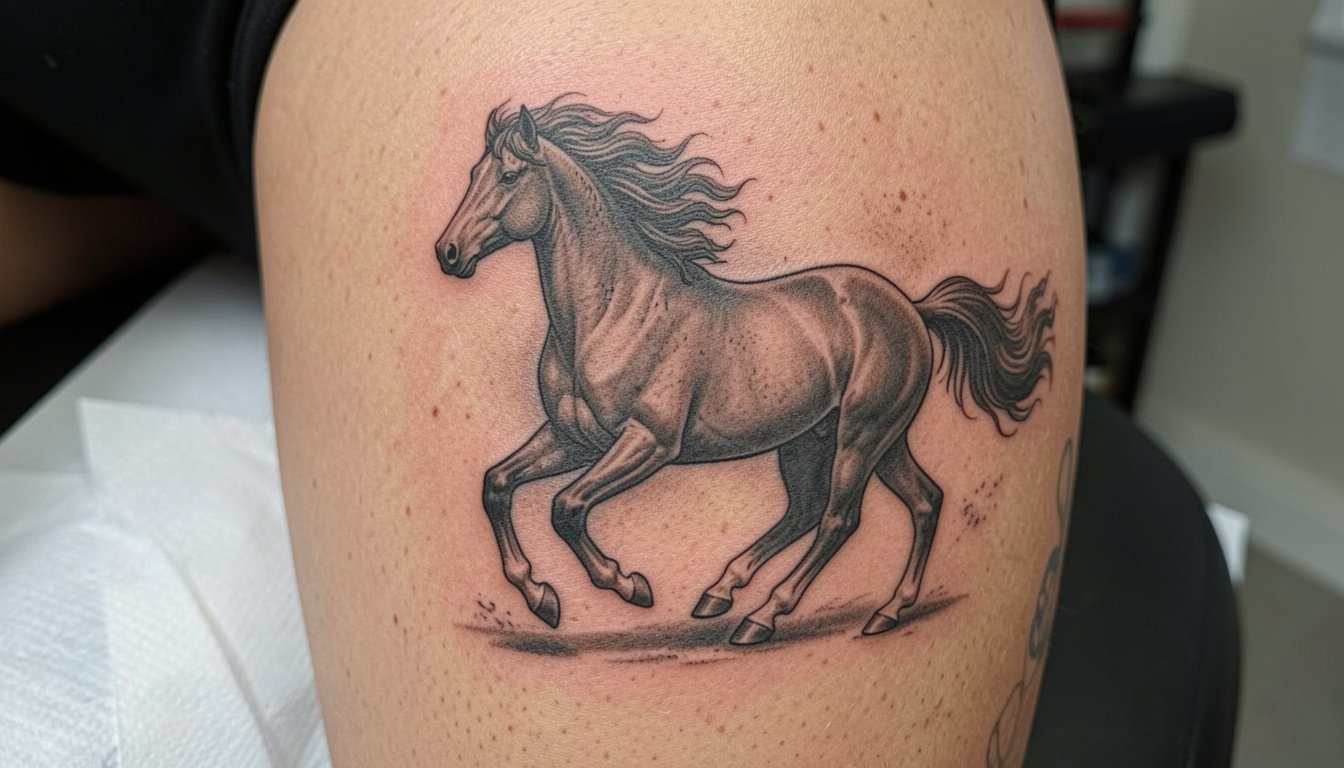
2. Mid-Gallop Full-Body Horse on the Thigh
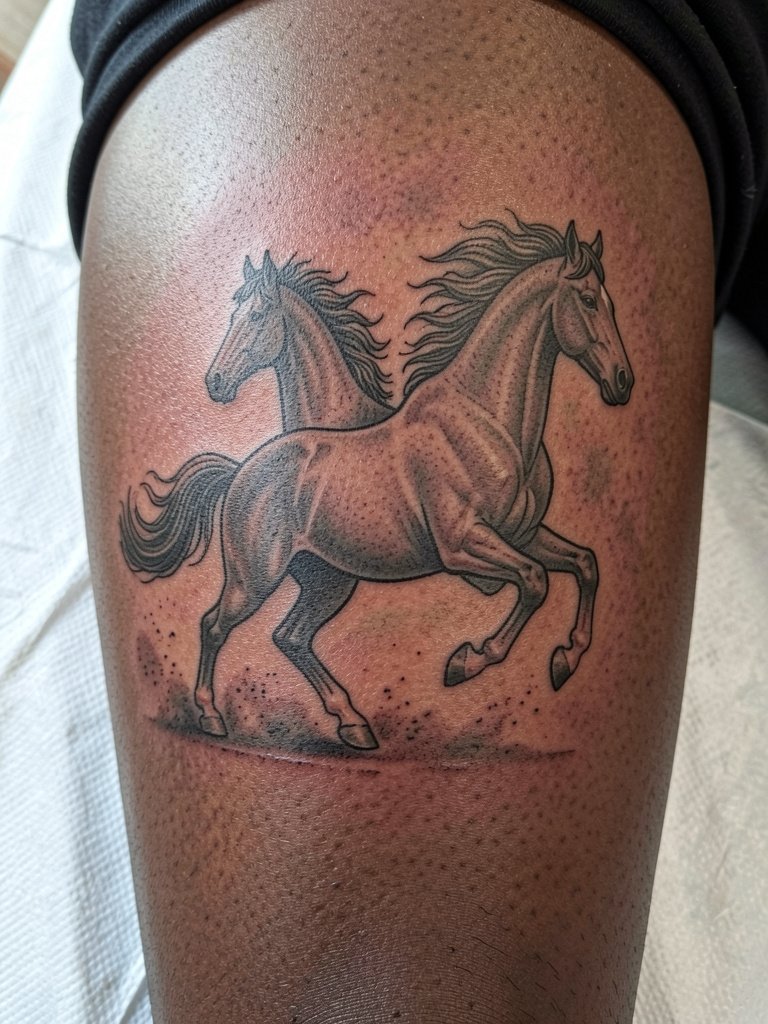
This composition wants the thigh because the long vertical canvas lets the legs and mane breathe. Tell your artist whether you prefer strict black and gray or a muted color palette so they can plan saturation and session count. There are two camps on color here. One camp prefers black and gray because it ages more predictably and keeps anatomy readable. The other camp favors selective color and watercolor accents because it adds life and can highlight muscle planes. Both positions are valid. If you choose color, plan for an extra touch-up session later and avoid soft-edge watercolor across areas that get frequent friction from shorts. For the session wear bring loose shorts or bike shorts so the artist can roll the leg without compressing the skin.
3. Minimalist Horse Silhouette on the Inner Forearm
Small silhouettes work because they simplify anatomy into a readable block, which reduces blowout risk on the palm-up surface. The decision between a single-needle fine line version and a solid silhouette splits artists into two camps. One group says fine line is elegant at first but fades and spreads, especially on inner forearm skin that sees daily movement. The other group says fine line can hold if the design is slightly scaled up and spacing is left around the main contours. Ask for mockups at three and five inch sizes so you can see how the silhouette versus single-needle version reads. For session comfort wear a rolled-sleeve linen shirt and bring a thin sleeve you can slip out of easily. This placement pairs well with linen button down shirts to frame the piece after healing.
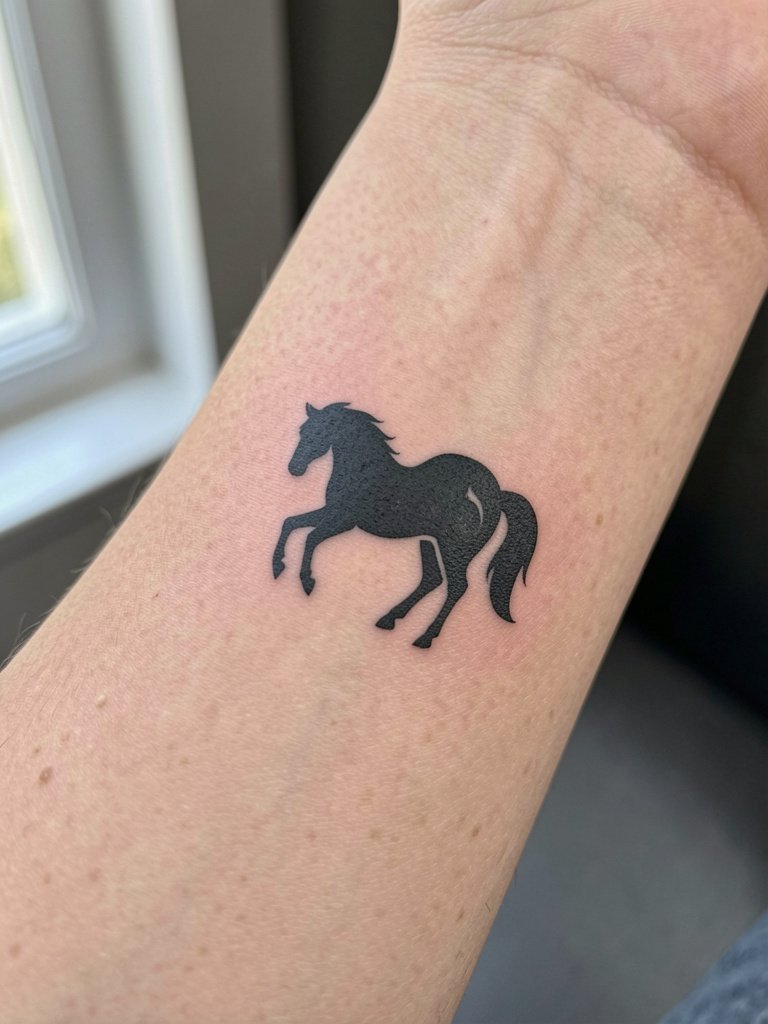
4. Single-Line Horse Profile at the Wrist
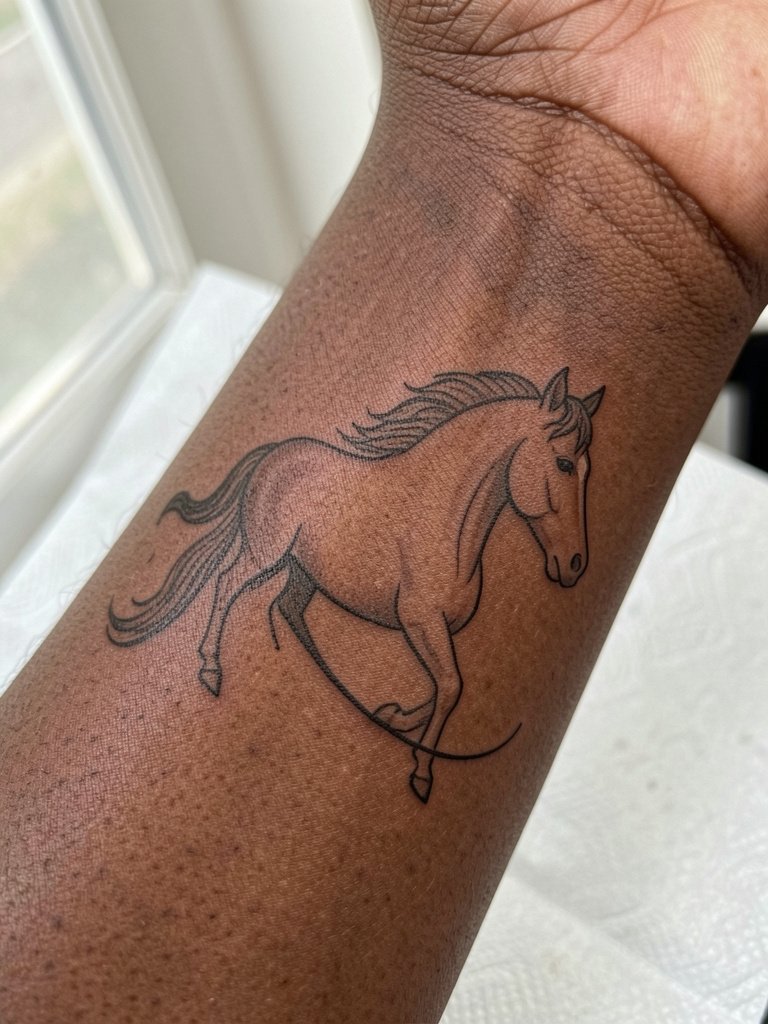
Wrist skin moves and wears quickly so a single-line profile needs slightly heavier line weight than online quick sketches. Specify exact line thickness during consultation so the artist knows to bias depth for longevity. A typical mistake is using reference with ultrathin lines and expecting the same on wrist skin; ask for a mock stencil placed on your wrist to judge presence. Expect a short session and possible touch-up at 12 months for edge sharpening. Styling note: avoid bulky watch bands on that wrist and try thin chain bracelets on the opposite hand to keep the profile visible. Consider thin chain bracelets for balance.
5. Watercolor Horse with Motion Wash on the Outer Upper Arm
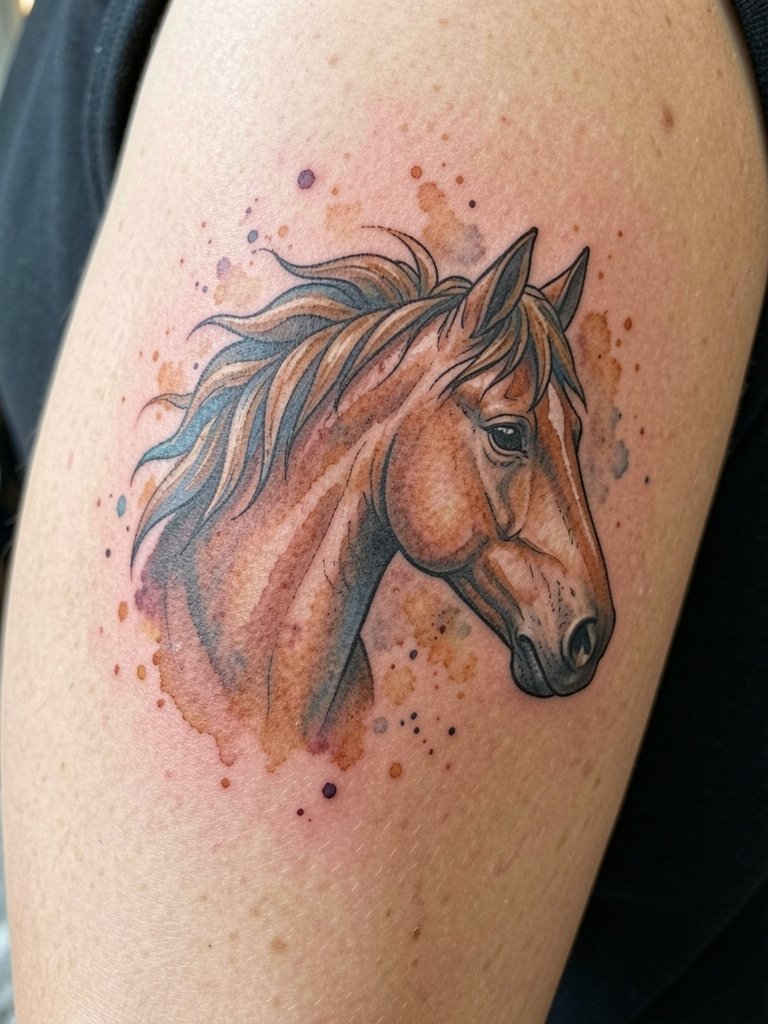
Watercolor accents bring a painterly motion to a realistic horse, but soft edges are the part most likely to lose definition. Explain to the artist which areas you want to remain structured, for example the eye and jaw, versus paint washes that can blur gracefully. Watercolor fans and cautious realism advocates disagree about longevity. One camp accepts touch-ups as part of the design life because color fades unpredictably. The other camp avoids large watercolor washes for pieces intended to stay sharp without frequent retouching. If you want both, ask for a hybrid approach where black contouring protects the key anatomy. Session time usually runs longer because of color layering. For showing this off pick rolled short-sleeve tees or sleeveless tops and consider sleeveless tees that keep the arm area visible.
6. Abstract Brushstroke Horse on the Forearm
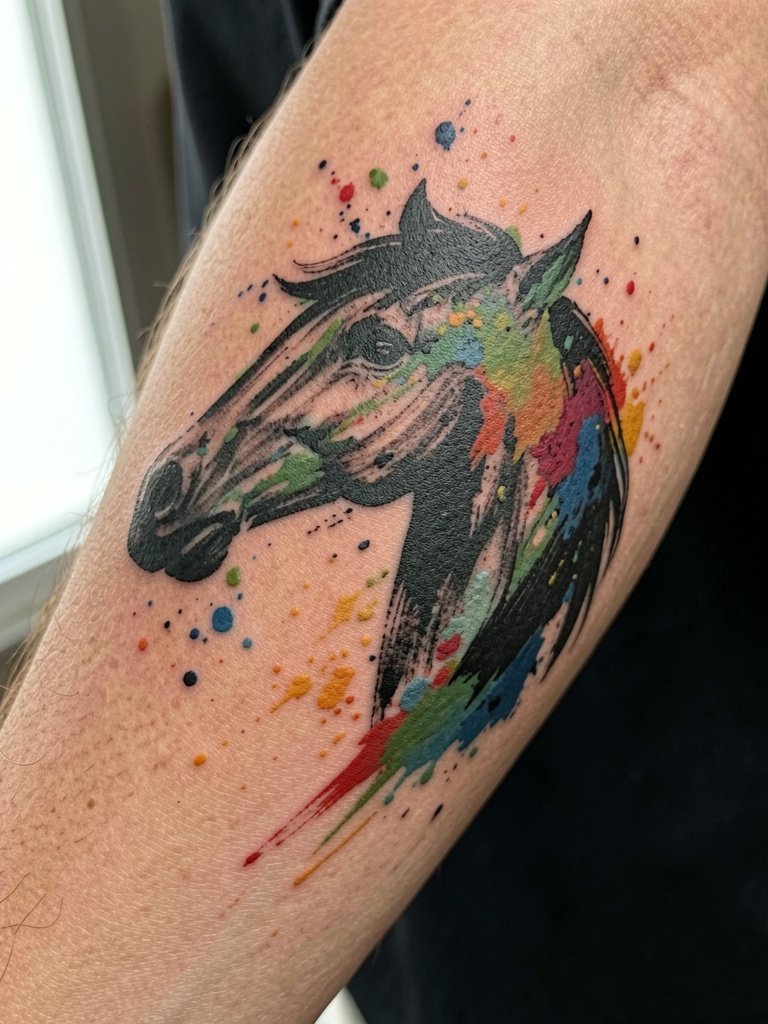
Brushstroke horses read as movement rather than anatomy which makes them forgiving on textured forearm skin. Use this when you want motion without photorealism. During consult bring compositional references that show brush weight and where you want suggestion versus detail. A frequent mistake is overloading brush marks into a small area which then loses its intended energy. Expect one to two sessions depending on color. For appointment comfort wear a short-sleeve shirt that can be removed easily so the artist has full access. No accessory links in this one since the session wear advice is straightforward.
Session Day Picks
These items smooth the session and the first healing week for the upper-arm, forearm, wrist, thigh, and ankle pieces above.
-
Stencil transfer paper kit. Lets you preview how the portrait linework and single-line profiles sit on your skin before the needle goes down, which is crucial for placement decisions in ideas 1 and 4.
-
Topical numbing cream. Applied per the product directions about 45 minutes before helps with wrist and rib-adjacent discomfort during longer realism sessions without altering shading.
-
Thin protective film roll. Useful after thigh and forearm work to protect areas that rub against clothing in the first 48 hours.
-
Fragrance-free gentle body wash. Keeps healing ink clean during showers without irritating delicate linework on small portraits and silhouettes.
-
Healing ointment. A thin layer for the first few days locks in moisture for fine line pieces without clogging needle channels, which helps the eye highlights and slender contours in realistic portraits.
7. Horse Head with Floral Framing on the Outer Upper Arm
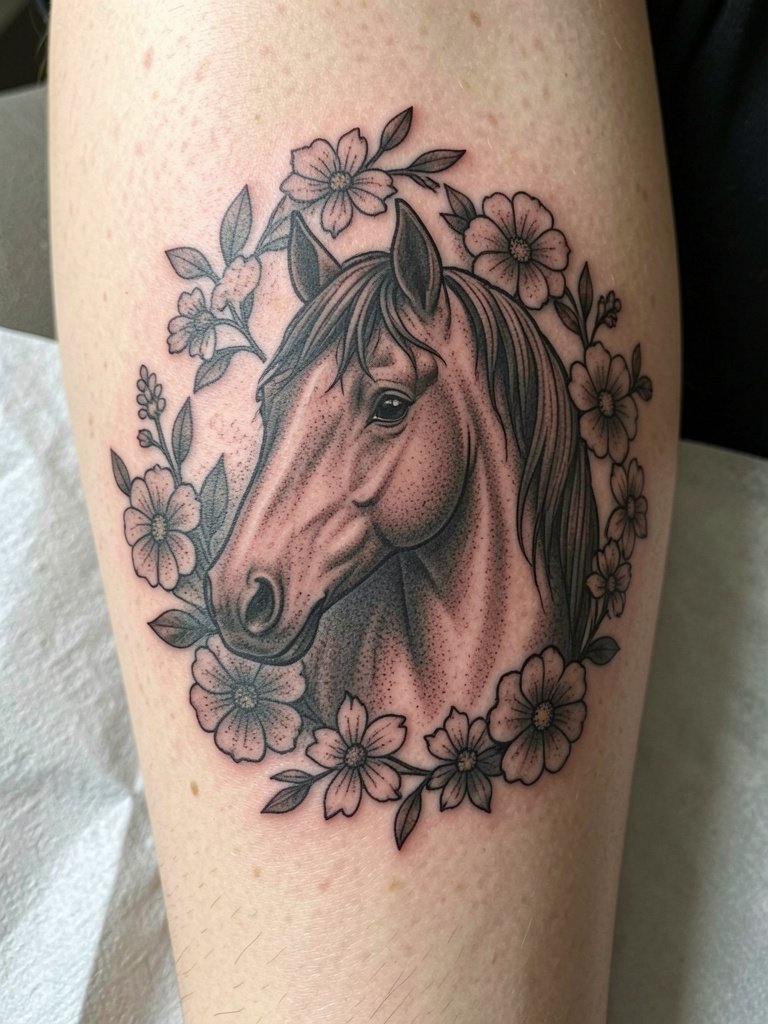
Framing a horse with florals softens the edge of a realistic portrait and helps the piece age by creating sacrificial elements that blur a bit without harming the face. Specify which flowers matter to you and where they should sit relative to the mane so the artist can plan negative space. A common mistake is crowding flowers too close to facial features, which merges by year two. This piece typically takes one to three sessions depending on color. For after-heal display choose rolled flannels or fitted tanks so the floral frame reads without visual noise. Pair with a rolled flannel shirt for a casual reveal.
8. Vintage Illustration Horse Portrait on the Upper Arm

The vintage engraving approach substitutes cross-hatch and stipple shading for smooth gradients which can be friendlier to aging on upper arm skin. The debate about fine line versus bolder realism shows up here because veterans of both styles champion their method. One camp argues that fine cross-hatch and stipple need larger scale to avoid softening into indistinct texture. The other camp says that with careful spacing and slightly heavier contour lines those textures can hold and keep the vintage look. Ask to see three-year healed examples with similar skin tone and scale before booking. This style often feels like a longer session but the result photographs like an old bookplate.
9. Fine Line Horse with Wind or Grass Details on the Inner Forearm
Adding environmental cues such as grass or wind lines helps a small portrait read as part of a scene rather than a floating head. For inner forearm placement request slightly increased line weight for the mane and leave breathing room around the grass lines to avoid early merging. The common aging trajectory is that single strands soften first, so plan a touch-up window at year two to restore crispness. This session is quick and tolerable on this surface. For post-heal styling, linen button-downs with rolled cuffs complement the vertical composition and keep the inner forearm visible. Try a relaxed short sleeve shirt for easy showing.
10. Book-Illustration Horse on the Calf
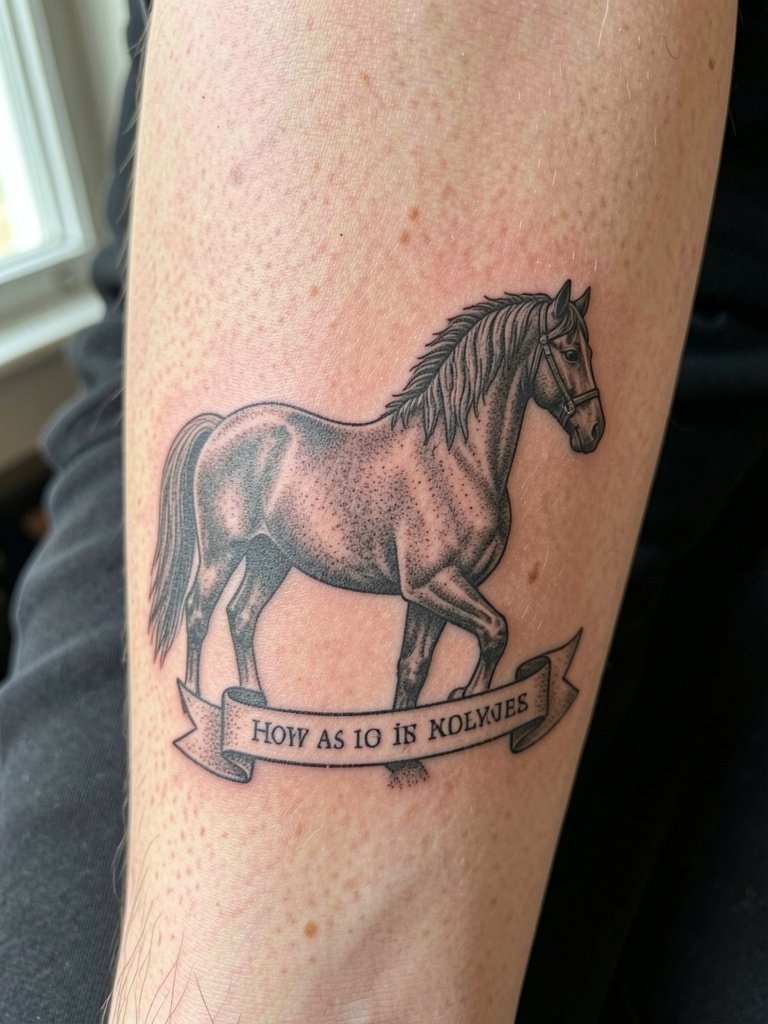
Calf placement gives you a canvas large enough for vintage illustration details and optional banner text. Specify exact caption wording if you want letters, because generators and stencils need precise text. A common mistake is squeezing lettering into small banners which becomes illegible after healing. Calf skin tolerates longer sessions well and ages predictably compared with hands or wrists. During the session wear shorts or rollable pants so the artist can expose the area without tight seams. For weekend reveals cropped straight jeans or midi skirts frame the calf artwork without cutting off the composition.
11. Blackwork Horse Profile on the Outer Forearm
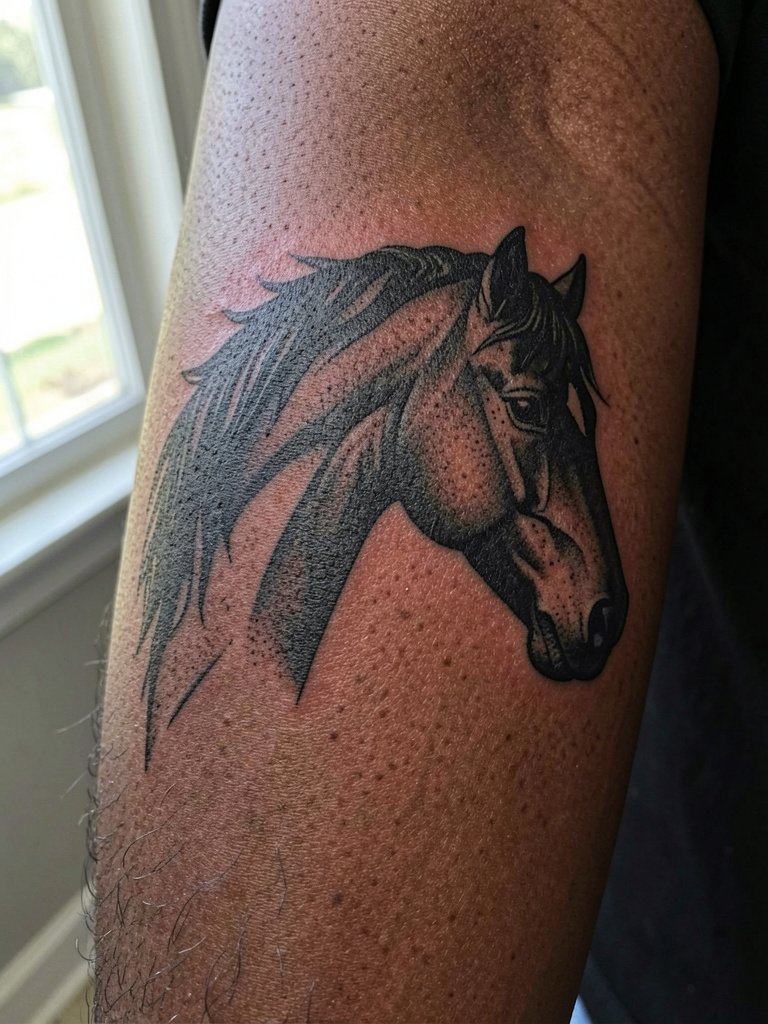
Blackwork silhouettes age in a very readable way because the bold fill avoids thin fragile elements. If you want longevity choose this over micro-realism for the forearm. During consult specify edge crispness and how much negative space you want within the mane. A mistake people make is requesting too many fine internal details inside a heavy block which defeats the purpose and invites patchy fading. Expect one session and minimal touch-ups beyond five years. For wardrobe pairing, monochrome basics and denim jackets rolled to mid-forearm keep the bold profile visible. Consider a black crew neck tee to anchor the look.
12. Realistic Horse with Landscape Background on the Back
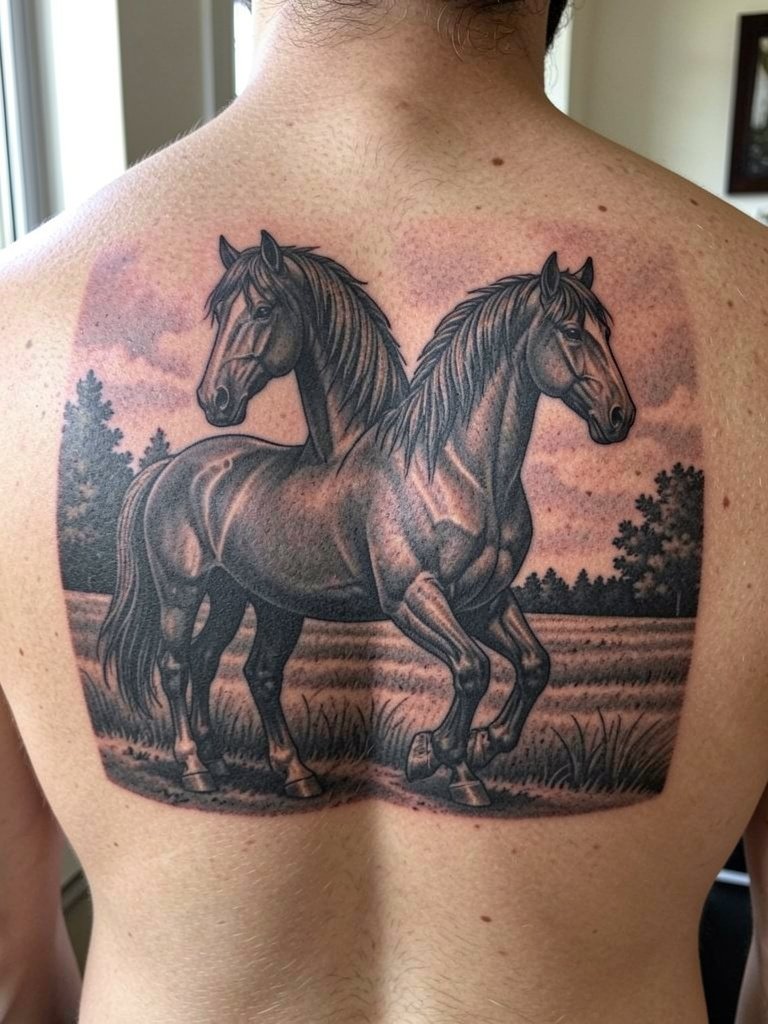
Large back pieces convert an animal portrait into a narrative scene but they demand clear planning about composition and negative space. When you want a landscape integrate reference images of the specific place you care about so the artist can scale horizon and foreground elements properly. A common error is cramming too many story elements which flattens the horse visually. Realistic back scenes usually need multiple sessions and a multi-stage touch-up plan. For session access wear a button-front shirt or loose tank so the artist can reach the spine and shoulder blades without fabric friction. This placement is great for dramatic reveals in backless tops once healed.
13. Tiny Horse Head Behind the Ear
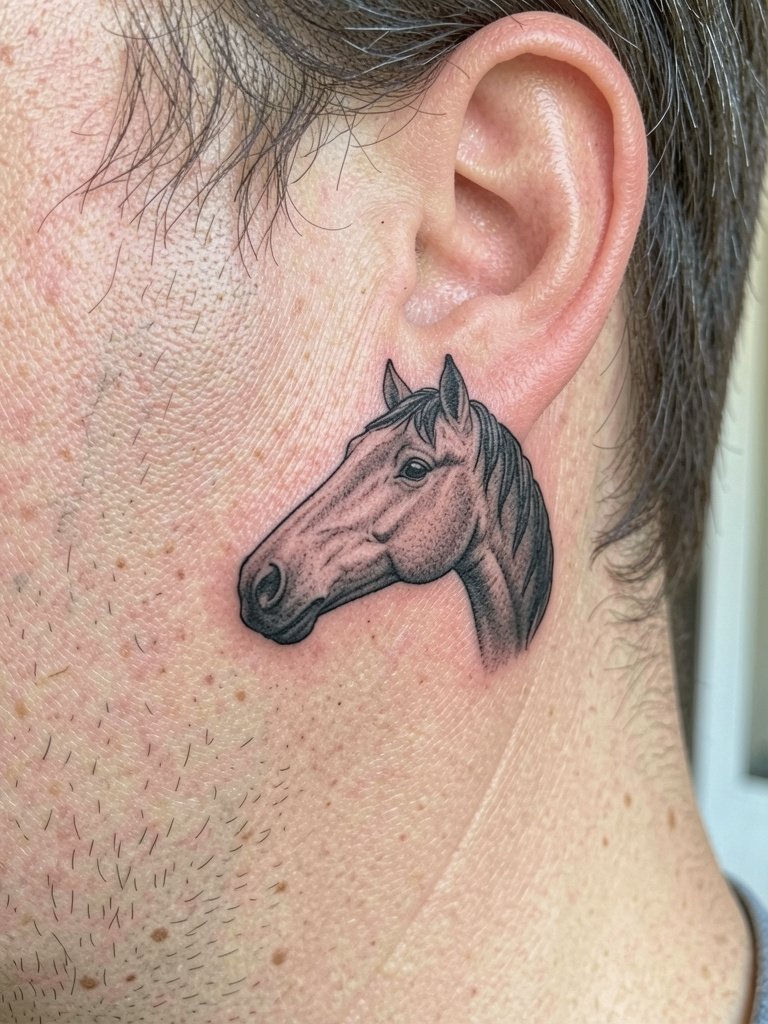
Tiny behind-the-ear work is discreet but fragile. The mastoid skin accepts small tattoos quickly, but detail must be simplified so ears, eyes, and nostril do not merge. Specify maximum width so the artist knows to prioritize silhouette over texture. Expect a brief session and possibly an earlier touch-up than larger pieces because micro lines can spread. For showing the spot, pin hair up or use small clips. A simple accessory like small hoop earrings frames the area without competing with the ink.
14. Small Horse Head on the Wrist
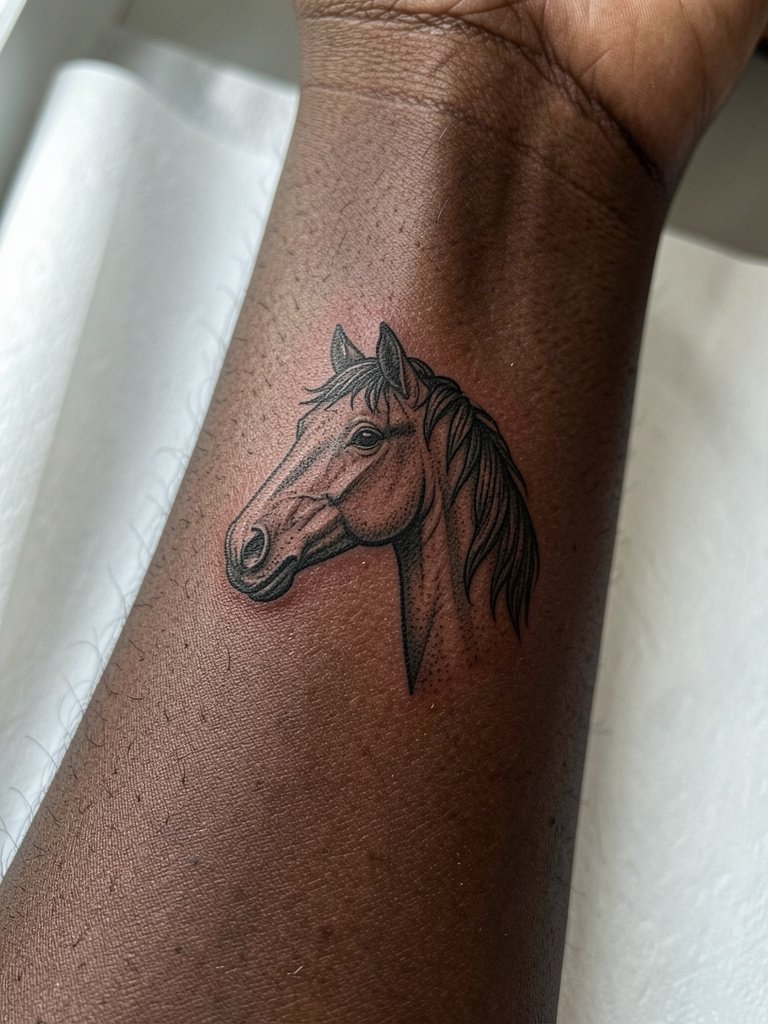
Wrist tattoos face constant sun exposure and friction from watches or cuffs so keep the composition bold within the small scale. Ask the artist to show how the head reads at two and three inch scales and request slightly heavier contour lines for the jaw and eye. People often underestimate how much contrast the wrist needs, leading to early softening. Sessions here are short but slightly more sensitive. Avoid bulky watches on that wrist and use a minimal watch or none for the first few months. No affiliate link here because the accessory advice is specific and simple.
15. Traditional-Flash Style Horse Head on the Outer Upper Arm
Traditional flash translates the horse subject into bold graphic shapes that age predictably and usually need fewer touch-ups over time. Choose this route when you want readable edges and lower maintenance. During consultation ask the artist to match the palette to your skin tone with color sample swatches so saturation reads well healed. A common mistake is asking for too many micro details inside the flash layout, which defeats the style. These pieces are often completed in a single session. For easy showing wear sleeveless tees or rolled flannels and keep the arm free of heavy jewelry.
Frequently Asked Questions
Q: How big should a realistic horse portrait be so it does not blur over time?
A: For facial realism plan on at least palm-sized dimensions, roughly three to five inches across, so the eye, nostril, and mane have room. If you prefer smaller, switch to silhouette or single-line treatments because tiny photoreal detail tends to merge with skin texture. Expect a possible touch-up at one to three years for extreme fine work.
Q: Which ages better, black and gray realism or color?
A: Black and gray typically ages more predictably because contrast remains readable and the pigment blends into skin tones with less hue shift. Color can make a piece feel more alive right away but may require periodic refreshes, especially in soft watercolor areas. If you want the best of both ask for black structure with selective color accents so the anatomy stays crisp.
Q: What should I wear to my appointment for a thigh or calf horse tattoo?
A: Wear loose shorts or bike shorts for thigh work and rolled pants or shorts for calf work so the artist can expose the area without tight seams. A good session outfit is loose gym shorts or a skirt that can be adjusted without compressing the skin. Avoid tight waistbands and bring a zip-up hoodie for comfort between passes.
Q: How do I find an artist who specializes in realistic animal work?
A: Search Instagram and TikTok for hashtags like #horsetattoo, #realistictattoo, #blackandgreytattoo, and #finelinetattoo and use location filters to narrow to nearby studios. Look for posts explicitly labeled as healed photos and ask the shop by message for healed portfolios rather than only fresh shots. Reddit communities such as r/tattoos and r/tattooadvice can point to local guest spots and artists who post multi-year healed images.
Q: How does skin tone affect choices between black and gray and color?
A: Darker skin tones can read strong blackline work and saturated blackwork very well, while subtle color washes may need more contrast to show up long term. Medium tones often suit muted browns and warm accents. Ask to see healed examples on similar skin tones and request color swatches during the consult so saturation decisions are realistic.
Q: Will a horse tattoo on the wrist hurt a lot and how long is a session?
A: The wrist is more sensitive than the outer arm, but most small horse head sessions run 30 to 90 minutes depending on detail. Expect surface soreness and some stiffness for a few days. For longer work plan for a break halfway through and bring a small snack and water to stay comfortable.
