
Bold black Māori-inspired pieces often outlast dainty imitations. Heavy black linework and clear negative space keep koru spirals and manawa lines legible as skin ages, while ultra-thin curls blur into a gray smudge. If you want designs that read like carved patterns years from now, choose spacing, scale, and flow with the body, not a trendy single-needle look.
1. Full Facial Tā Moko with Curved Koru and Manawa Lines
A full facial tā moko demands scale and cultural context. The face is historically the most significant placement in Māori tradition, so expect deeper conversation about lineage and meaning. One camp favors traditional uhi carving for its groove texture and ritual, while another camp prefers machine work for finer control and easier healing. If you plan this, tell your artist which side of the face maps to which ancestors and bring reference photos that show the exact koru curvature and spacing you want. The session will be intense and often staged across multiple days, and you should seek a practitioner who can show healed facial examples.
2. Male Chin and Jaw Moko Adaptation
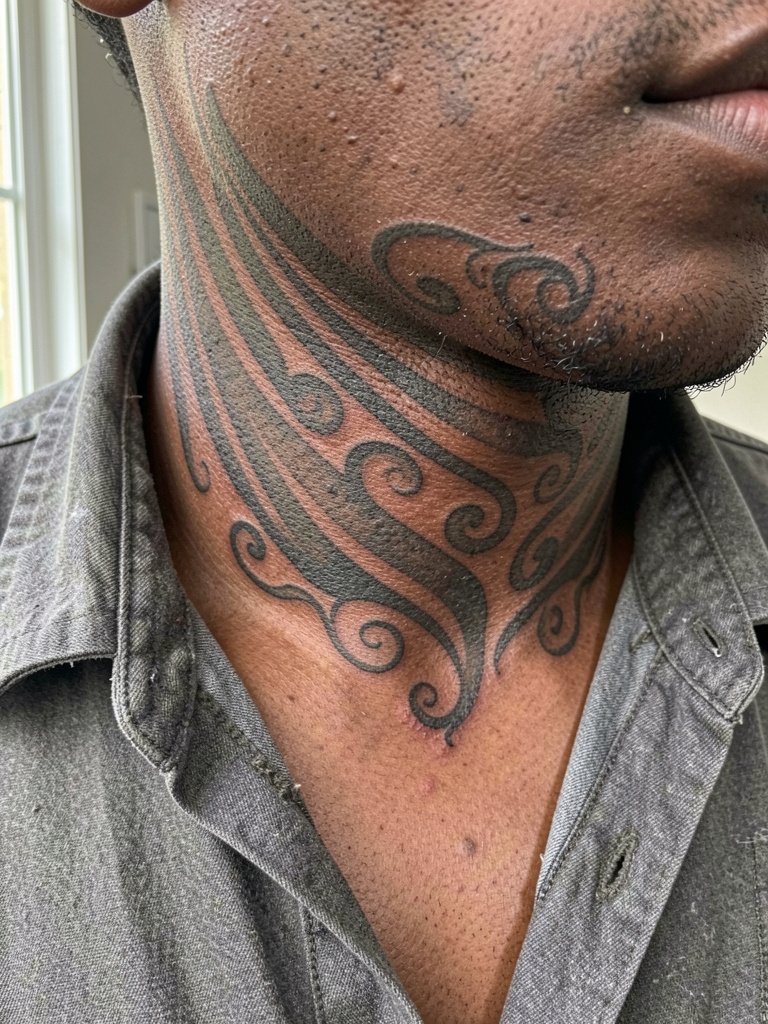
This jawline version keeps the face language intact while reducing overall coverage. For many wearers the jaw gives a bold identity without full-face commitment. A common mistake is asking for hair-fine bands that wash out on textured jaw skin. Instead, plan slightly heavier linework and wider spacing so the pattern reads from a few feet away. For the session, wear an open-collar shirt for easy access. Expect touch-up work at one to three years depending on natural fade and how the skin settles.
3. Women’s Chin Moko Kauae, Centered Symmetry

The moko kauae sits on the chin and often reads as a clear cultural marker. Symmetry here works if ancestry mapping supports it, but symmetry alone can flatten the storytelling. One mistake is choosing tiny filigree that becomes indistinct. When you consult, show photos at the actual width you want because scale matters more than ornament. Session-wise, expect a short, focused appointment and a conservative touch-up plan. Simple hoops or small studs pair well with this placement, and for show-off wear try scoop-neck tops that frame the jaw.
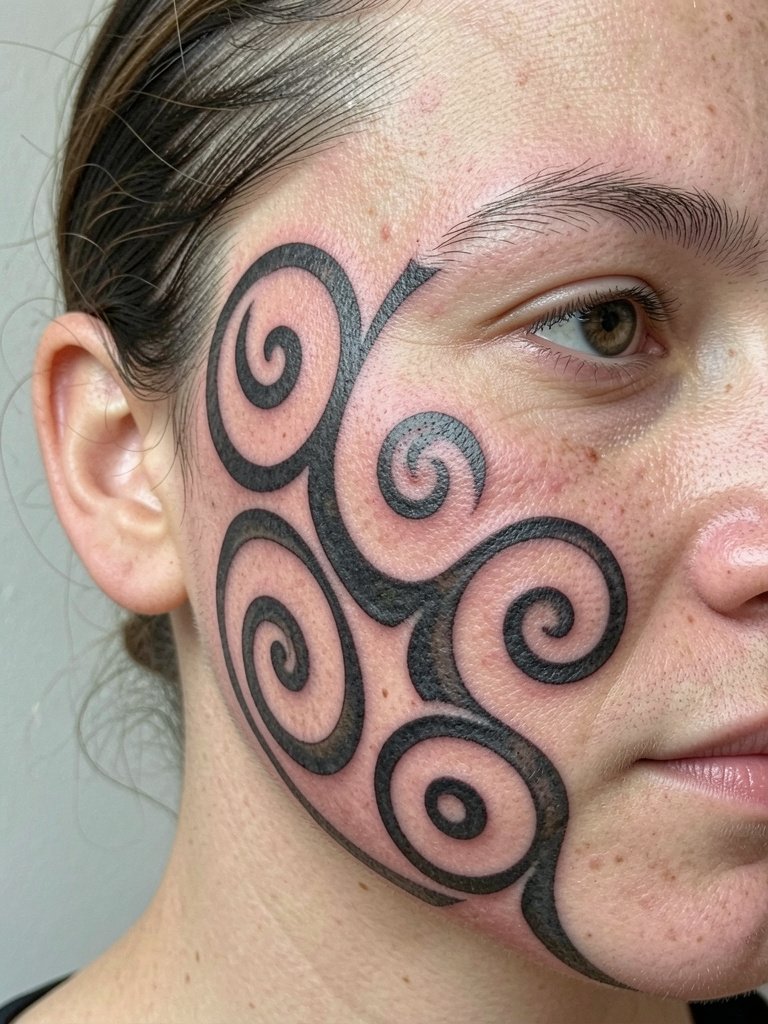
4. Lower Lip and Nostril Accent Moko

Compact facial accents give traditional cues without full coverage. They age faster on high-motion areas like the lip border, so stronger line weight helps retention. Discuss exact placement relative to the vermillion border so the artist can plan needle depth and spacing. The most common regret is asking for filigree that disappears with daily face movement. For sessions, avoid heavy makeup and wear a loose top to the appointment. Because the placement is delicate, plan a touch-up at around the one-year mark.
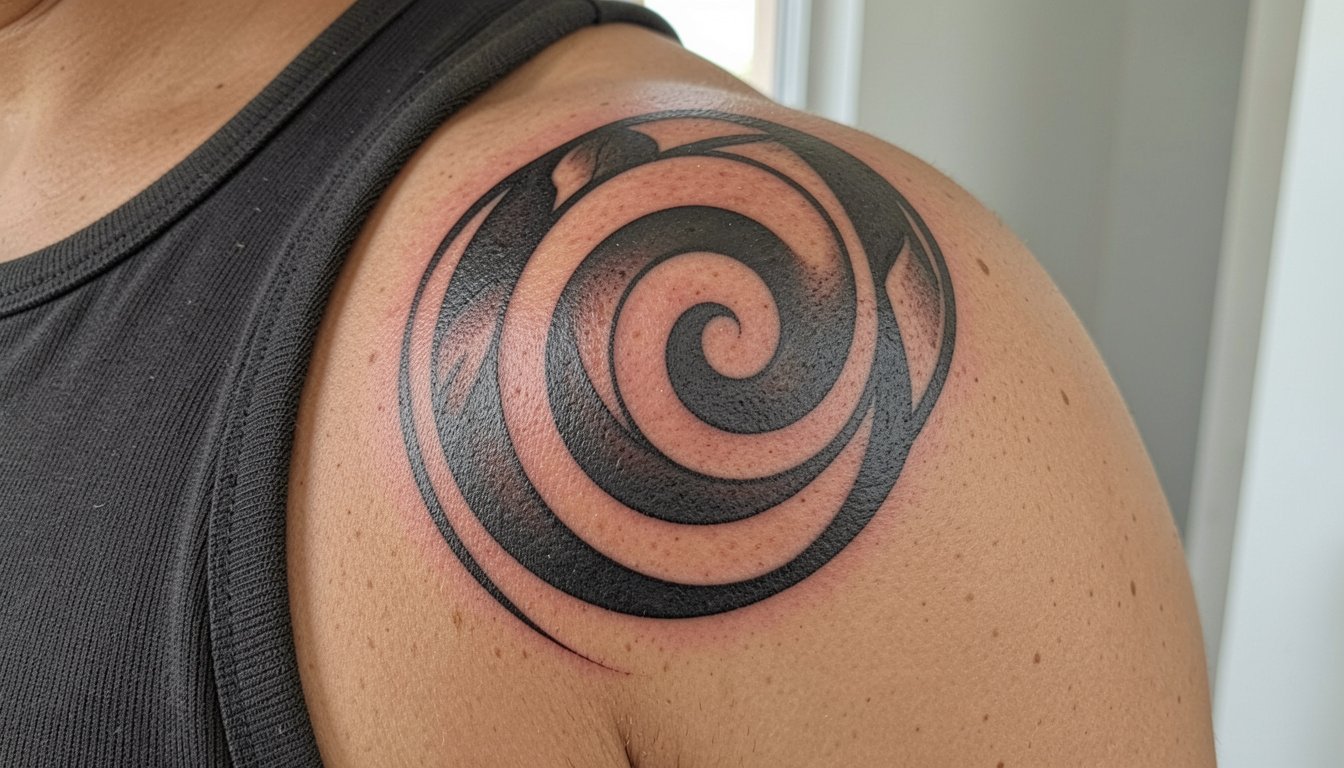
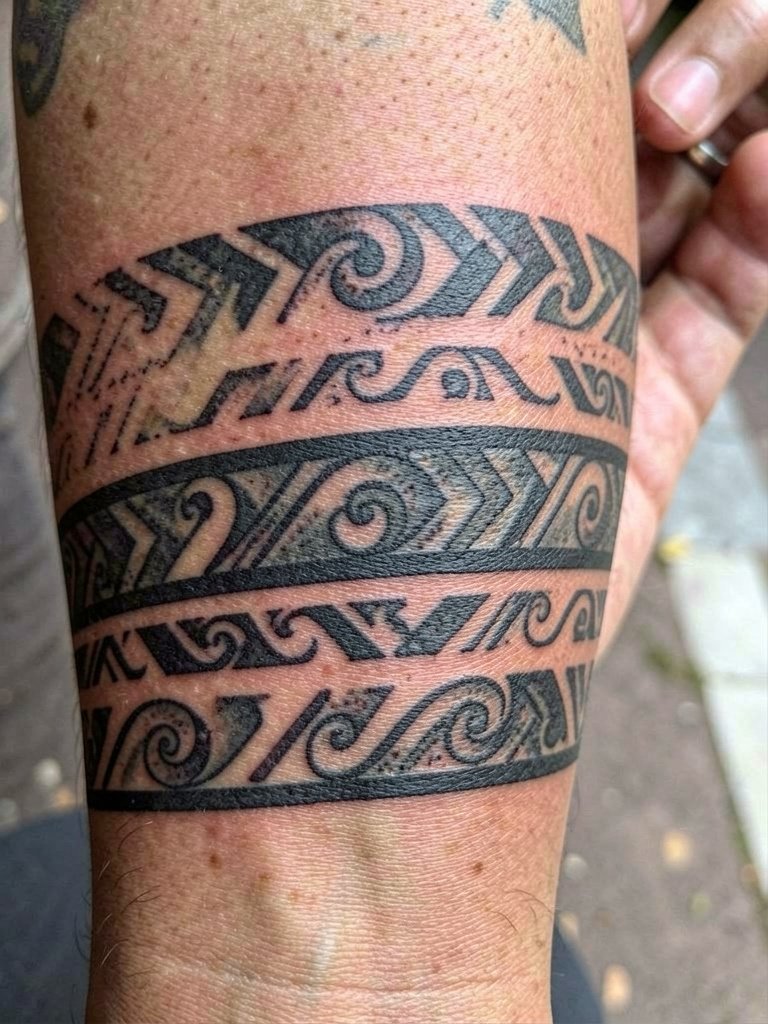
5. Shoulder-to-Outer Upper Arm Banded Moko
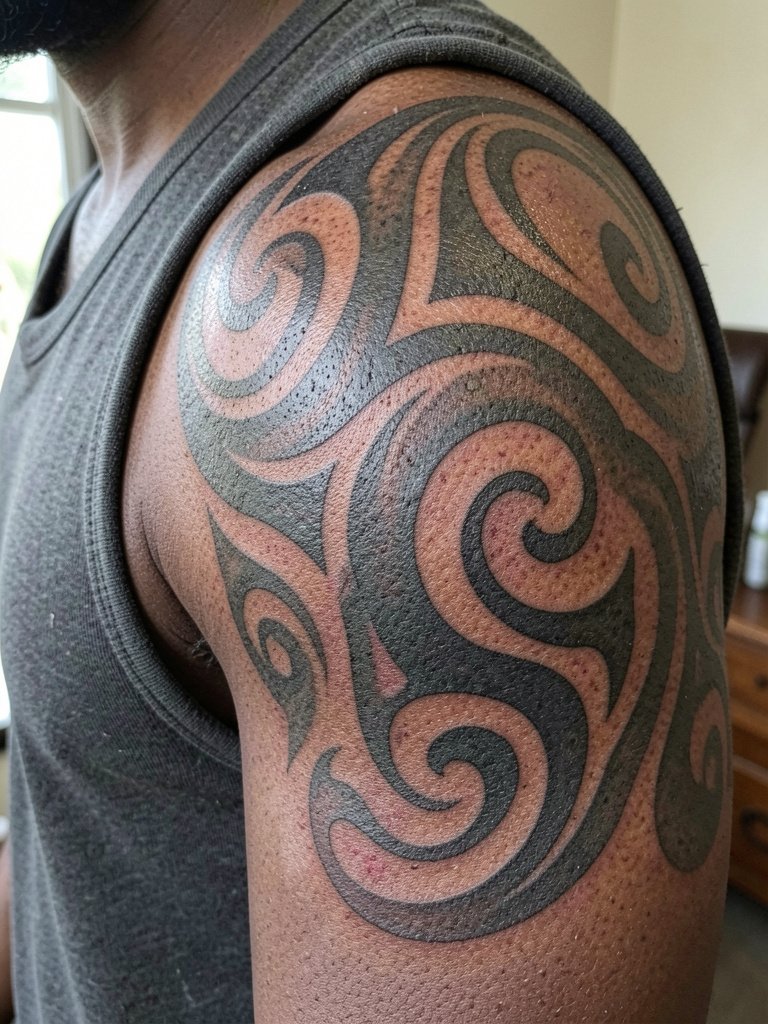
Shoulder bands follow muscle curves and look best when given room to breathe. If you want a partial sleeve later, plan the band edges so they flow into future panels. A common error is tight, wraparound bands that fight the shoulder’s roundness. For the session wear a muscle tank top so the artist has clear access. Expect moderate pain and a multi-hour session for larger bands. This placement holds bold blackwork well and usually needs only rare touch-ups.
6. Back Flow and Pāua-Inspired Patterns

Large back planes let patterns breathe and maintain carved rhythm. Plan the composition with spine, shoulders, and muscle groups in mind. A common mistake is copying a small flash and blowing it up to the back, which loses detail and balance. Discuss negative-space pacing and where koru transitions should sit relative to the spine. For sessions bring loose, easy-removal clothing that does not rub the area. After healing, open-back tops and swimwear showcase the work best.
Session Essentials
These picks smooth the early days for the shoulder, back, and facial pieces above.
-
Stencil transfer paper kit. Lets you preview line placement on skin before the needle hits, which is crucial for face mapping and shoulder bands.
-
Topical numbing cream. Applied as directed and timed correctly, it helps with jawline and ribcage discomfort without altering saturation.
-
Thin protective film roll. Useful for hand and ankle pieces that face friction during the first week.
-
Fragrance-free body wash. Gentle cleansing reduces irritation while the skin scabs and flakes.
-
Aquaphor Healing Ointment. A mainstream balm that many artists recommend in a thin layer for the initial healing days.
7. Leg Panel from Upper Knee to Lower Torso
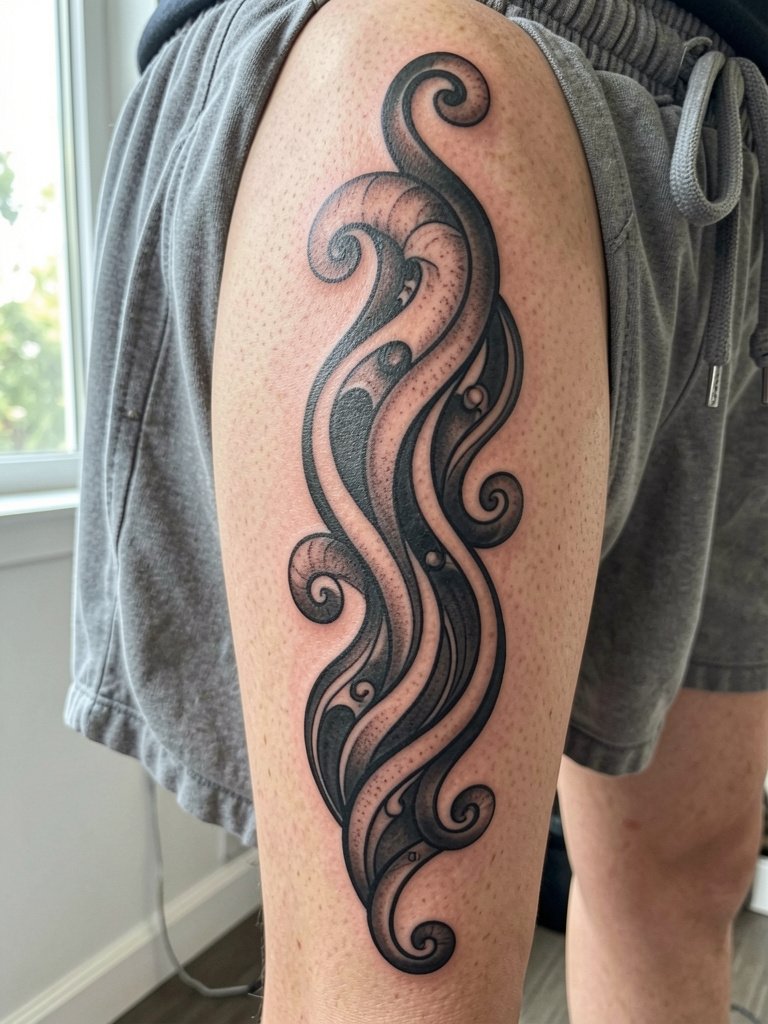
Vertical leg panels emphasize body flow and look striking when uninterrupted by seams. One common mistake is starting the pattern too low, which breaks the visual line at knee movement. Ask for a mockup that shows how the motif looks while standing and while seated. For the session wear loose drawstring shorts so the artist can roll the leg up without pressure. Touch-ups for large leg panels often happen after one to two years depending on activity and sun exposure.
8. Hand and Occupational Mark Tattoos
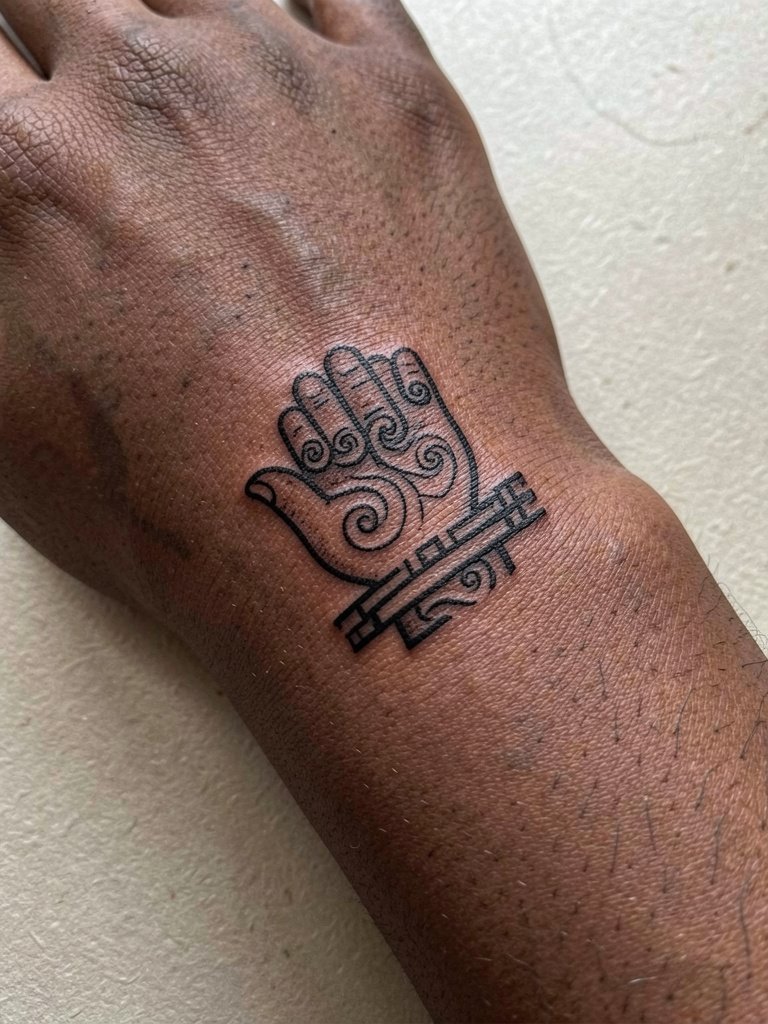
Hands age and wash constantly, so designs need bold shapes rather than intricate filigree. A typical mistake is tiny detail that dissolves after heavy use. Discuss daily activity with your artist and plan for more saturation. Expect frequent touch-ups, especially for finger and knuckle marks. Minimal rings and neutral sleeve choices let hand motifs read cleanly. For the appointment avoid wearing jewelry on the tattooed hand.
9. Forearm Geometric Polynesian Bands

Inner-forearm bands are a popular entry point for Māori-inspired blackwork because they are visible yet easy to cover. The error people make is cramming too many small motifs into a short span. Ask the artist to show the design at the actual width you want so spacing is correct for aging. For session wear, choose a short-sleeve or a rolled sleeve top. Rolled sleeves and solid tees showcase forearm bands well and keep the focus on clean linework.
10. Koru-Based Calf or Shoulder Motif

The koru symbolizes new life and reads clearly when given scale. Calf placement needs curvature that follows the muscle or it will distort while walking. One mistake is shrinking the koru so detail vanishes. Discuss how the spiral looks when standing and when seated. For showing off try cropped pants or shorts and pair with ankle boots or sandals to frame the calf. For the appointment wear pants you can easily pull up without friction on the fresh ink.
11. Manawa Line Compositions across Torso or Sleeve

Manawa lines read as a life-journey spine and anchor larger compositions. The common failure is treating the line as mere filler. Ask for proportional spacing between the central line and offshoot koru so the torso flow remains legible at distance. The session may need multiple sittings if it crosses ribs and shoulder. For show-off wear fitted solid shirts or unbuttoned overshirts that reveal the line across chest and arm.
12. Split Lineage Face Design, Left/Right Division
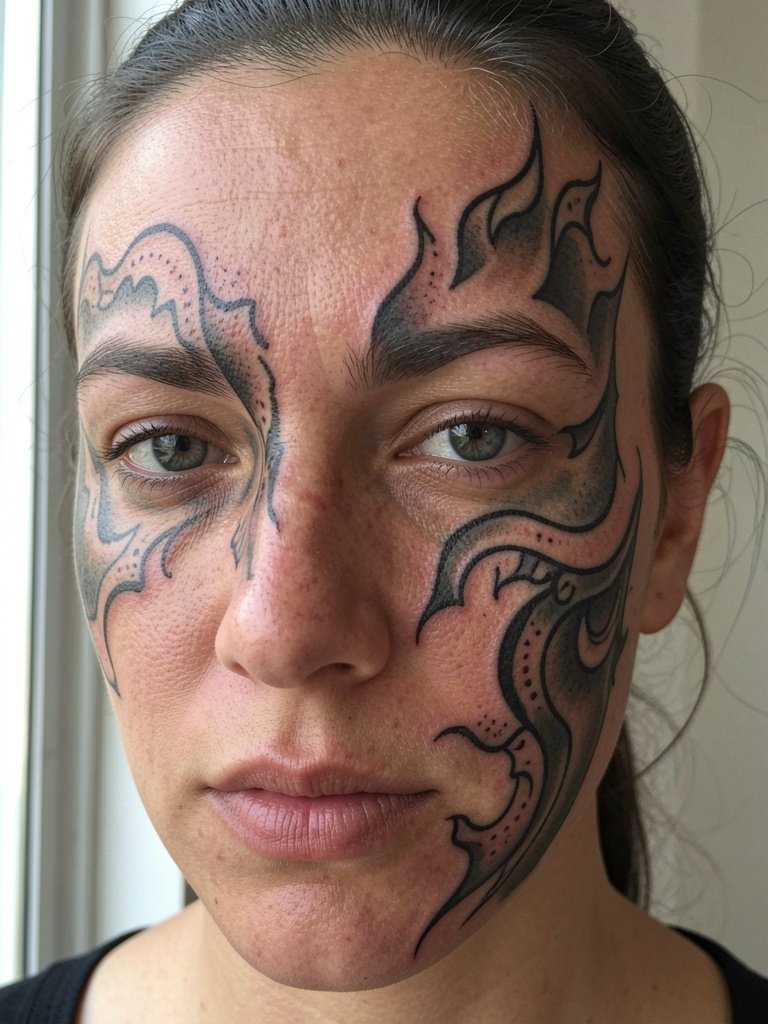
Dividing the face to represent paternal and maternal lines is a powerful storytelling device. Some practitioners argue the face should remain fully traditional and hold asymmetry by lineage. Another group prefers aesthetic symmetry for modern balance and wider public readability. If you choose split mapping, bring clear family references and agree with the artist which symbols represent which side. Sessions are complex and usually scheduled over several visits.
13. Chiselled Uhi-Style Groove Reproduction

Uhi-style pieces provoke a major debate. One camp insists on traditional hand-tool carving because the grooves and ritual are integral to tā moko. The other camp argues machine work increases accessibility and reduces healing complexity while still honoring the aesthetic. If you want a grooved look, clarify whether you mean literal hand-tool carving or a machine recreation that simulates texture. Discuss healing expectations because hand-tool methods can require ceremonial aftercare practices that differ from modern tattoo healing.
14. Partial Body Moko for Women: Arms, Neck, Thighs
Women historically wore tattoo beyond the face in many contexts, and scaled body panels let you sample that language. The mistake here is mixing too many different motifs without a unifying spine. When planning, pick a motif family such as koru plus a single geometric element and repeat it. For the session wear breathable tops that allow neck and arm access. Thigh placements pair nicely with skirts or shorts for show-off wear and warrant a discussion about intimacy and cultural origin respect before booking.
15. Forearm Wrap That Translates to a Partial Sleeve
A forearm wrap can serve as the start of a sleeve when you design edges to transition into upper-arm panels. People often treat the wrap as a finished piece and then suffer awkward seams later. Ask for design anchors that allow future expansion. For the session pick a short-sleeve or rolled-sleeve shirt. Rolled sleeves and solid shirts keep the focus on readable bands and let the wrap show cleanly.
16. Calf-to-Ankle Flow Bands
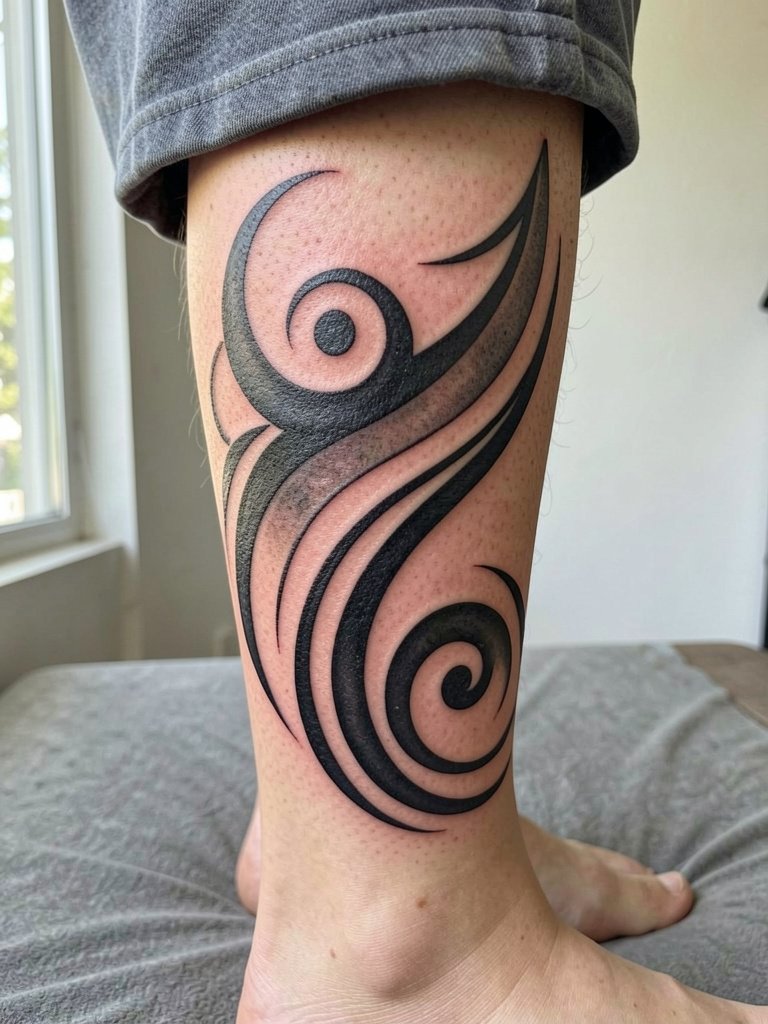
Leg flow that continues to the ankle creates a cohesive vertical statement. Incorrect tapering ruins the visual pull and can look lopsided with boots or socks. Ask the artist to simulate the look with footwear you plan to wear. During the appointment wear shorts you can easily slide up. Cropped pants and ankle boots show off the design best.
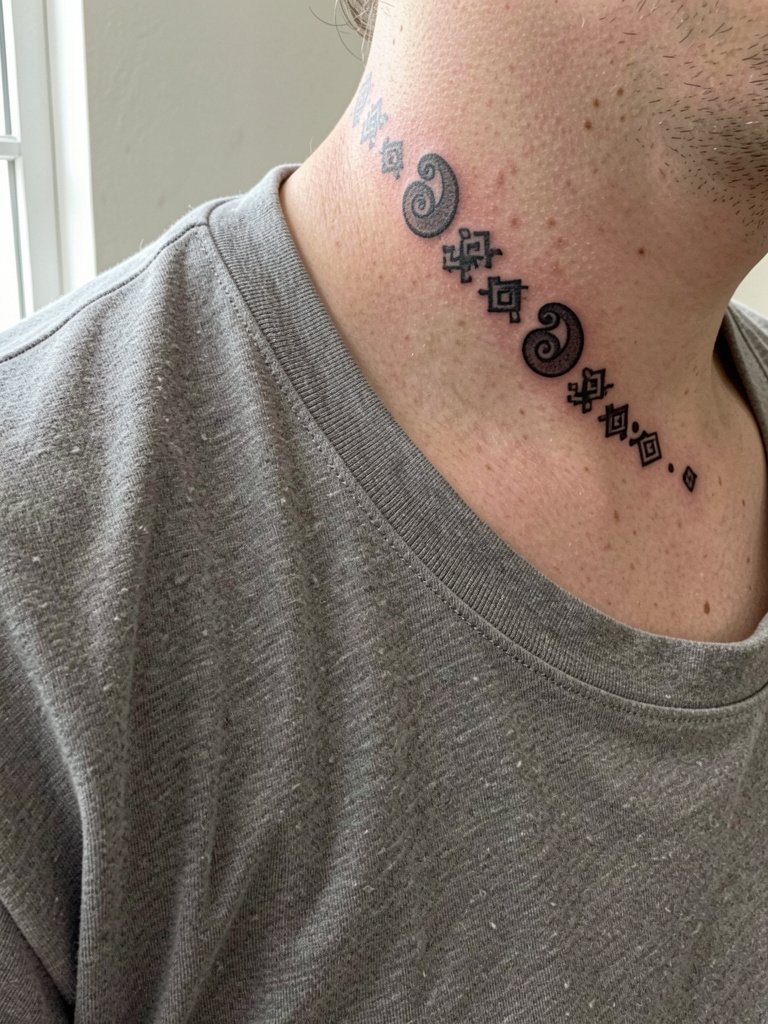
17. Collarbone Koru Accent and Minimal Chest Flow
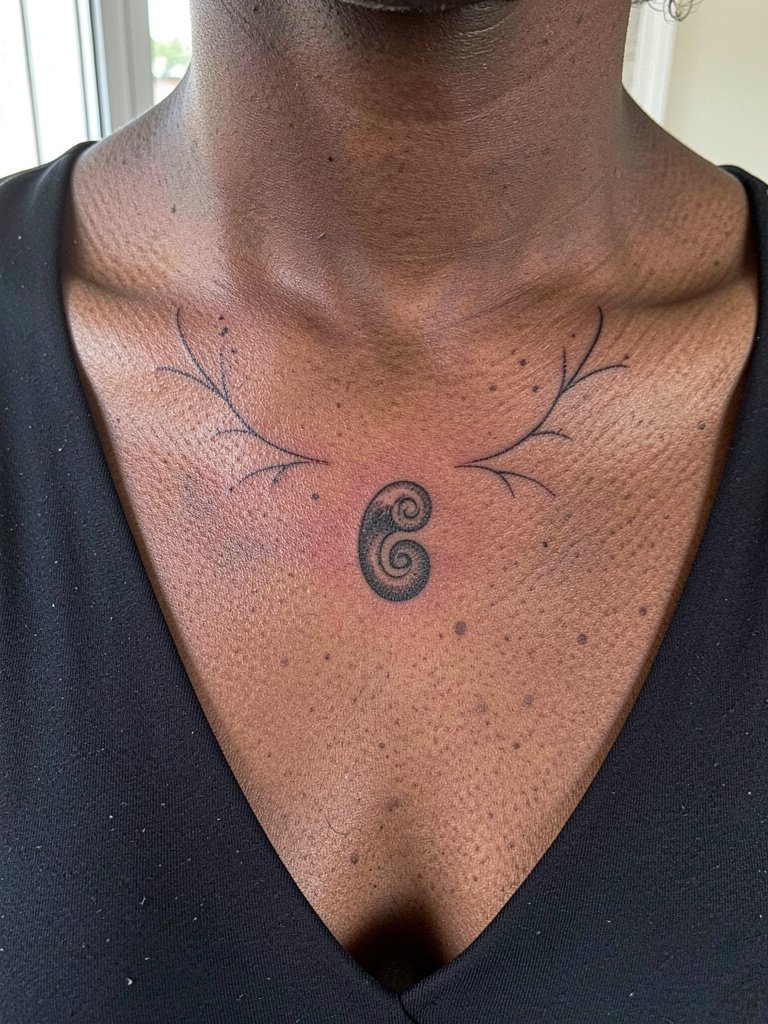
Collarbone work is visible and elegant when scaled correctly. Tiny detail can blur with clavicle motion, so choose bold terminals and moderate spacing. Discuss how the motif moves with shoulders so the artist positions it for your posture. For showing off, open-collar shirts and simple chains work well. For the session wear a top with an easy neckline so the artist can work without fabric fuss.
18. Sternum Band with Central Manawa Element
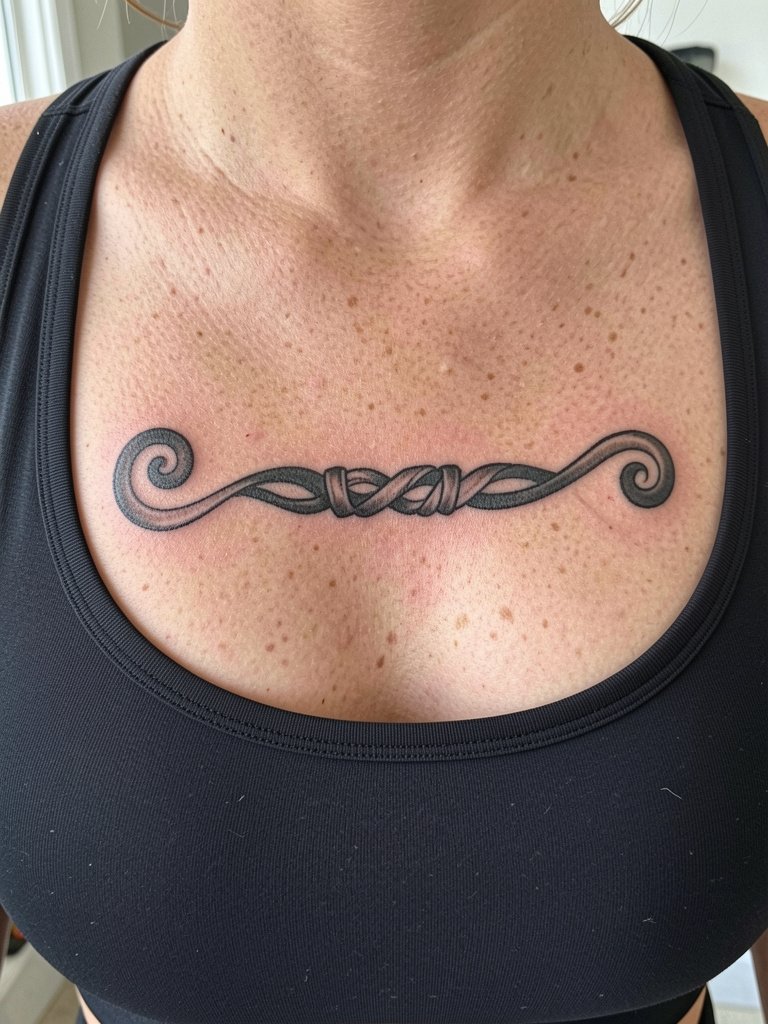
Sternum bands require planning around body curvature and potential sensitivity. A frequent error is underestimating the needed boldness for the center line, which can blur with chest movement. Clarify expected pain management and session length with the artist. For the session wear supportive, removable clothing like a fitted sports bra. Open-neck evening wear highlights sternum work once healed.
19. Small Ankle or Foot Motifs
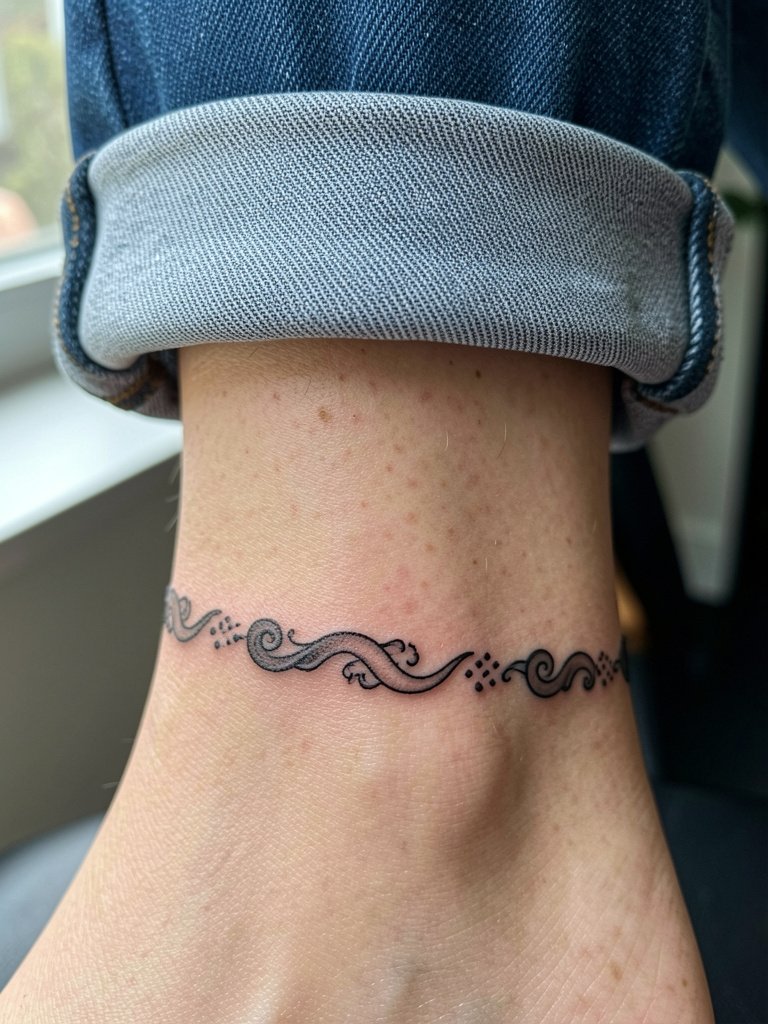
Ankle tattoos get friction from socks and shoes and often need denser ink. Small delicate dots can fade quickly, so opt for stronger terminals. For the session roll your pant cuffs or wear shorts to give the artist clear access. Cuffed jeans and sandals show the ankle motif best for casual wear. Plan for a likely touch-up in the first year.
20. Finger and Knuckle Symbols

Finger work is high-maintenance because of constant washing and wear. The most common mistake is asking for intricate linework that the skin cannot hold. Choose solid silhouettes and accept higher touch-up frequency. Keep rings minimal during healing. Expect yearly touch-ups and plan placement where rings will not shadow or rub the design.
21. Thigh Paneled Moko for Larger Narrative Pieces
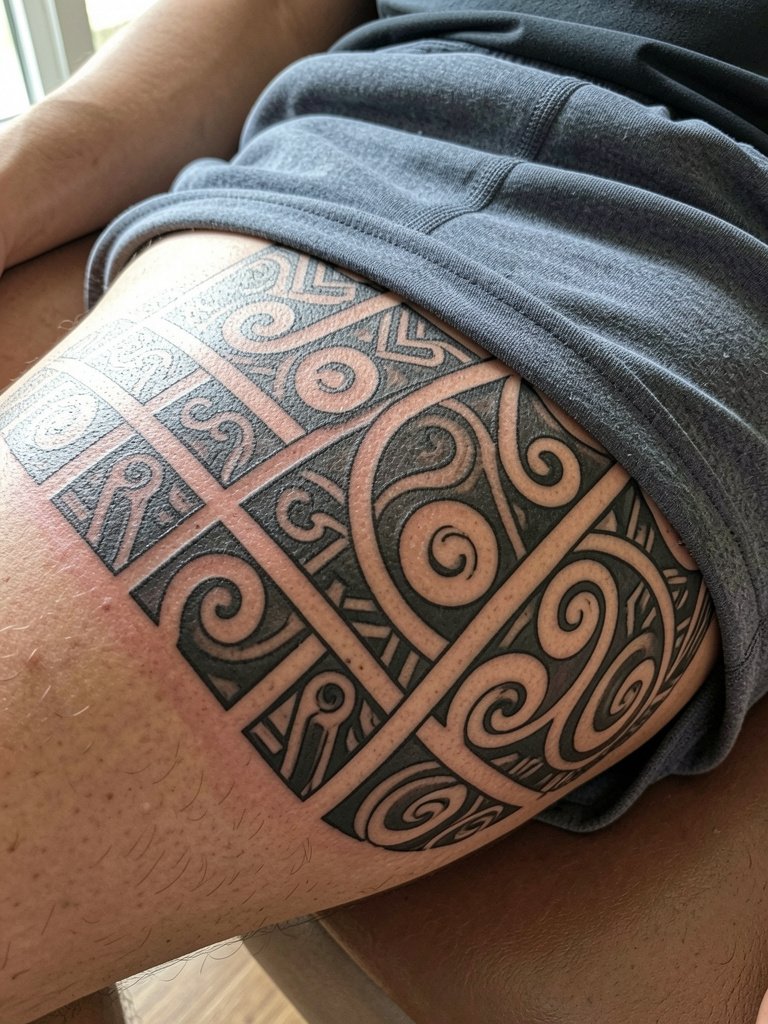
Thigh panels allow narrative sequencing and are forgiving for scale changes. A mistake is combining too many motif types without a clear reading order. Request a composition map that shows how each panel connects. For the session wear shorts with an easy hemline. Skirts and shorts expose thigh panels attractively and let koru flows read clearly.
22. Upper Back Shoulder Blade Statement Panel

Shoulder blades are ideal for asymmetrical statements that peek from shirts and dresses. Watch out for designs that cross the scapula in ways that distort with shoulder movement. Ask the artist to check the composition in moving poses. For appointment comfort wear a loose top you can remove without dragging fabric across the fresh ink. After healing, open-back tops highlight single-blade panels effectively.
23. Full Sleeve That Blends Tā Moko Motifs and Polynesian Geometry
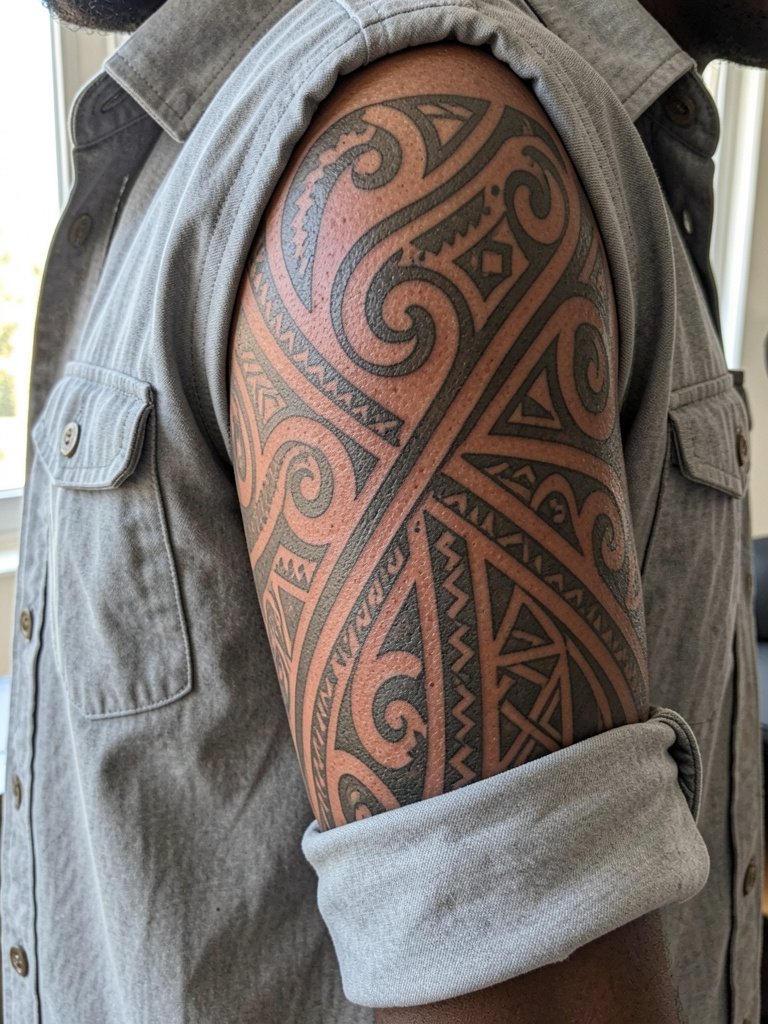
A sleeve gives the most room to tell lineage and life-journey motifs without crowding. The trap is patchwork sleeves that lack a unifying spine. Before booking, ask the artist to present a staged wrap that shows the transitions and read at arm-length distance. Sleeves age well if you favor strong anchors and clear negative space. For showing off, roll sleeves or wear sleeveless tops that let the composition breathe.
Frequently Asked Questions
Q: How can I find artists who do respectful Traditional Māori tattoo patterns without naming specific shops?
A: Search social platforms using style-specific vocabulary like tā moko, koru, and manawa, and filter by location to find portfolios that show healed work rather than only flash. Look for artists who explain the symbolism in captions and who post complete healed photos. Hashtags to try include #taMoko, #maoritattoo, and #polynesiantattoo.
Q: What should I discuss with an artist when I want a koru or manawa piece so it ages well?
A: Be specific about scale and spacing and request mockups at the exact width you want, so the artist can show how negative space and line weight hold over time. Ask for healed photos from two and five years to assess how their work settles on similar skin types. On placements like the inner wrist or fingers, plan for heavier terminals.
Q: Are there cultural concerns I need to be aware of before getting Māori motifs?
A: Yes. One view stresses that tā moko is lineage-specific and rooted in identity, and that borrowing without cultural context risks erasing meaning. Another view allows creative adaptation for non-Māori wearers when done respectfully, often recommending collaboration with knowledgeable practitioners. If in doubt, have a frank conversation about origin, symbolism, and whether the artist can show culturally appropriate examples.
Q: How long does healing take and what clothing should I wear to the session for face, shoulder, or leg work?
A: Healing varies by placement but generally initial skin sealing takes about one to two weeks and deeper settling takes months. For face appointments wear no makeup and a loose top with an easy neckline. For shoulder work pick a sleeveless or muscle tank top. For leg or thigh sessions choose loose shorts or drawstring pants you can slide up without tugging. For a show-off outfit after healing, items like open-back tops frame large back panels well.
Q: Will a machine reproduction ever look the same as traditional hand-tool uhi work?
A: Machine techniques can recreate many visual aspects of tā moko and allow finer control and easier healing, while hand-tool carving produces distinctive groove texture and a different surface feel. One camp values uhi for its ritual and textural result. The other camp values machine accessibility and precision. Talk through expectations for texture, ceremony, and healing before committing so you know which experience you want.
