
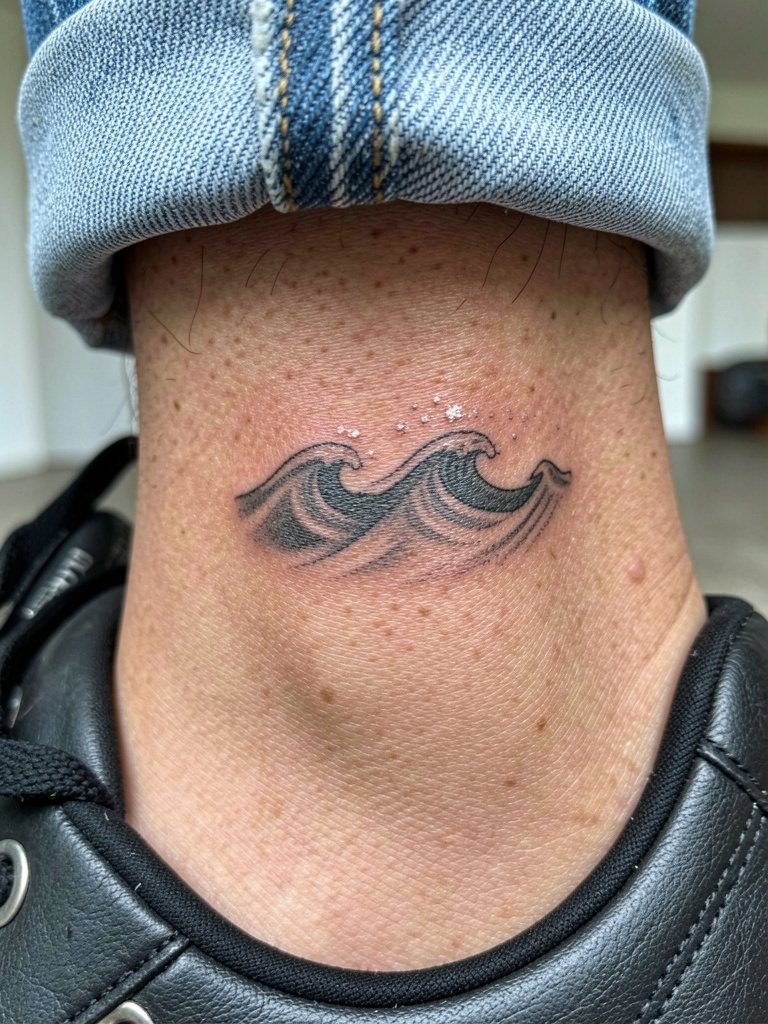
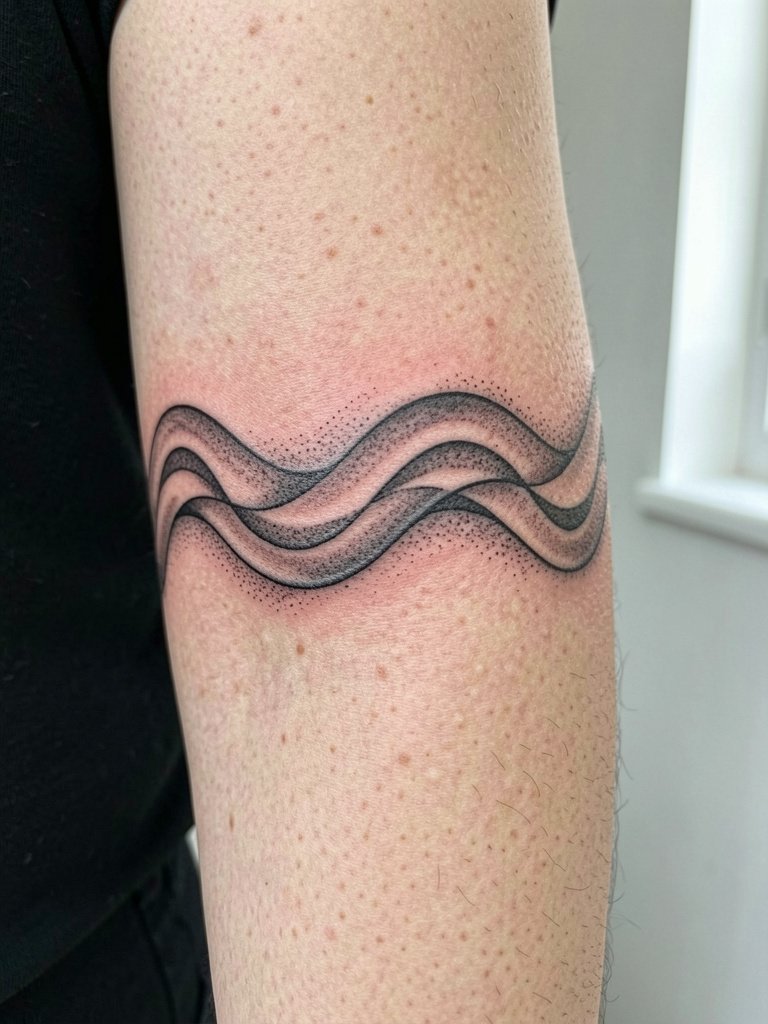
Delicate ocean motifs flood feeds lately, but what looks ephemeral online often blurs on real skin. Thin watercolor washes and single-needle curls are eye-catching on day one, and they usually lose contrast by year two. If you want a wave that still reads peaceful after multiple summers, choose composition, spacing, and placement with longevity in mind. The first idea below shows a fine-line forearm wave that keeps its calm long term.
1. Fine Line Wave Band on Inner Forearm
A narrow wave band reads elegant on the inner forearm and stays visible under rolled sleeves. I recommend this when you want something discreet but legible at arm's length. Bring two reference photos showing the exact line weight and the band width you expect, so the artist can translate it into a three-inch versus five-inch scale. The inner forearm is low on blowout risk but the skin is thin, so slightly heavier linework holds better at year two than ultra-fine single-needle. Session time is often an hour. Wearing a loose long-sleeve shirt you can roll up makes the appointment easy. Pair it with a rolled linen shirt for warm-weather outfits that let the band peek out.
2. Minimalist Crescent Wave Behind the Ear
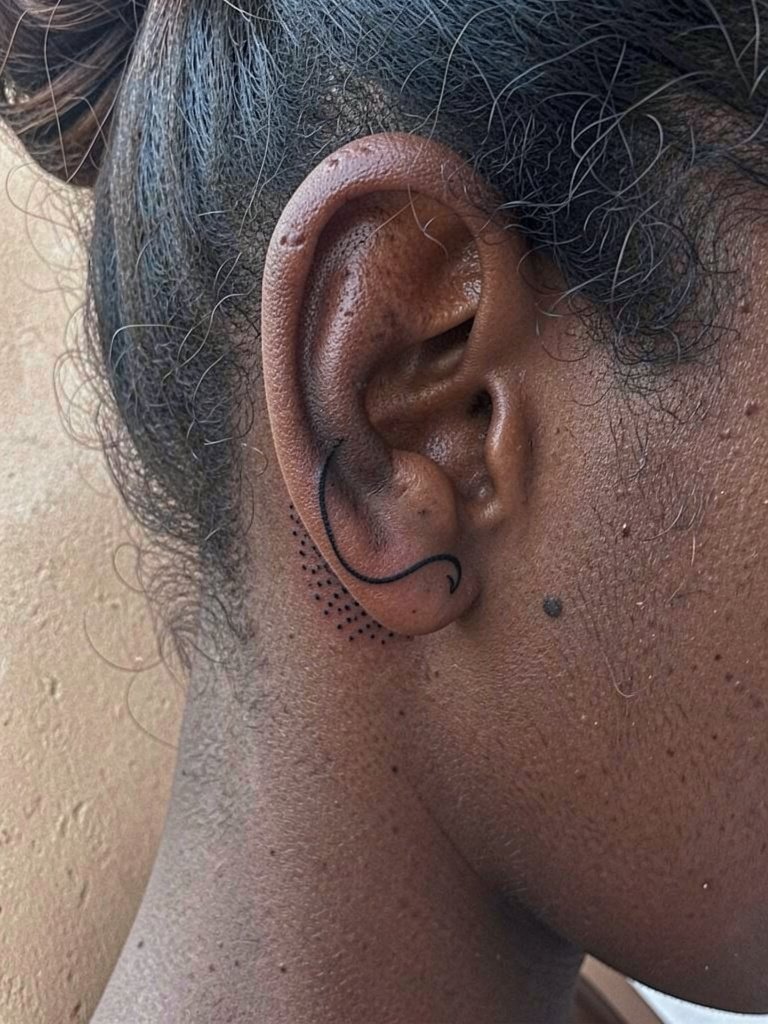
Tiny curves behind the ear make a quiet statement that peeks out with short hair or an updo. This placement is sensitive but quick, typically a 20 to 35-minute session. Expect sharper contrast at six months and slight softening by year three, especially if the piece is made too dense. A common mistake is asking for minuscule dot work that fills into a grainy patch over time. During your consult, specify needle spacing and ask to see healed photos from the same placement. For show-off styling, a pair of delicate hair clips or a high bun highlights the area.
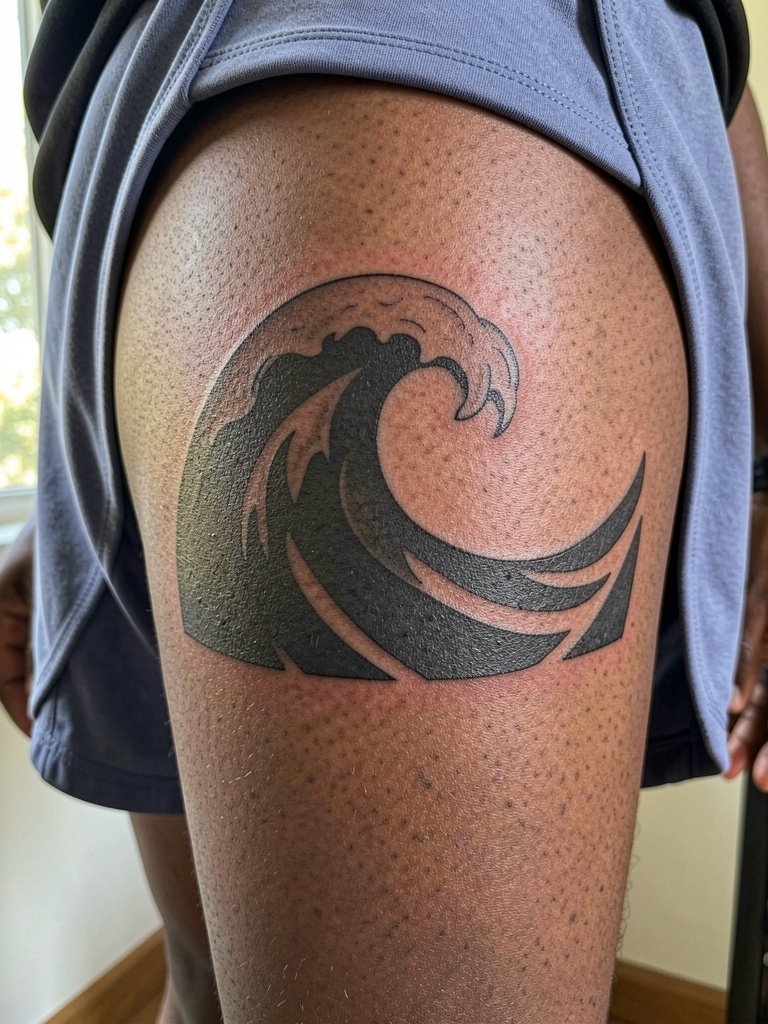
3. Blackwork Rolling Wave on Calf
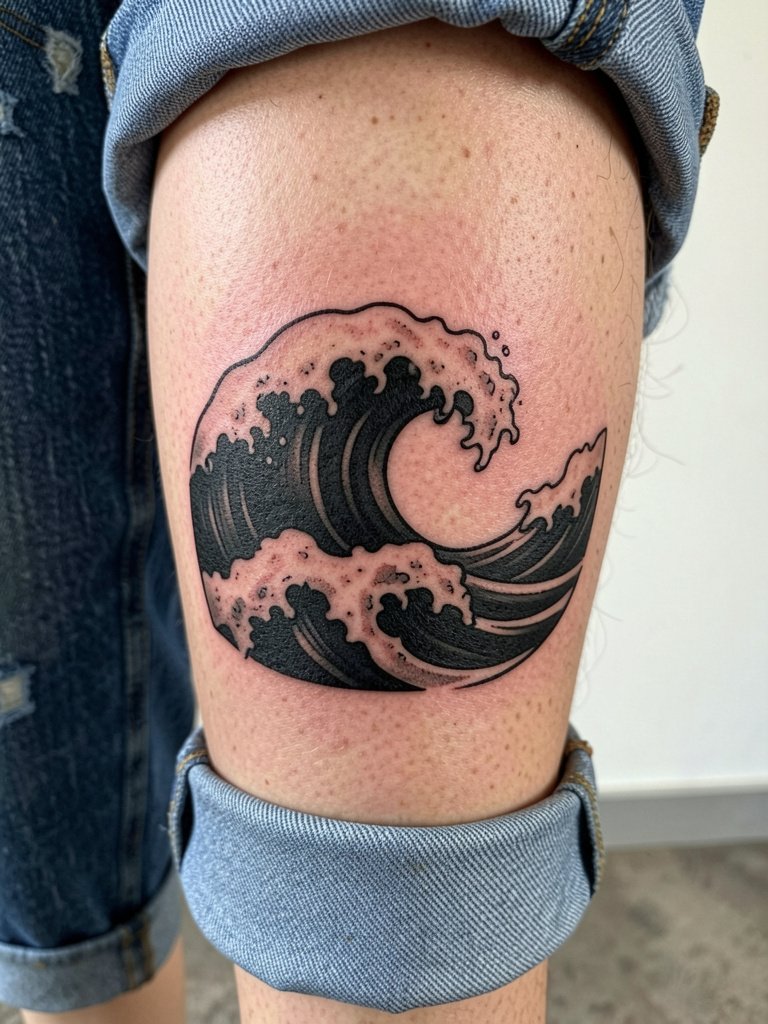
A high-contrast blackwork wave lasts because saturation resists fading and the calf has thicker skin. This is a good choice if you want a tattoo that reads from across a room. Sessions can run one to two hours depending on size and shading. Beware of requesting a sketchy blackwash that looks great fresh but becomes patchy as the pigment settles. For a clean long-term outcome, ask for solid fills and crisp negative space. The calf tolerates heavier passes, so pain is moderate. Pair this with cuffed jeans to show the crest on cooler days.
4. Tiny Wave Ring on the Finger
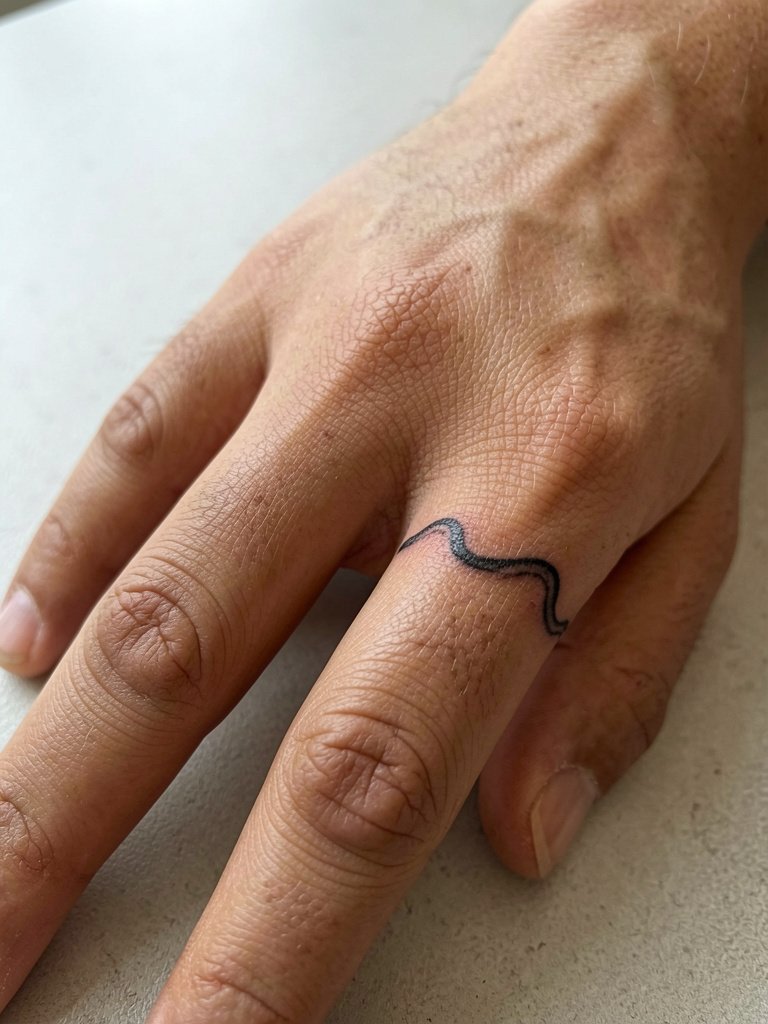
Finger tattoos weather differently because of constant washing and friction. Small wave rings are charming but require touch-ups more often. I suggest slightly thicker linework than your favorite Instagram example to avoid early fading. The usual mistake is asking for micro single-needle bands and then expecting them to look identical after a year. Session time is short, but plan for a touch-up within 6 to 12 months. For wearing, thin stacking rings or a neutral band pair well. A good accessory to show off the finger wrap is a set of slim stacking rings.
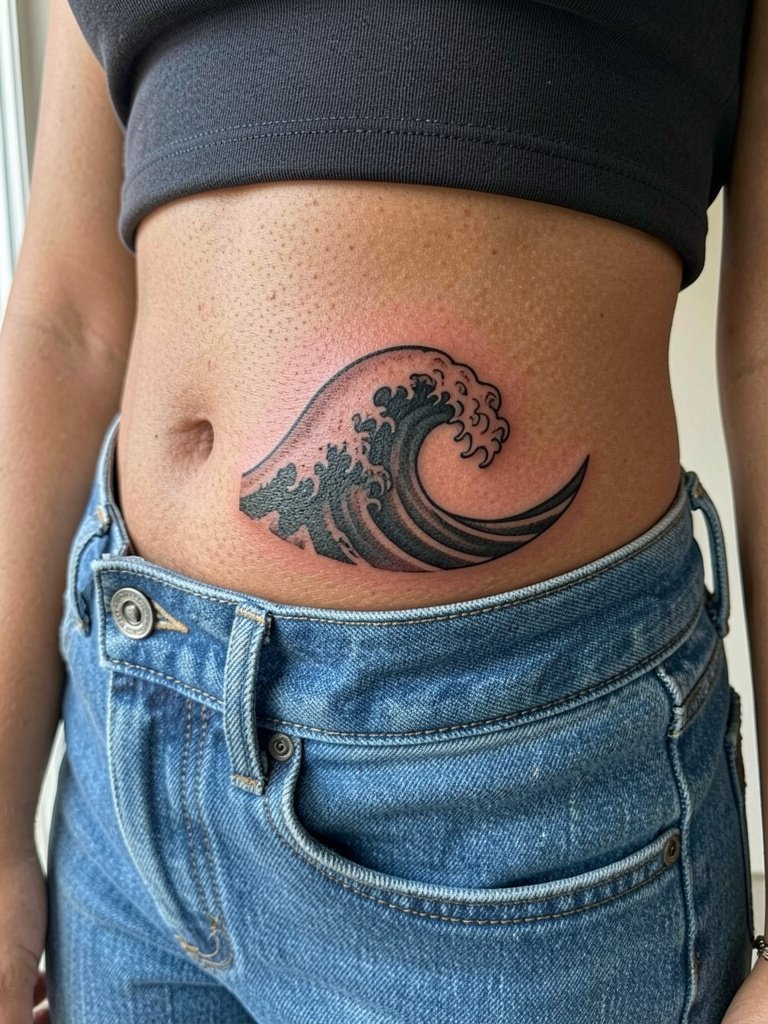
5. Watercolor Wave Splash on Ribcage
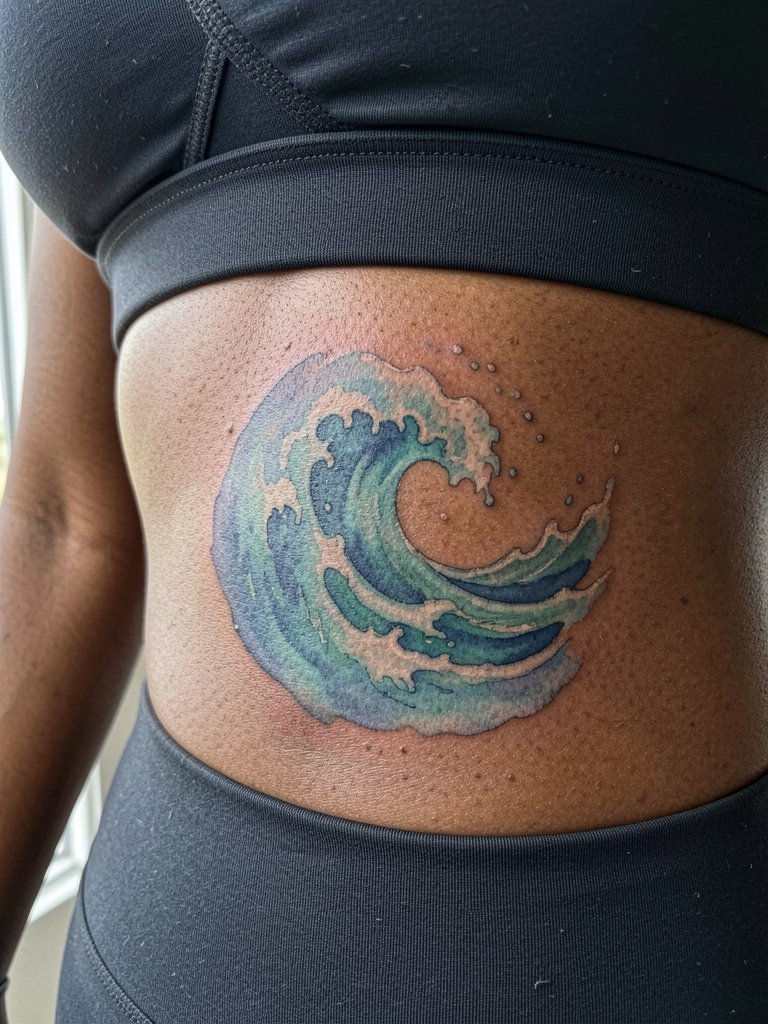
Ribcage watercolor looks atmospheric but it ages unevenly if the washes are too thin. Artists split into two camps on this placement. One camp argues that fine washes blur and lose vibrancy as the skin flexes. The other camp says careful layering and slightly increased saturation keep the color readable for years. If you prefer watercolor here, ask for slightly denser color edges and a plan for a touch-up at year one. Pain is high in this area and session length depends on coverage. For the session, wear a fitted sports bra you can keep on to maintain comfort and access.
6. Geometric Wave Band Across Collarbone
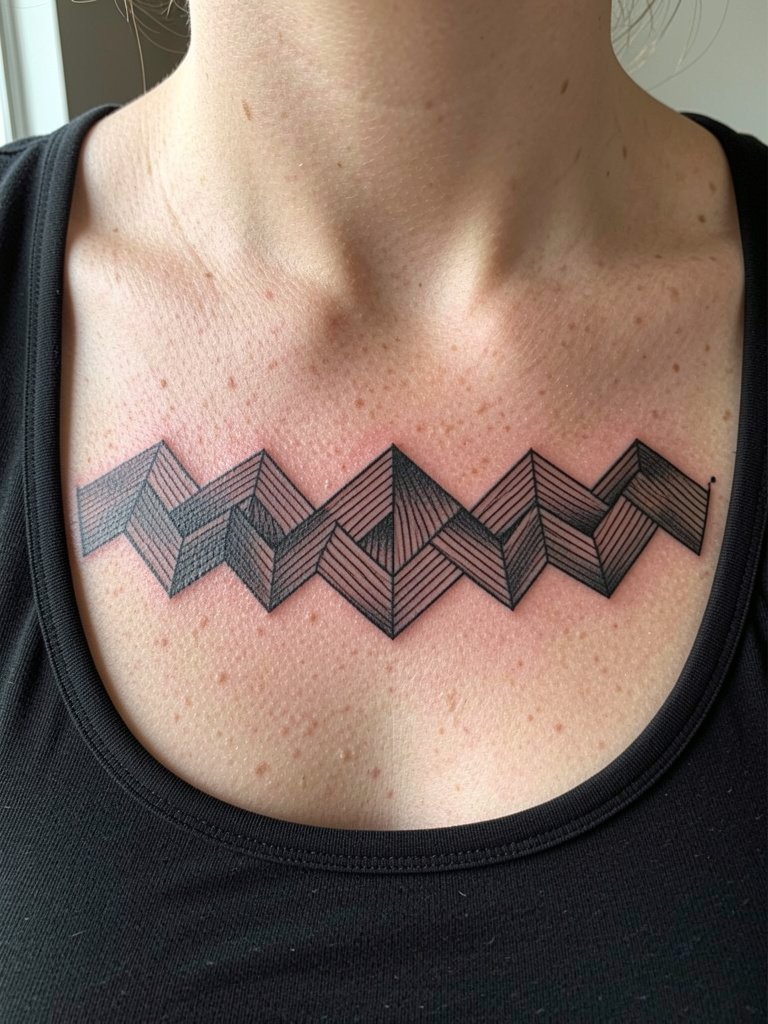
A collarbone band that uses geometry and negative space stays crisp if given room to breathe. For a successful result, ask for slightly thicker key contours and even spacing between repeats so the pattern does not merge over time. The collarbone is bony and the session can feel sharp in short bursts, usually 45 to 90 minutes for this scale. A mistake is compressing too many repeats into a narrow band, which will age into a muddle. This style pairs well with open-neck tops. Try an open-neck tank to show the symmetry.
Pre-Session Essentials
The small wrist, finger, and rib pieces above have particular prep needs, and a few simple items make the chair time and first week easier.
-
Stencil transfer paper kit. Lets you preview line placement on skin before the needle hits, which helps when you want precise bands and geometric spacing from ideas above.
-
Topical numbing cream. Applied per instructions about 30 to 45 minutes before the appointment eases rib and finger sensitivity without changing the look of fresh lines.
-
Thin protective film roll. Useful for wrist and finger pieces to reduce friction from washing and typing during the first few days.
-
Fragrance-free gentle body wash. Cleans the area without irritating pigments while the work starts to heal.
-
Aquaphor healing ointment. A familiar option for the first 48 hours to keep linework moist without over-saturating fine-channeled areas.
7. Micro-Realism Wave on the Ankle
An ankle micro-realism piece looks refined but faces constant rubbing from socks and shoes. If you want detail at this scale, accept that touch-ups are part of the plan. Tell the artist you want the shading to be flatter and slightly more contrasty than the tiny reference photo so it reads from standing distance. Expect 30 to 60 minutes. The typical error is insisting on hairline stipple that disappears. For outfits, low-cut ankle boots or cuffed jeans put the little crest on display. A pair of ankle boots is an easy wardrobe match.
8. Continuous Wave Sleeve Accent on Outer Forearm
An outer forearm accent works well as a sleeve starter because the area tolerates varied line weights. When you want a wave to integrate into future work, specify transition points where the artist can add color or elements later. Sessions vary by length depending on coverage. A frequent mistake is asking for single-needle all the way through a sleeve proposal. Instead, pick a mix of linework and stipple shading to preserve readability at two to five years. Wear a short-sleeve tee for the session. For showing off, a rolled-sleeve shirt like a short-sleeve linen tee frames the flow.
9. Neo-Traditional Wave with Floral Accents on Thigh
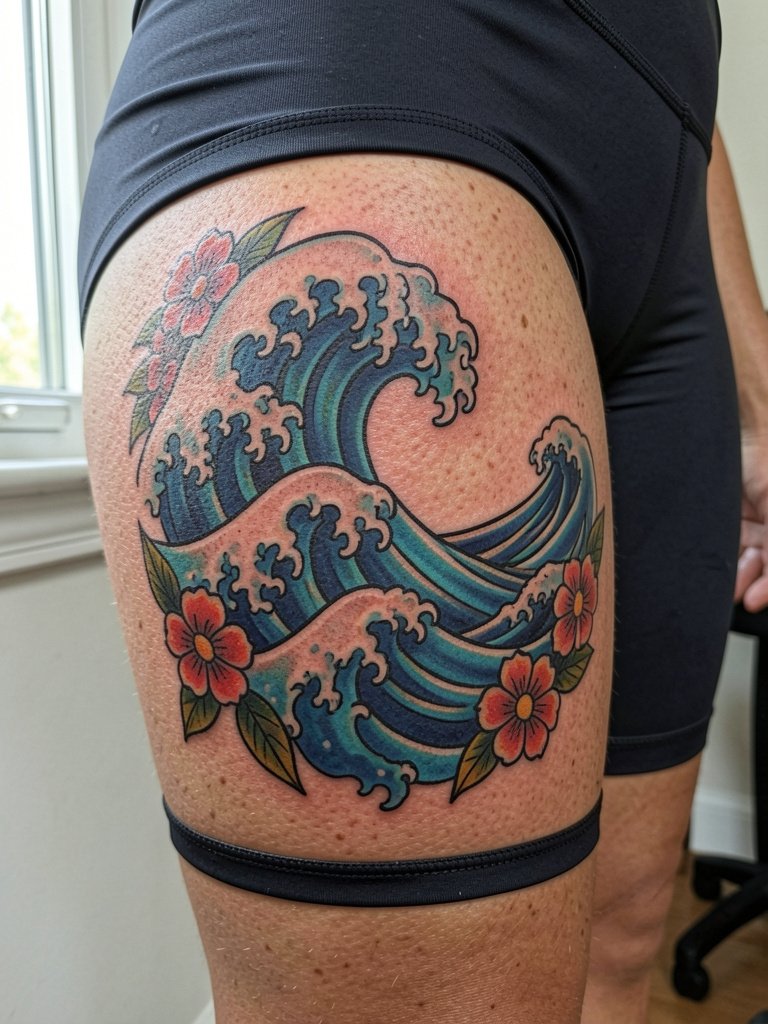
The upper thigh gives space for bold neo-traditional waves framed by flowers and leaves. This area heals well and fares better with saturated color than extremities. Discuss color choices and how they read against your skin tone, and plan for a touch-up at year one for any delicate color transitions. A mistake is asking for tiny floral detail that will lose edge when scaled up. Session time here is comfortable and typically longer than an ankle or wrist piece. For showing off, a flowy midi skirt with a side slit gives the thigh artwork movement.
10. Single-Line Wave across the Sternum
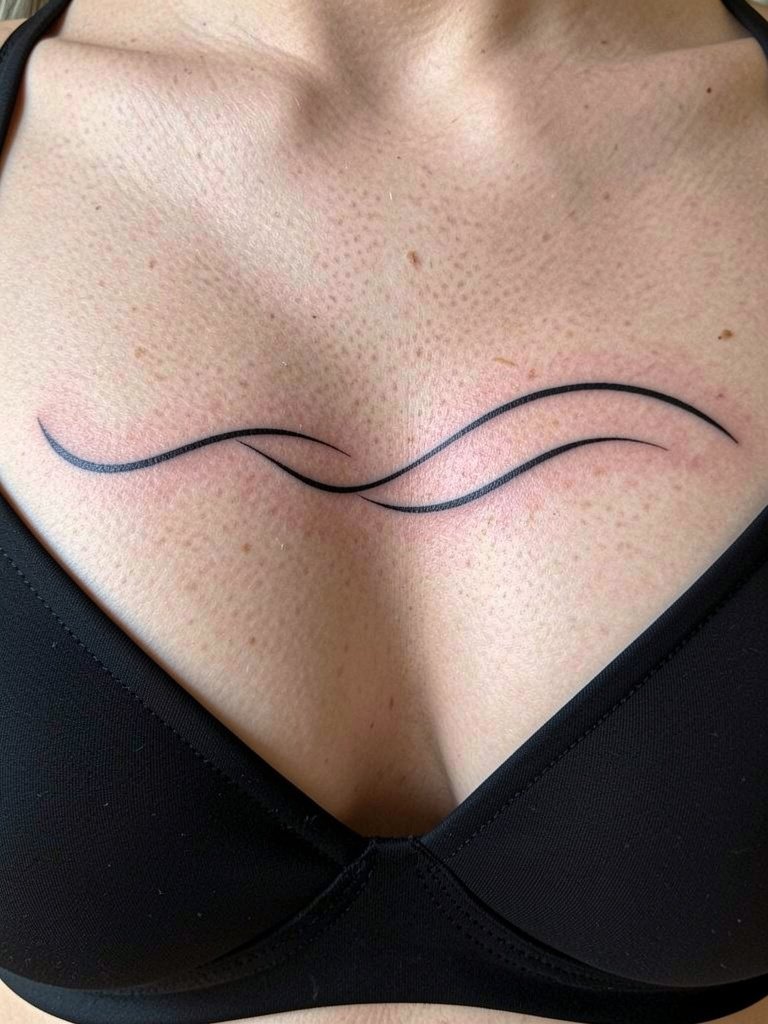
Sternum pieces require deliberate spacing to avoid blurring near the breast crease. Artists divide into camps on single-line sternum work. One camp cautions that the skin movement and curvature cause thin single-line work to blur within two to three years. The other camp says careful depth control and slightly broader line spacing prevent that. If you want a single-line wave here, ask for line spacing that accounts for the contour and a possible small touch-up window. Pain is higher due to the bone proximity and session time varies. For the session, a fitted bandeau keeps the area accessible without disrobing.
11. Dot-Work Wave Mandala on Back Shoulder
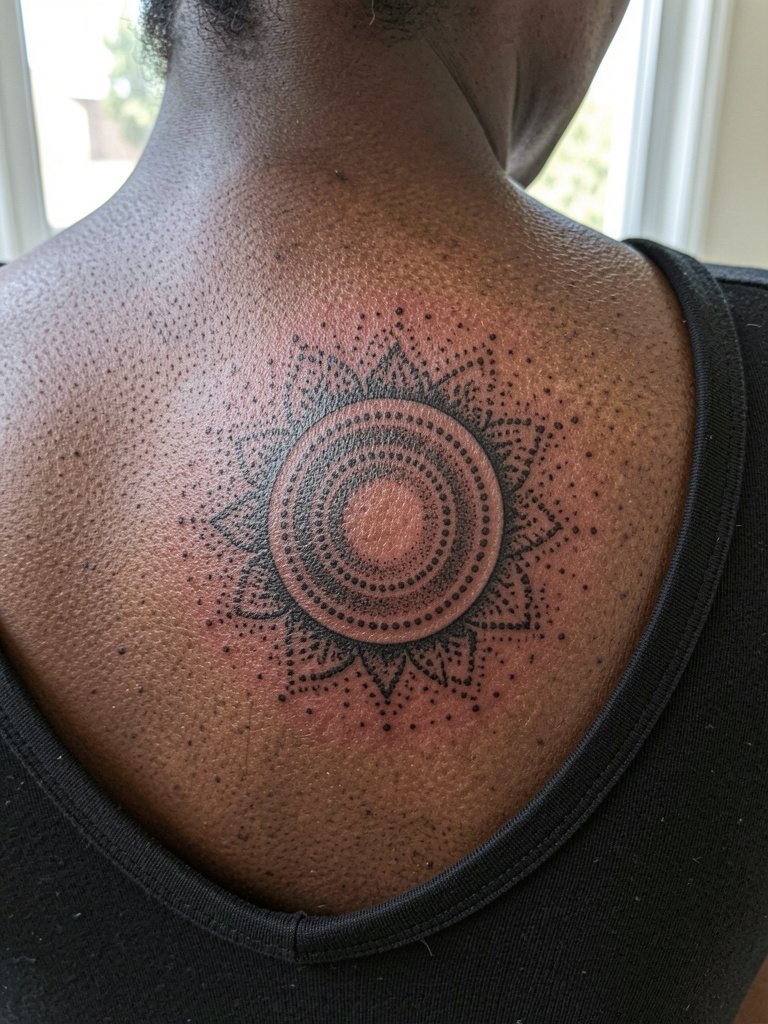
Dot-work mandala waves age gracefully because the technique blends with natural skin texture. When recommending this, I suggest mid-sized dots that keep form at two and five years rather than micro-dot fills that can blur. The back shoulder is moderate in pain and sessions often run one to two hours. A mistake is packing too many concentric rings into a small diameter, which causes loss of definition as the skin shifts. For clothing, off-shoulder summer tops set off the circular motif. Try pairing it with a wide-neck blouse.
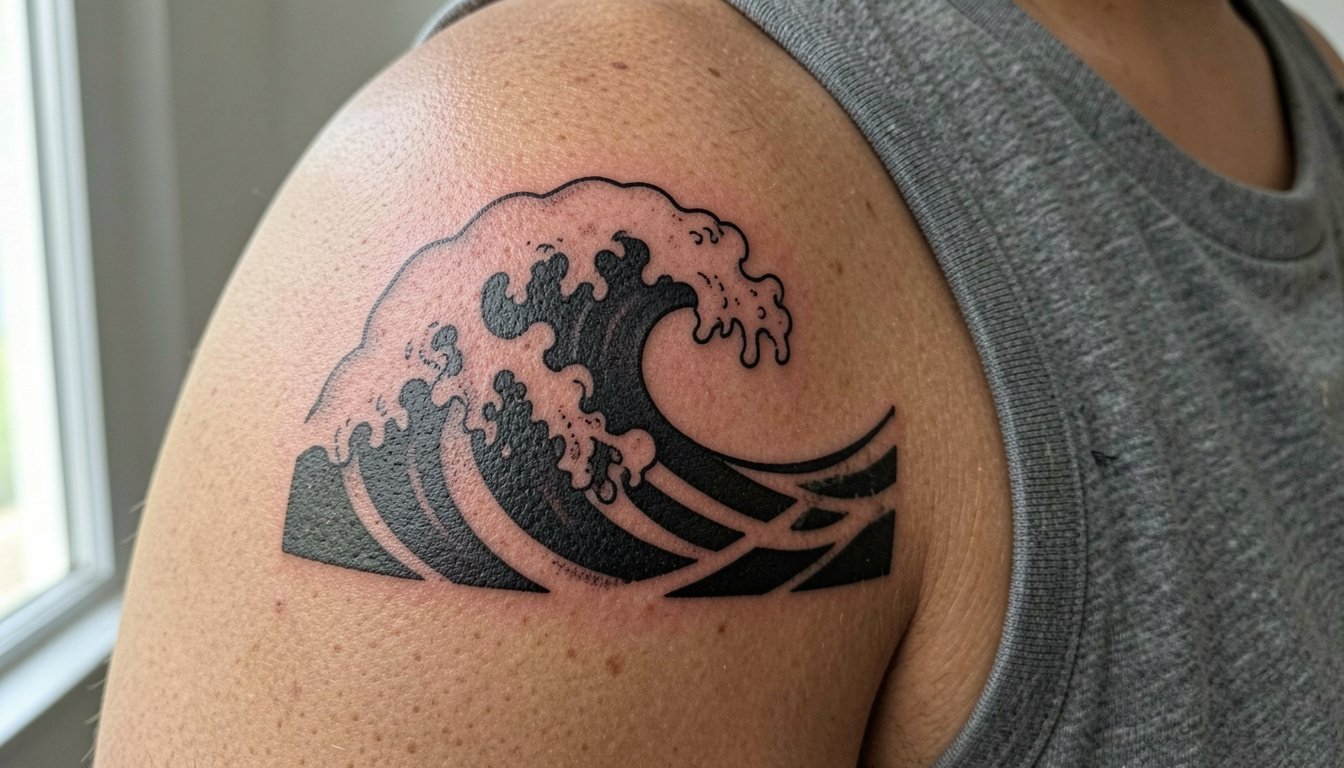
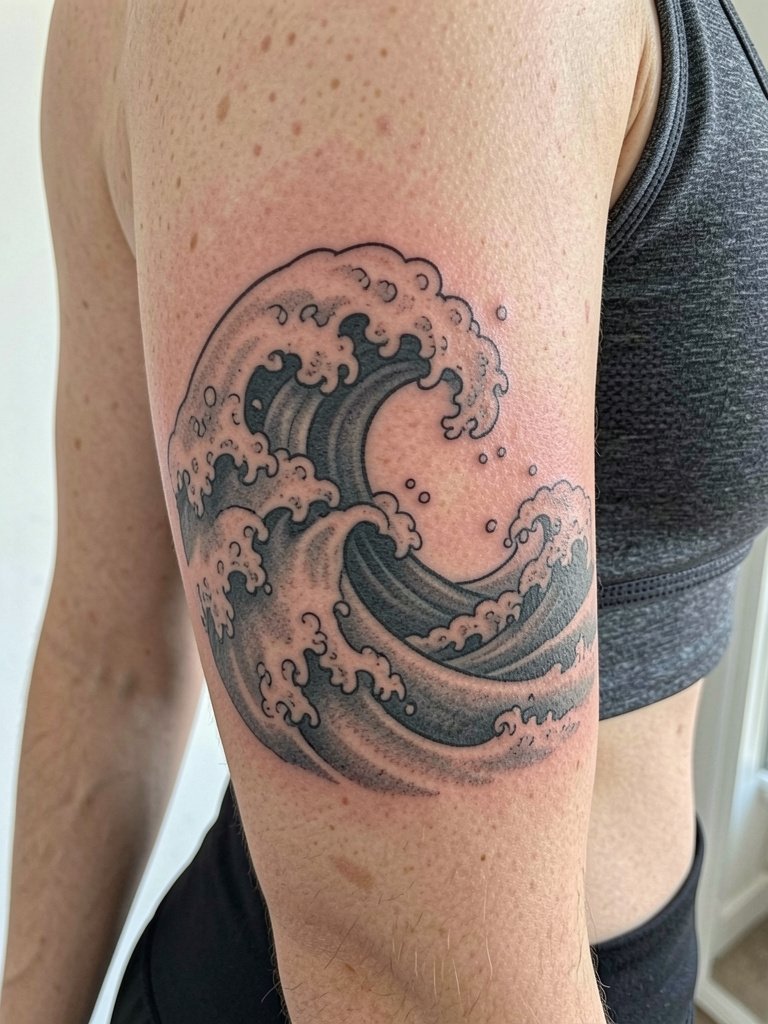
12. Wave Crest in Color on the Upper Arm
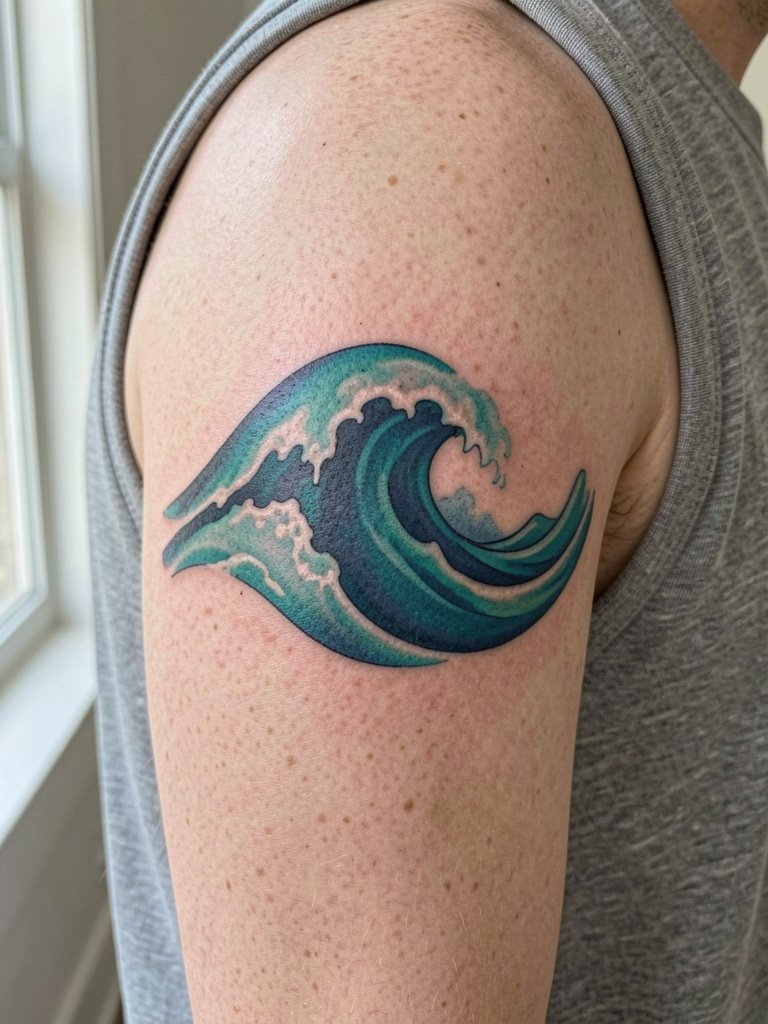
Colorful upper-arm waves stay vivid when saturation and contrast are prioritized. One common error is asking for soft blended edges without solid anchor lines, which makes the piece look washed out later. For consultation, bring color swatches and ask the artist to show healed color photos on similar skin tones. Two camps debate fine-line color here. One camp argues that delicate color washes fade into indistinct patches over time. The other camp says denser layering and crisp bordering can preserve the composition. Sessions for a single crest are moderate in length. Wear a sleeveless tee for easy access and to preview how the colors sit against your skin.
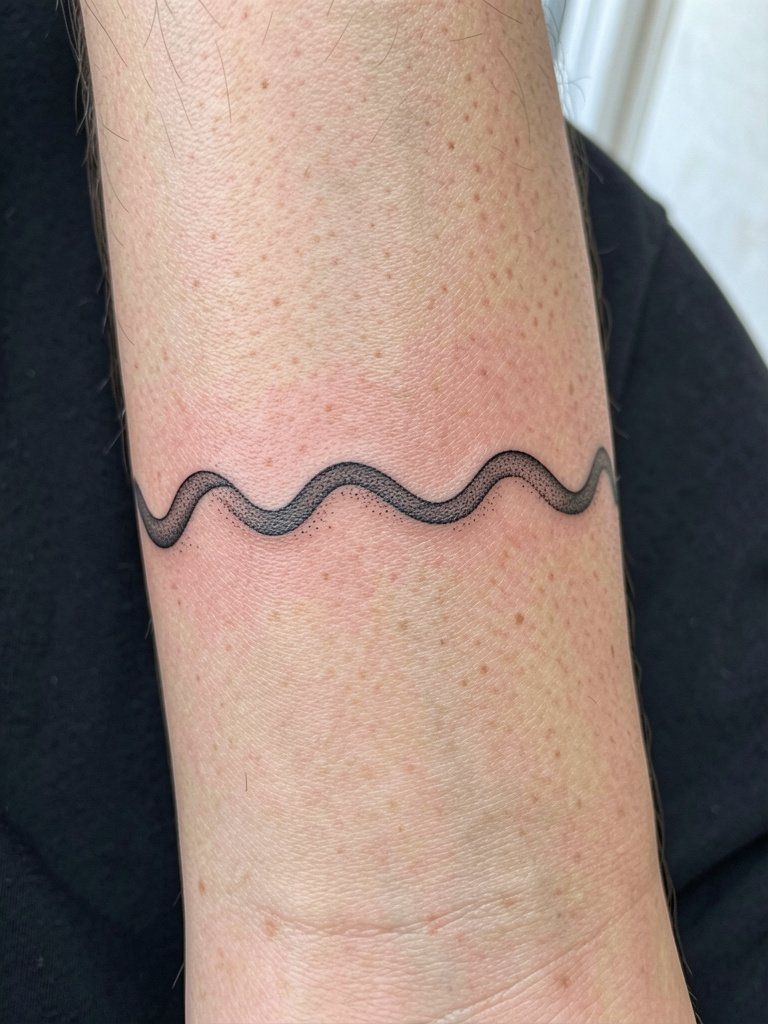
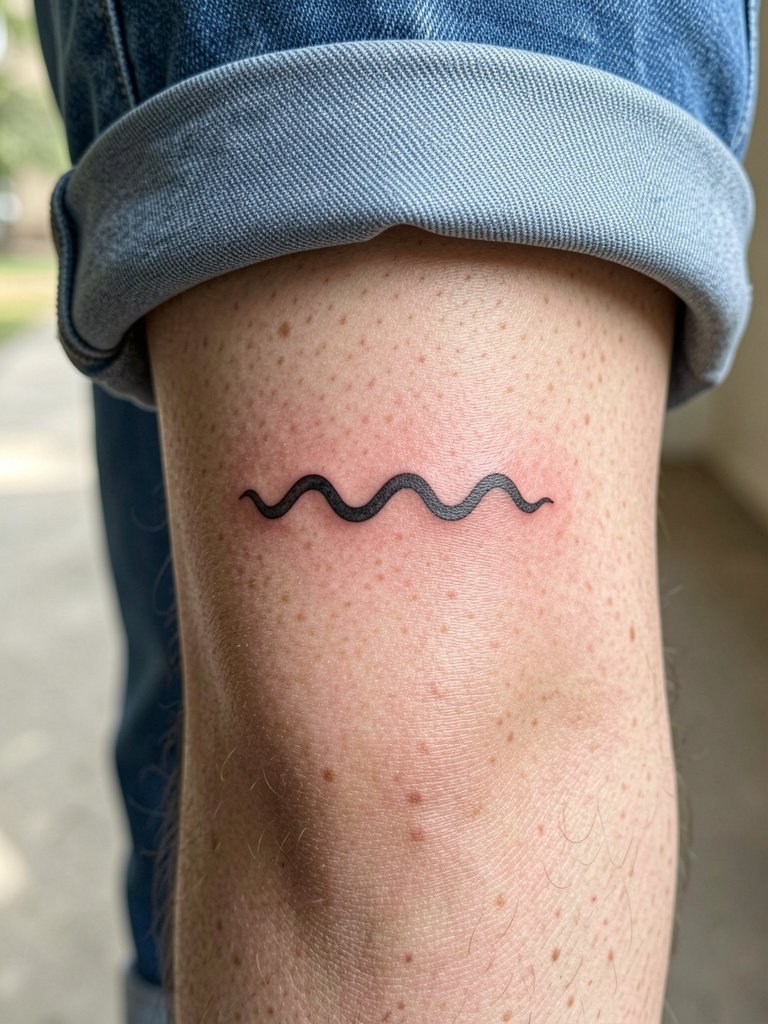
13. Linework Wave Bracelet on Wrist
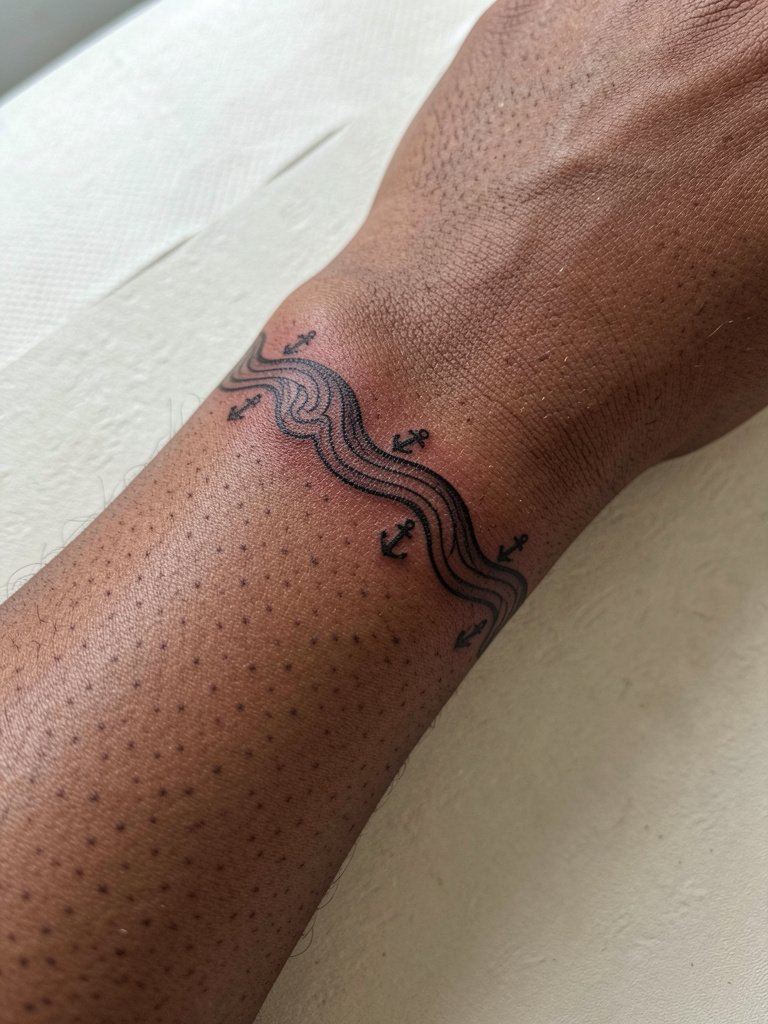
Wrist bands are visible daily and need slightly bolder strokes than micro-examples. For a bracelet band that reads at six months and beyond, ask for anchor points with slightly heavier line weight. The wrist is high use and will need touch-ups more than the forearm. Session times are typically under an hour. The most common mistake is choosing hairline bands that vanish under frequent handwashing. For a show-off look, cuffed long-sleeves and rolled bracelets help present the band. Consider pairing it with a beaded wrist wrap.
14. Abstract Wave Negative Space on Lower Back

Negative-space waves on the lower back use black surrounds to keep form visible against body contours. This region heals consistently and tolerates bold contrast. A mistake is leaving too little negative space which then blurs into a dark block. Plan the artwork with distinct borders and spacing to maintain the motif at year three. Sessions are comfortable and usually take under two hours for medium pieces. For outfits, low-rise jeans plus a cropped top frames the lower-back artwork. A cropped tank shows the placement naturally.
15. Small Wave Tattoo on the Side of the Neck
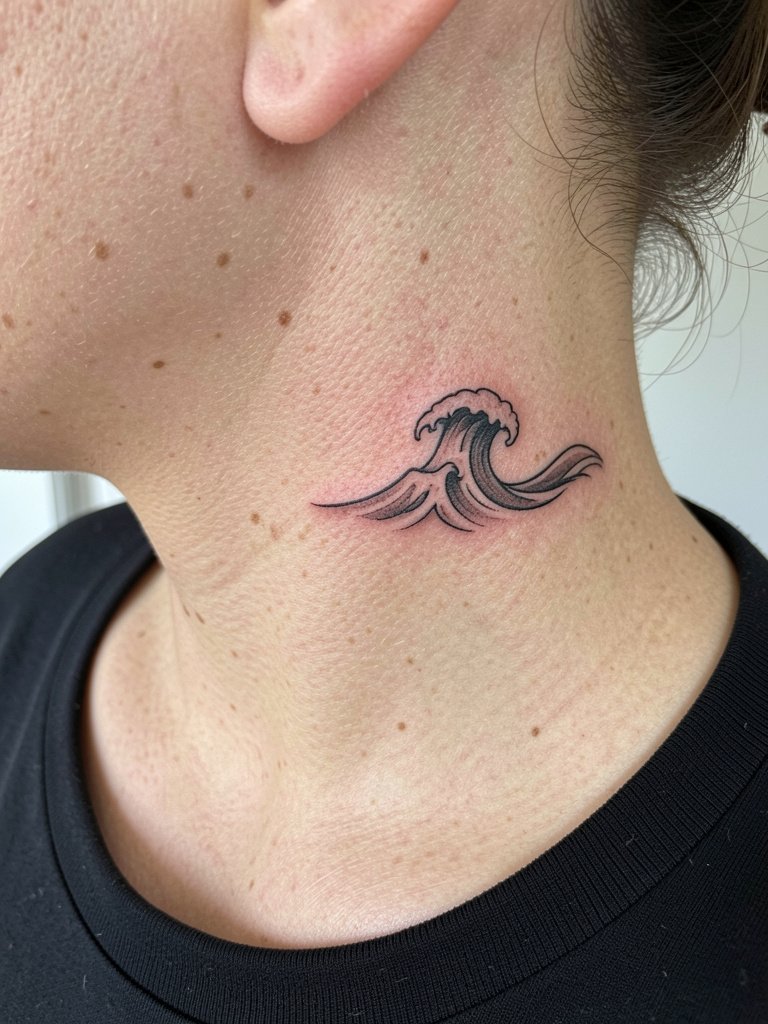
Neck tattoos become part of how people see you every day. If you want a small wave here, request a compact design with slightly heavier outline to reduce the chance of feathering. The neck sits higher on pain scale and sessions are brief but intense. A frequent error is picking an ultra-fine motif that loses edge by year two. For visibility, pair it with wide-neck tops and necklaces that leave the lateral neck visible. A simple pendant necklace complements the placement without covering the piece.
16. Tiny Wave Dot on the Back of the Hand
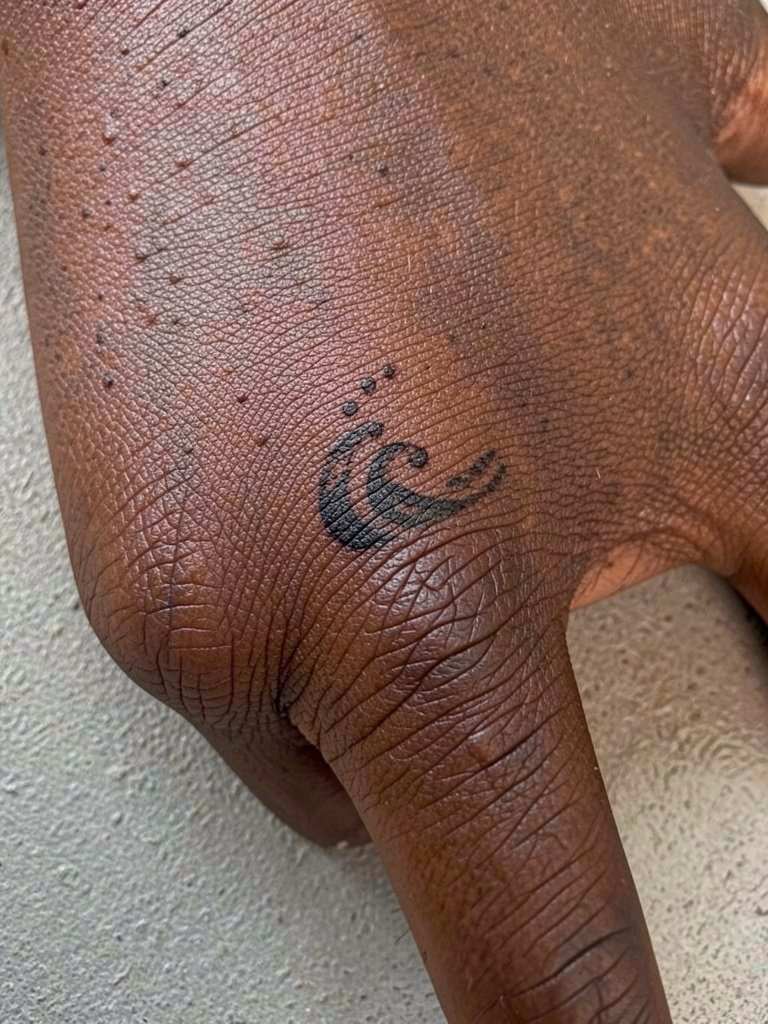
Hand tattoos face heavy wear and fade faster than most spots. A small dot-work wave is possible but plan on touch-ups and occasional refreshes. When discussing the piece, specify that the dot density should be moderate so it does not fill in under daily abrasion. Sessions are quick but may sting. A common mistake is assuming a hand tattoo will hold as well as a forearm piece. If you want to show it off, cropped sleeves and rings help, but expect upkeep. Pair with a minimal leather bracelet to balance the hand area.
17. Stylized Wave with Foam Pattern on Rib Side
The side-rib area offers sweep for stylized foam patterns, but skin movement matters. Ask the artist to map the foam so repeats sit on stable skin planes and avoid creases. Expect high pain and sessions that may need breaks. Many people request dense dot foam that fades into smudge as the area flexes. Pick slightly larger dots and subtle shading that age into texture rather than blur. For the session, a fitted athletic top keeps the area accessible. No accessory is needed for this intimate placement.
18. Tiny Wave Tattoo on the Wrist Inner Side
Inner wrist designs get a lot of sun and washing. A classic tiny curve stays legible if you allow slightly bolder anchors and avoid micro-detail. When you sit with the artist, ask them to show how the line reads at two different widths so you can choose durability over ultra-fineness. Session is quick and pain is moderate. The usual regret is starting with single-needle micro work that demands early touch-ups. For showing off, bracelets and rolled sleeves help. Try a thin cuff bracelet to frame the curve.
19. Cresting Wave with Horizon Line on the Upper Back
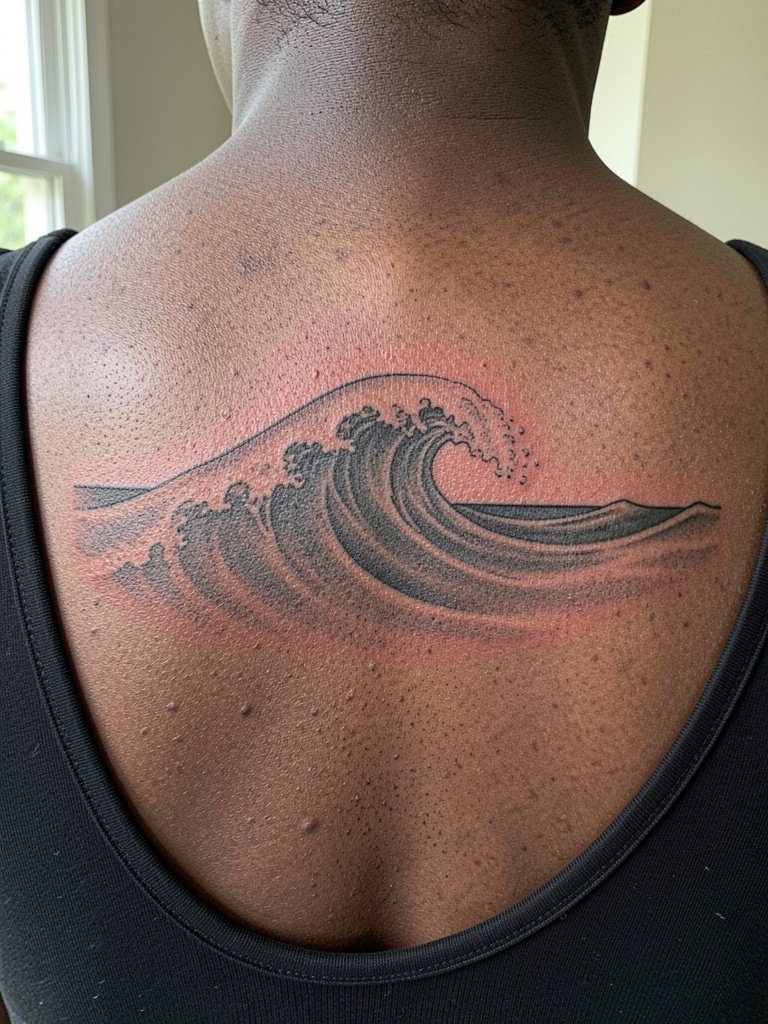
Upper back compositions let you play with scale and negative space. A horizon line anchors the wave and helps it read as a scene even from a distance. Talk about the horizon placement relative to your shoulder blades so the design remains centered when you move. A common mistake is letting the scene sit too low where waist movement distorts it. Sessions can run longer for larger pieces. For show-off outfits, wide-neck tops and back-baring dresses present the scene well. A wide-back dress highlights the piece.
20. Thin Wave Script Along the Rib Edge
Combining script and a wave along the rib edge reads intimate and poetic. Keep the lettering slightly bolder than your favorite calligraphy reference so it survives the stretch of the area. The rib is a painful spot and sessions may be split. Avoid long micro-lettering because letters compress and blur. Bring the exact text and font sample so the artist can scale it for longevity. A fitted cropped tee keeps the area accessible during the session. No accessory is required for this private placement.
21. Single Bold Wave on the Side Hip
Hip placements allow for bold single motifs that peek out from swimwear and low-rise garments. The lateral hip handles saturated black well and ages steadily if placed on the firmer lateral bone. One error is putting the design too close to the waistband where friction causes fading. Discuss exact placement with the artist while wearing the clothing you plan to show with. Sessions are comfortable and usually short. Show it off with low-rise jeans or a cropped top. A pair of low-rise jeans reveals the placement without adjustment.
22. Wave Silhouette in Negative Space on the Thigh Outer Side
Negative-space silhouettes on the thigh read like bold shapes from a distance but preserve skin within the form. This approach ages well because contrast is the main tool rather than micro detail. A mistake is over-complicating the negative area with tiny stipples that will vanish. Sessions may take one to two hours. For display, skirts or shorts with a side slit present the piece. A modest pair of athletic shorts keeps the work visible but comfortable.
23. Small Continuous Wave Behind the Knee
Behind-the-knee tattoos are playful but sit on skin that creases a lot. Choose a simple continuous wave with clear spacing to avoid lines merging as the joint flexes. Sessions can sting and may need small breaks because of the awkward position. A common mistake is asking for dense shading in this crease area which will break up with motion. For the appointment, wear pants you can roll or shorts. For outfits, cropped cuffs and skirts show the area. Cuffed shorts or skirts work well in summer to reveal the curvature.
Frequently Asked Questions
Q: How do ocean wave tattoos age on different body parts?
A: They age based on skin movement and exposure. Areas with frequent friction and washing, like hands and fingers, fade faster and need touch-ups. Thicker, less mobile skin such as the upper arm, calf, and thigh retains saturation longer and often only needs a touch-up at year one.
Q: Can fine-line wave work hold up on ribs and sternum?
A: Artists split into two camps on fine-line in these zones. One camp says thin lines blur quickly because of skin stretch and movement. The other camp says a slightly heavier line weight and careful depth result in stable healed linework.
Q: Where can I find healed ocean-wave portfolios and location-based examples?
A: Search platform tags and portfolio keywords like #OceanWaveTattoo, #HealedTattooShots, and "wave tattoo healed" with location filters on Instagram and TikTok. Use portfolio sites and subreddit threads to compare healed work across skin tones and placements. Look for galleries that show one-year and three-year healed photos to judge longevity.
Q: What should I wear to my session for a thigh, rib, or shoulder wave piece?
A: Choose clothing that gives the artist easy access while keeping you comfortable. For a thigh or rib session, fitted shorts or a sports bra keeps the area exposed without disrobing. For the shoulder or upper arm, a loose tank or short-sleeve tee works well. Bring layered clothes for aftercare comfort.
Q: How often will small wave bracelets or finger rings need touch-ups?
A: Small extremity pieces commonly need touch-ups within 6 to 18 months, depending on daily wear and sun exposure. Expect a thinner, faster refresh schedule than larger pieces. If you want fewer touch-ups, request slightly bolder anchors at the outset and plan for annual check-ins.
