

Someone I know spent months bookmarking butterfly pictures before deciding the real problem was picking a style that would still look good two years from now. I have seen that happen in five shops across Brooklyn and at a few conventions. These 15 ideas balance immediate visual impact with longevity, placement-specific pain notes, and what to say at your consultation to get the healed look you want.
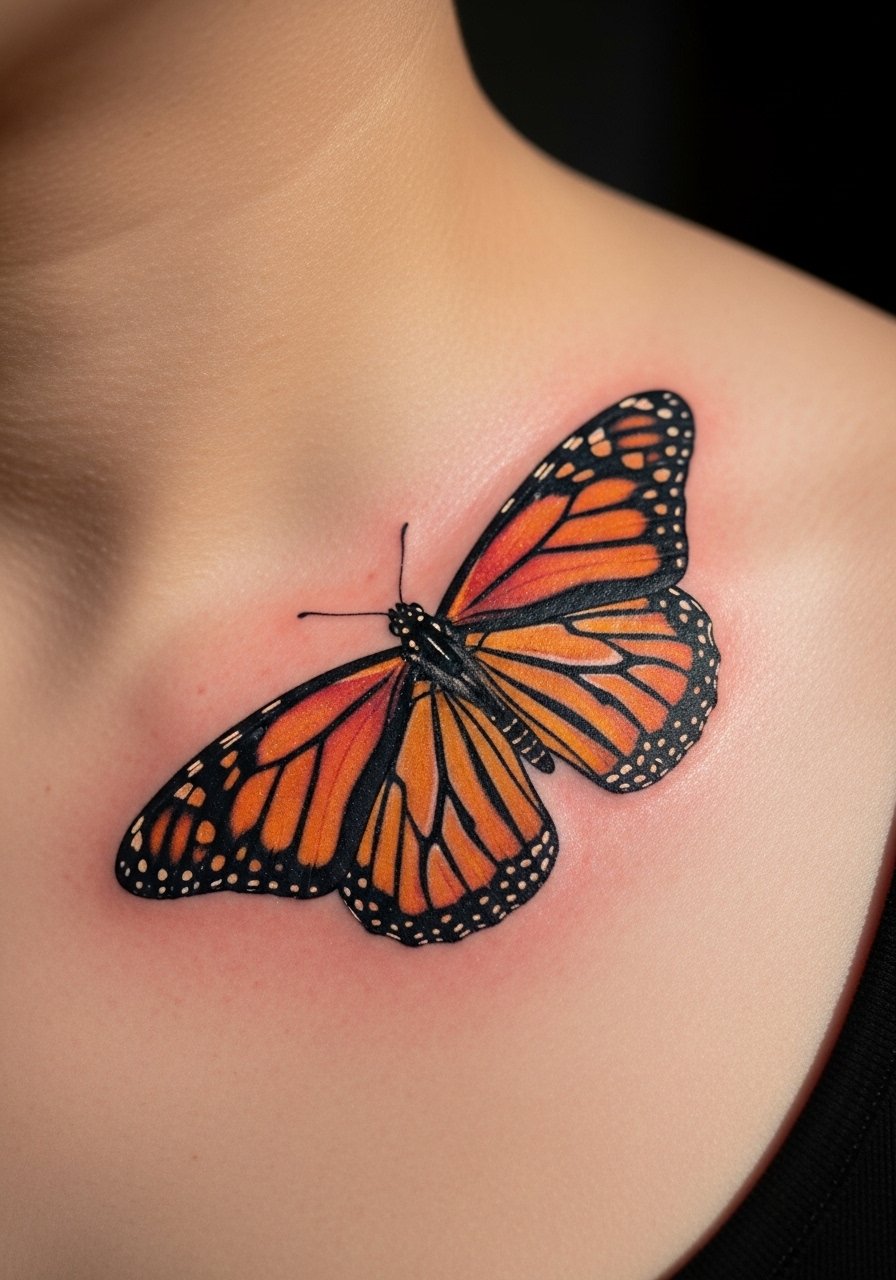
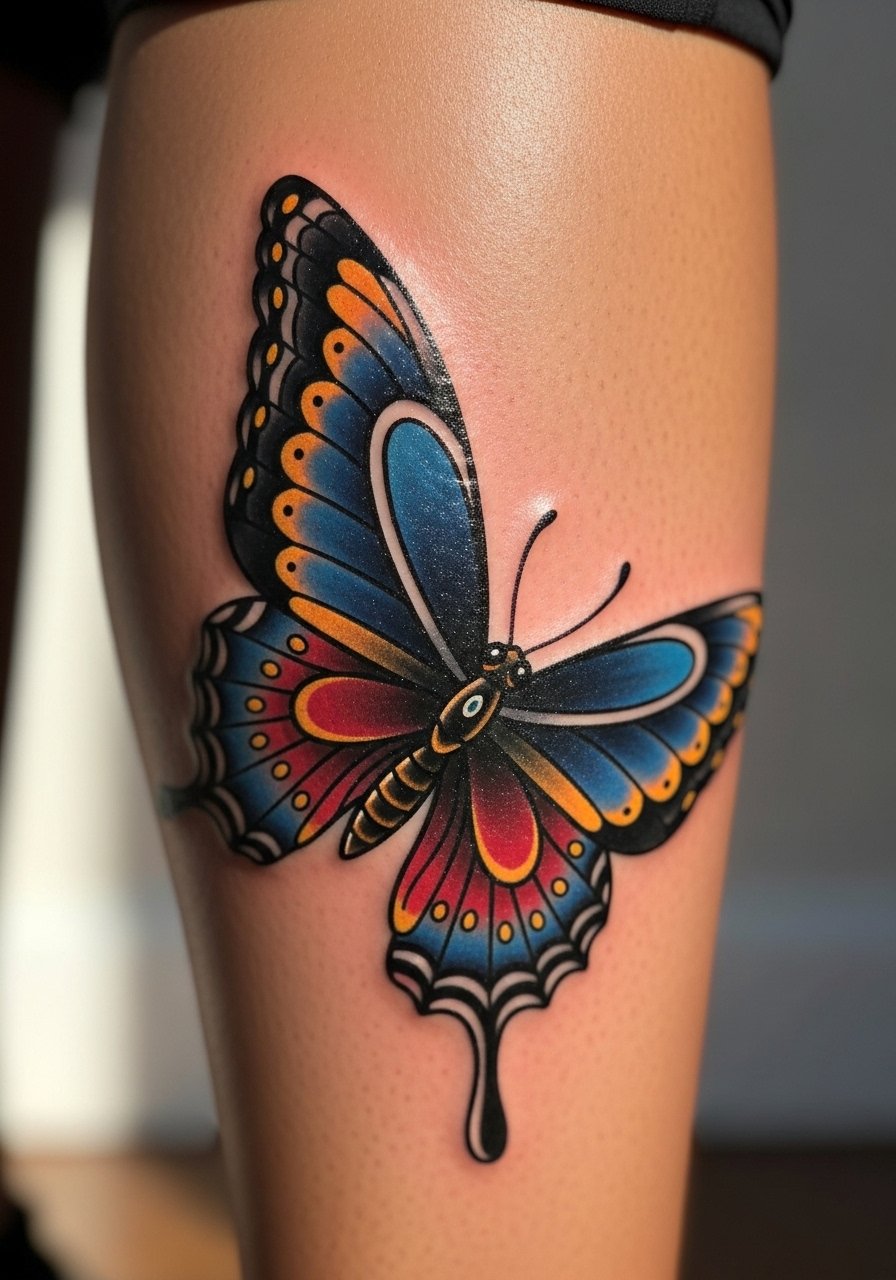
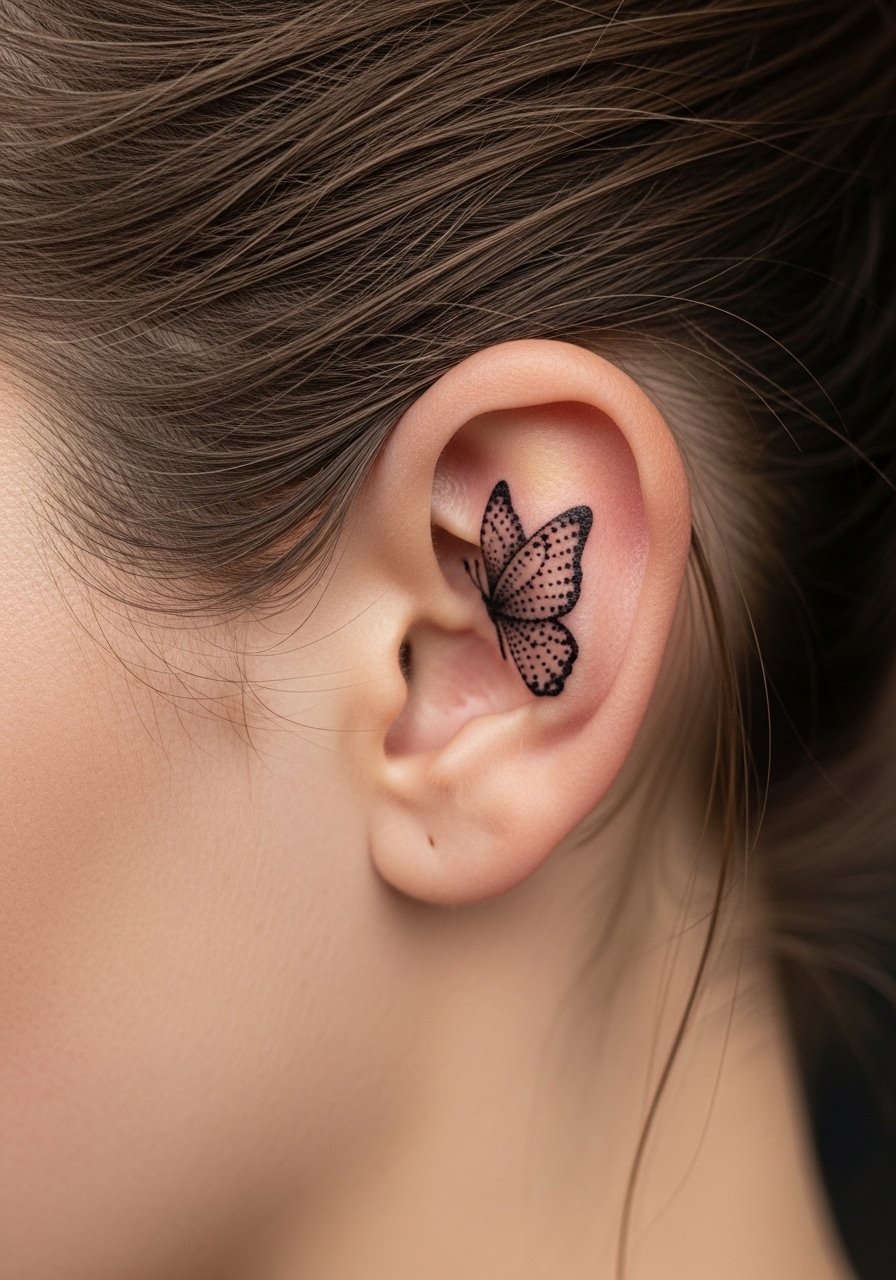
1. Realistic Monarch on the Collarbone
Someone I know first saw this one on a friend and booked the next week. The collarbone shows off micro-realism because the bone gives a flat canvas that helps tiny wing veins hold. Expect moderate pain, a one to two hour session for a 3 to 5 cm piece, and a follow-up touch-up around year two if you spend a lot of sun time. Tell your artist you want slightly increased saturation in the vein work and a thin tapered outline so the wing details do not blur into a soft gray patch later. Common mistake: asking for ultra-fine veins that sit too shallow and fade into fuzz. For healing, avoid tight straps rubbing the area for two weeks.
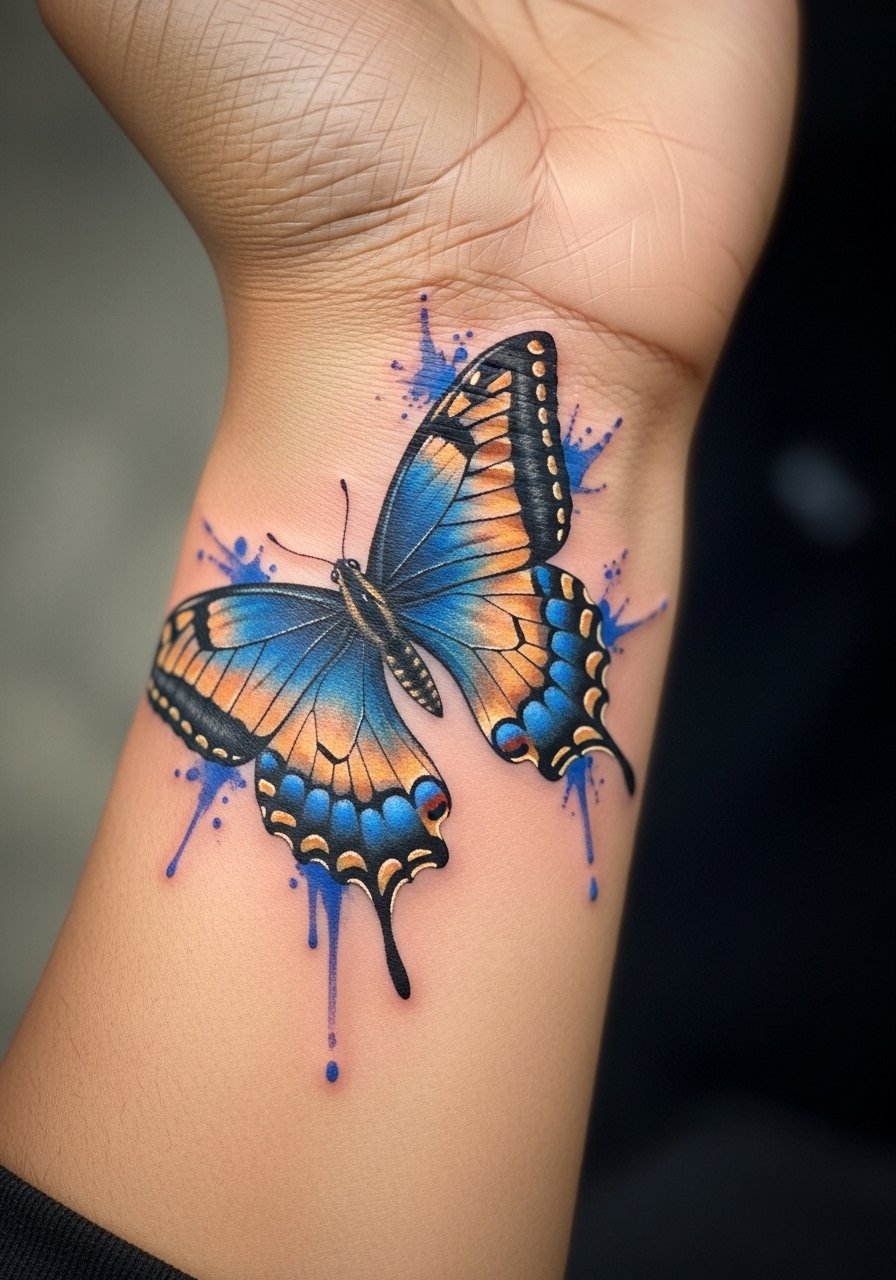
2. Watercolor Swallowtail on the Inner Wrist
Most watercolor tattoos from five years ago look washed out, but a wrist watercolor done with strategic line anchors holds color longer. The wrist is a high-movement area, so choose a swallowtail design with gentle black anchors at the wing bases to keep pigment from migrating. Single session, about an hour. Expect low to moderate pain. Tell your artist you want layered washes with iridescent blue and warm amber tones rather than a single bright fill. Blowout risk is higher on the inner wrist, so avoid feathered soft edges that can spread. At six months the colors will mellow, at two years you may need a color boost.
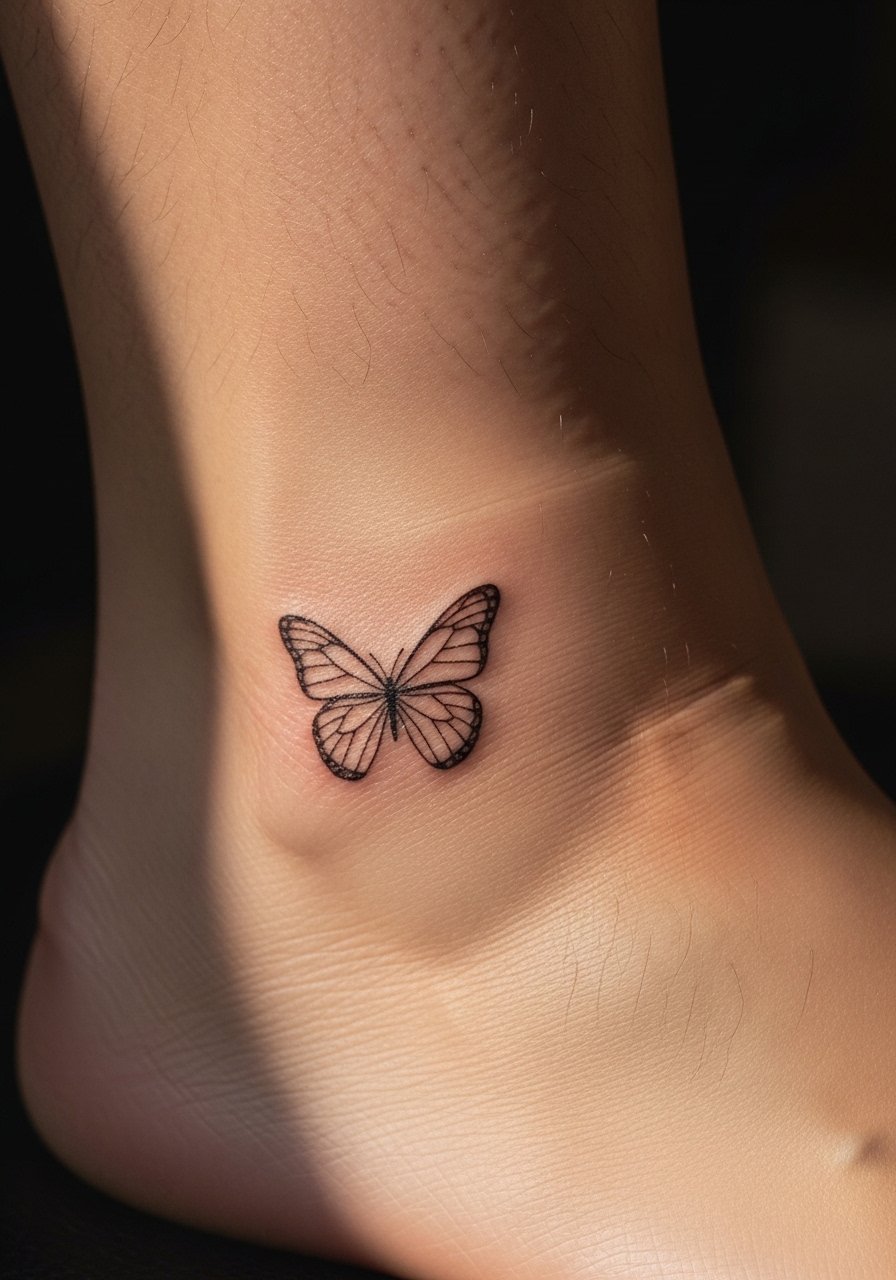
3. Minimalist Outline on the Ankle
When someone asks for a first small piece this is a go-to. An ankle placement keeps the design discreet but visible with certain shoes. Pain is low, session time under 30 minutes for a 2 to 3 cm outline. Ask the artist for a single-needle line that sits a touch deeper than a hairline so the outline does not feather into a gray ring. A common mistake is shrinking a geometric wing too small. That causes the linework to blur in a year. This style ages well if you allow a bit of space around the wings. If you wear ankle boots often, plan touch-ups sooner.
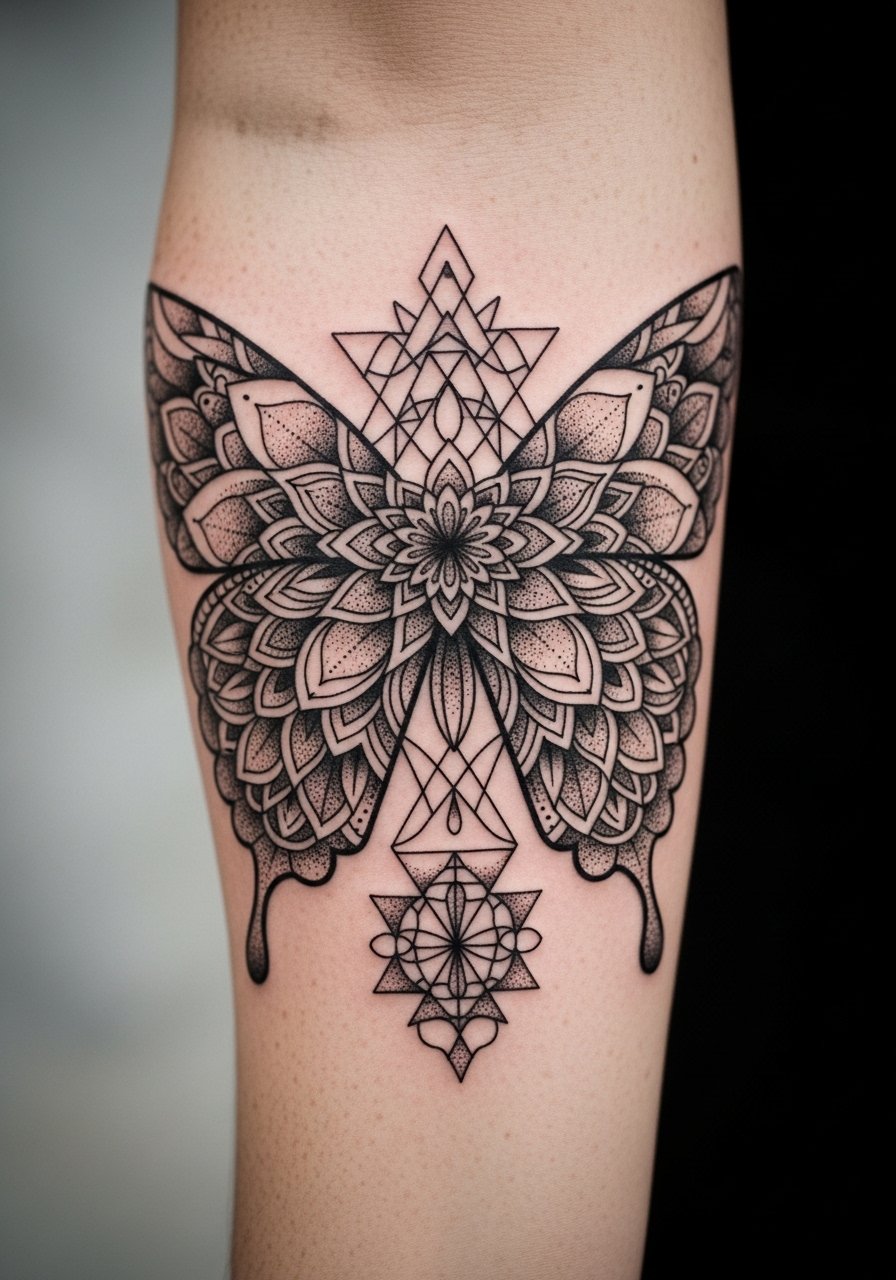
4. Geometric Mandala Butterfly on the Outer Forearm
There is something about symmetry and negative space that reads as deliberate from across a room. The forearm takes detail well, and a mandala-infused butterfly gives structure for stipple shading and crisp dot work. Expect two sessions for a 6 to 8 cm piece and mild to moderate pain. Tell your artist you want clear spacing between radial lines to avoid crowding as it heals. The biggest mistake is compressing mandala detail into too small a diameter. That makes the design look muddy after a year. For longevity, plan a light touch-up at year two to maintain crisp contrast.
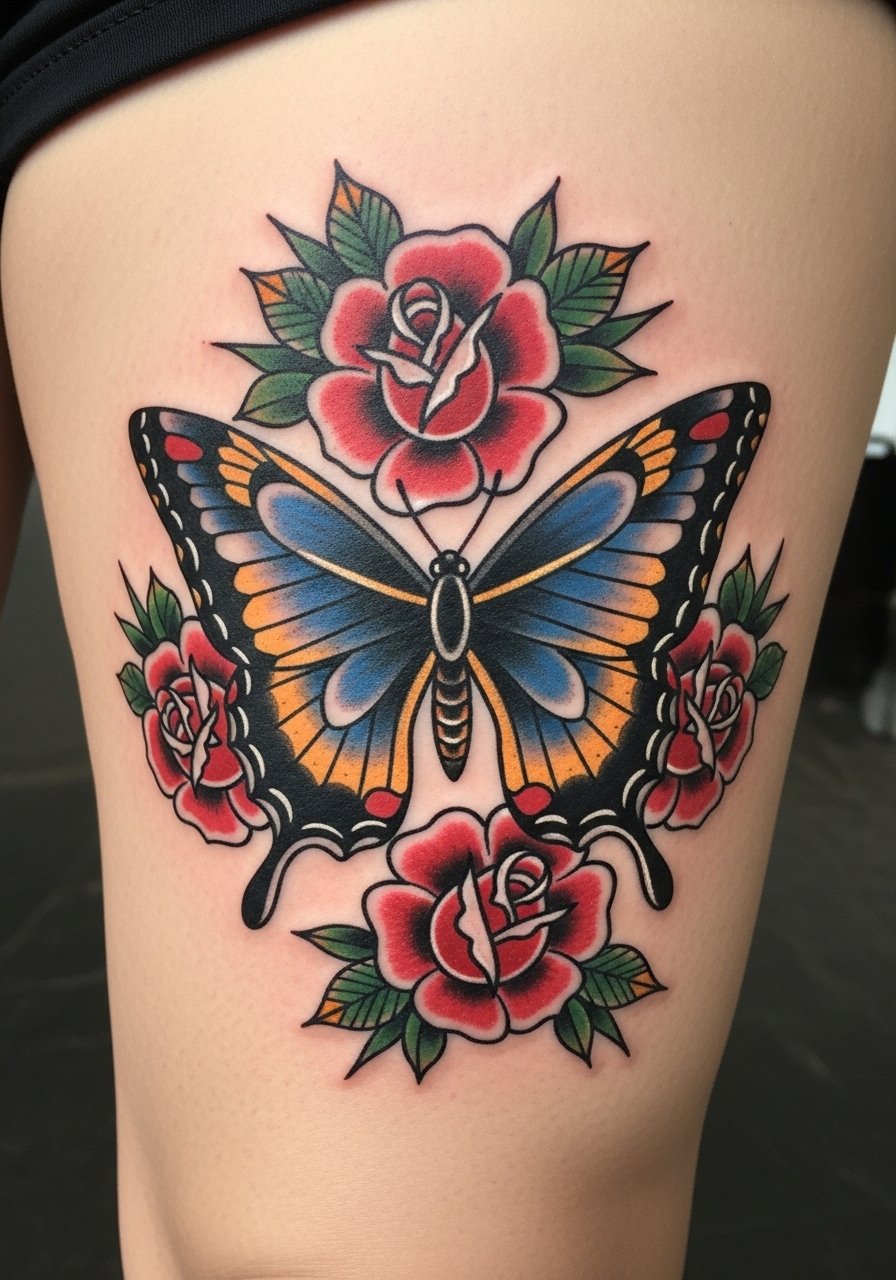
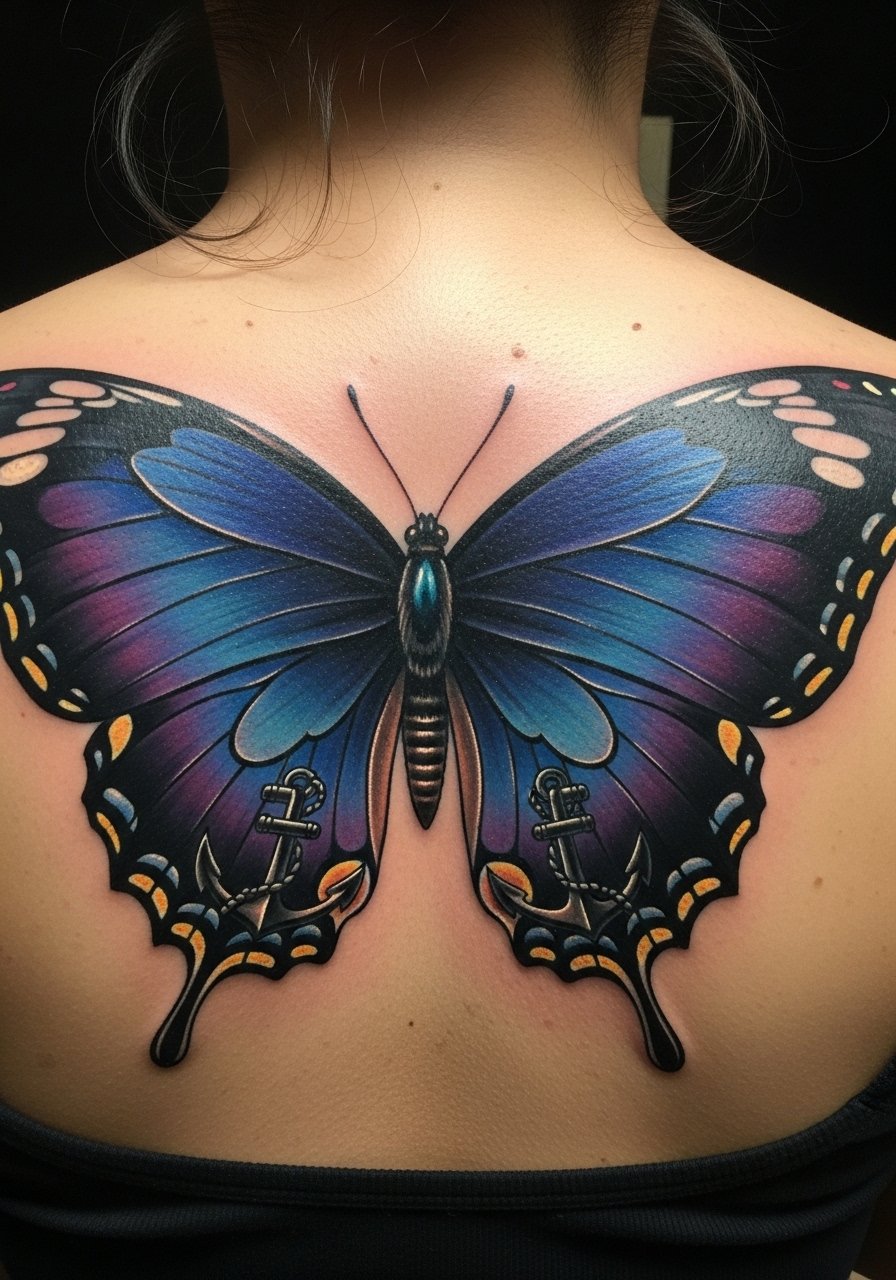
5. Traditional American Butterfly with Floral Fill on the Thigh
Fair warning, the thigh can be a drawn-out session if you go big. Traditional bold outlines and saturated color read well on curvy canvas, and the outer thigh lets you design a 10 cm center that pairs with flowers for flow. Two to three sessions for larger pieces. Pain is low to moderate depending on proximity to the bone. Ask for heavier saturation in the wing centers and thick outlines so the piece keeps its punch as pigment spreads over years. A common misstep is too-small color patches inside the wings. Those need touch-ups sooner than larger blocks.
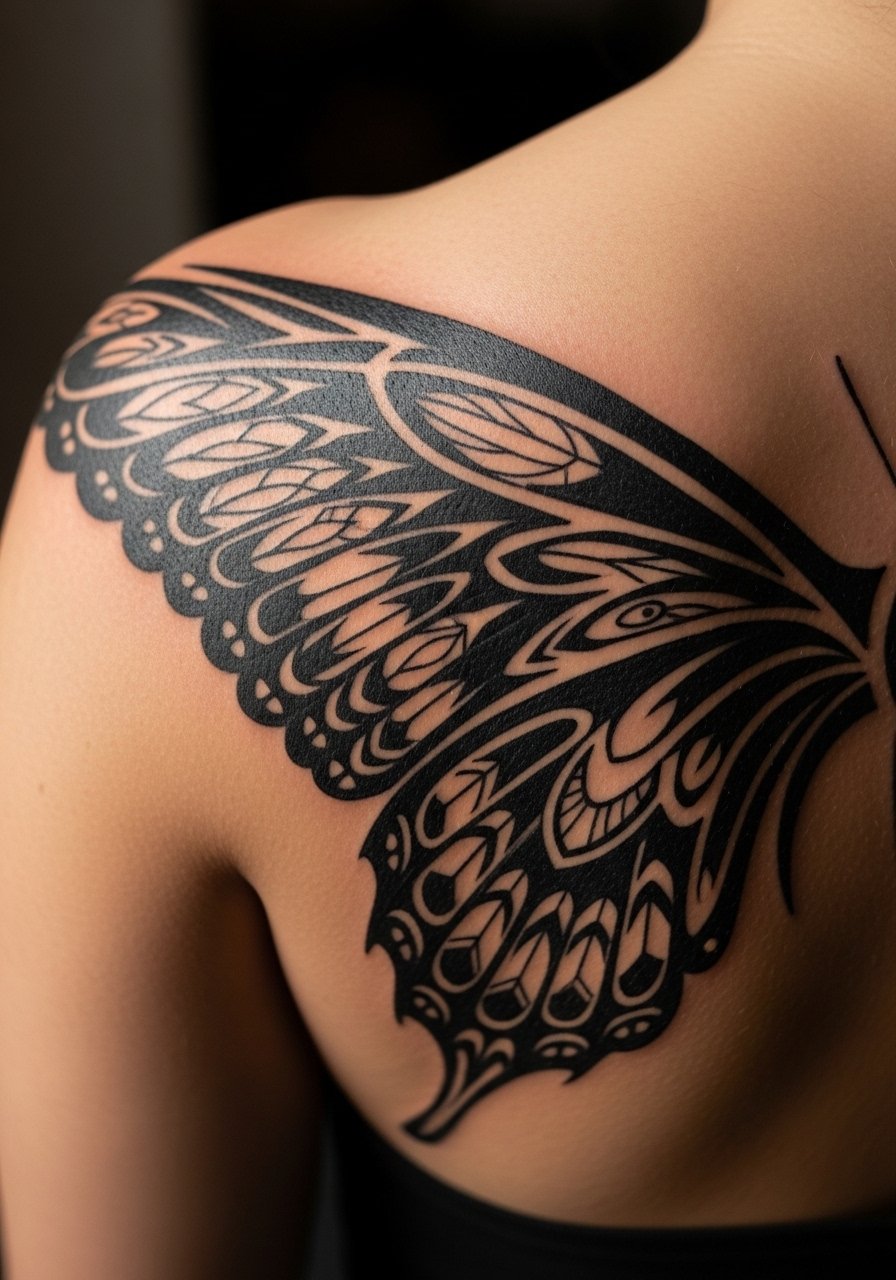
6. Tribal Butterfly Wings on the Shoulder Blade
This style traces to pattern-rich aesthetics and raises cultural sensitivity questions. One camp sees tribal linework as an aesthetic borrowing that empowers modern designs. The other cautions against adopting motifs tied to specific cultures without context. If you choose this look, ask your artist about the pattern origin and consider adapting motifs rather than copying sacred symbols. Shoulder blade placement is single-session friendly for a 7 cm piece, with low pain and strong longevity because of low sun exposure. A frequent mistake is asking for ultra-thin tribal lines. Those can blur into patchy black over time.
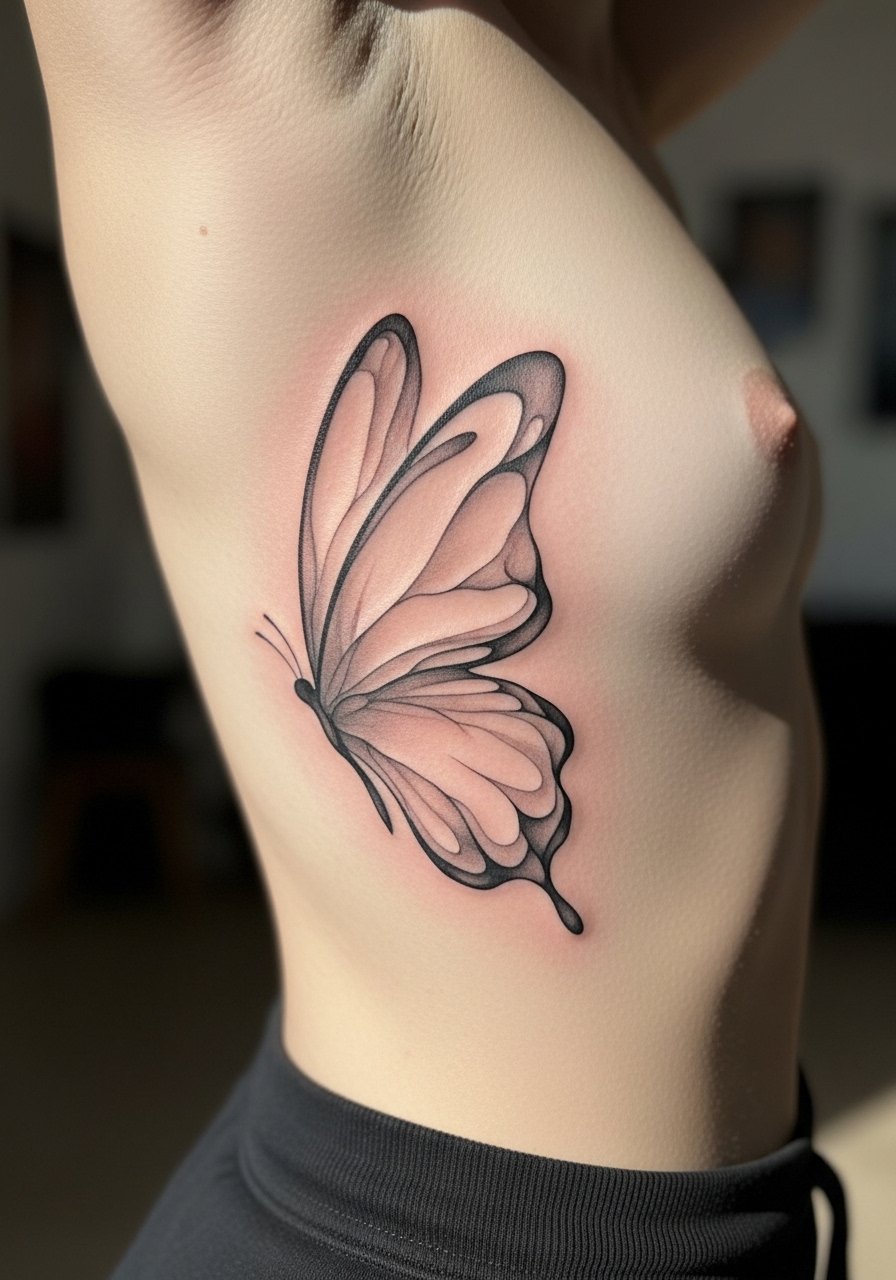
7. Abstract Silhouette on the Ribcage
Fair warning, the ribcage rates high on most pain charts. That matters because session comfort affects how long an artist can focus on crisp edges. An abstract silhouette uses fluid negative space and gray washes to flatter body contours and disguise stretch changes. One to two sessions for a 5 cm piece. Tell your artist you want broader, softer fills rather than micro-lines near the sternum to reduce blowout risk. Artists split on fine line on ribs. One group argues it blurs within two years. The other says proper depth and spacing settles fine. Ask the artist where they stand before booking.
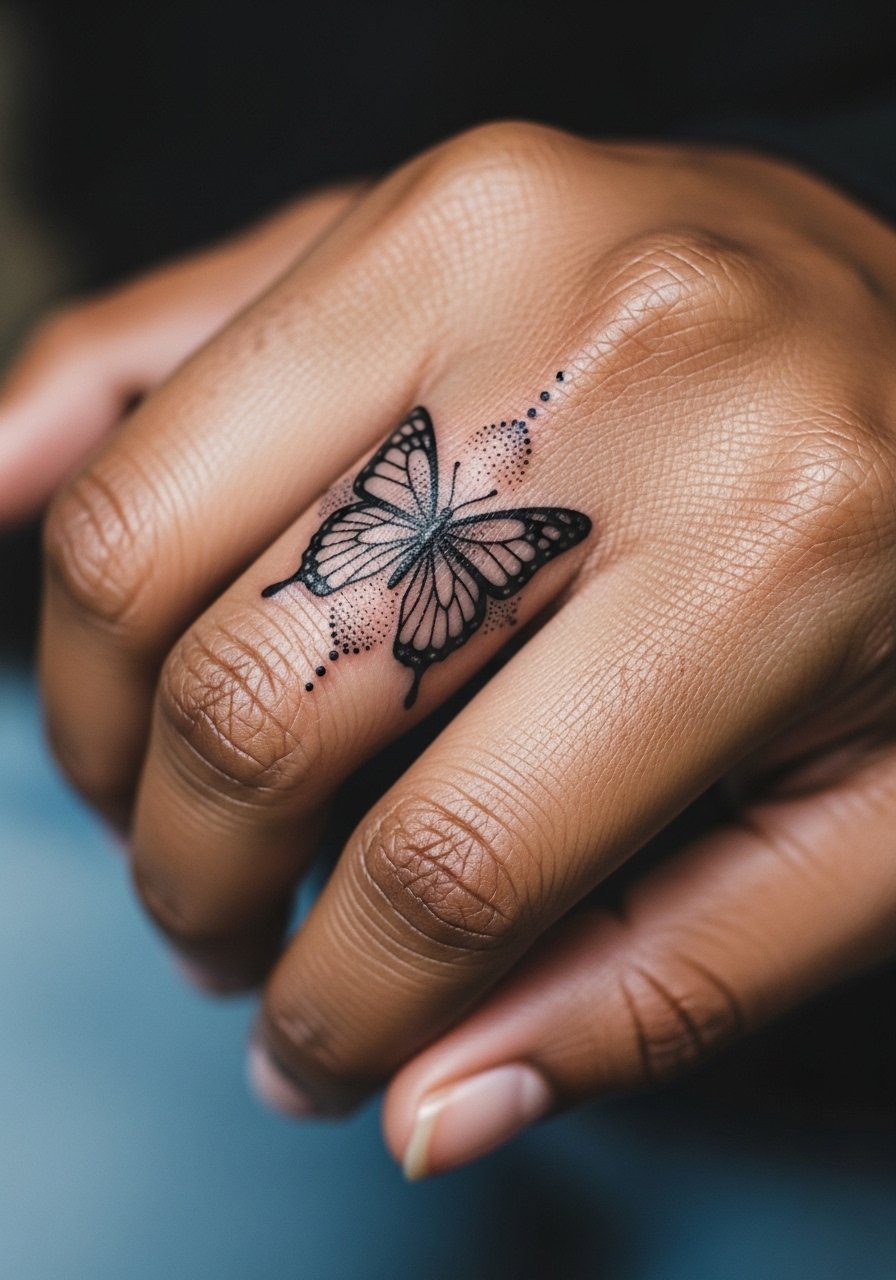
8. Fine Line Butterfly with Dots on the Ring Finger
The ring finger is tiny and unforgiving, and the biggest mistake is expecting single-needle detail to last unchanged. Pain is low but the skin there wears quickly from hand use. One quick session for a 1 to 2 cm motif. Ask for slightly bolder anchors and spaced dot work so the dots do not merge as the skin settles. Expect touch-ups around year one to keep separation between dots and the outline. Also consider that finger tattoos can affect some job situations, so weigh placement choices against professional needs.
9. Neo-Traditional Butterfly in Flight on the Calf
When you want bold shapes with illustrative shading, the calf gives room for motion. Expect two sessions for an 8 cm composition that reads as if the butterfly is mid-flight. Pain is low and healing is straightforward. During consultation, bring references that show the exact wing tilt you want and the color palette, for example a warm coral wing center with teal outer accents. A common error is asking for too many tiny decorative elements that obscure the silhouette. For longevity, the calf tolerates heavier saturation well so touch-ups are infrequent.
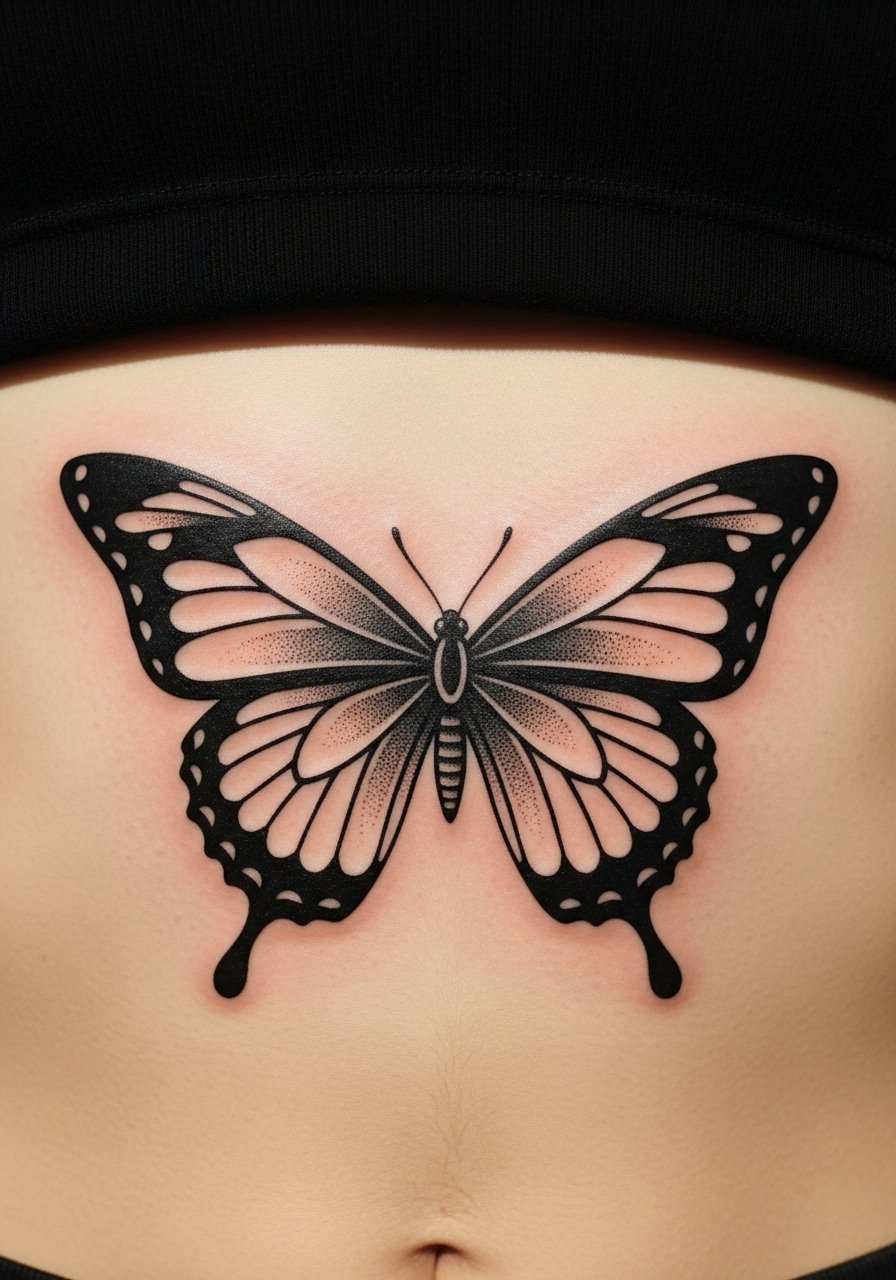
10. Blackwork Butterfly Frame on the Sternum
There is immediate visual impact in a solid black frame across the chest, but sternum placement needs a note about professional skill. Heavy blackwork settles differently on the sternum and can read uneven if not planned for chest curvature. Single session for a 6 cm bold piece and high to moderate pain. Tell your artist you want consistent saturation and a graduated edge to avoid a flat block on the midline. Hand placement and chest visibility have hiring implications, so consider how visible you want this area to be. Expect touch-ups in years three to five depending on sun exposure.
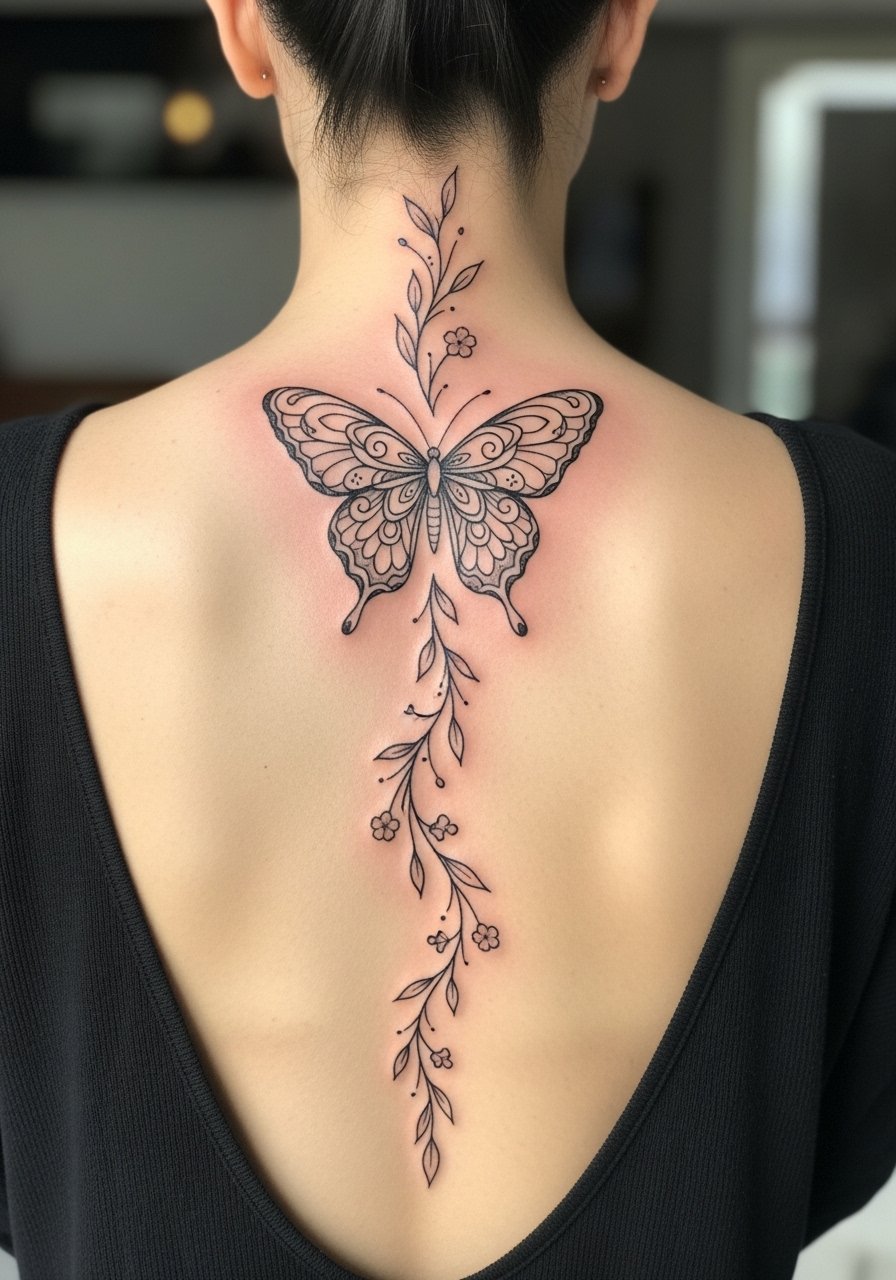
11. Ornamental Butterfly with Vines Down the Spine
I've seen ornamental vertical pieces like this pull together a back wardrobe in a way flashes cannot. This is a longer commitment, often a three-session plan for a 12 cm central spine piece that uses fine line filigree and vertical vine elements. Pain varies but the spine is more painful near the bony ridge. In consultation ask for filigree spacing that allows for slight skin migration over time. A common mistake is packing filigree too densely. That makes the design indistinct after a few years. Plan periodic touch-ups and sun avoidance for the mid-back.
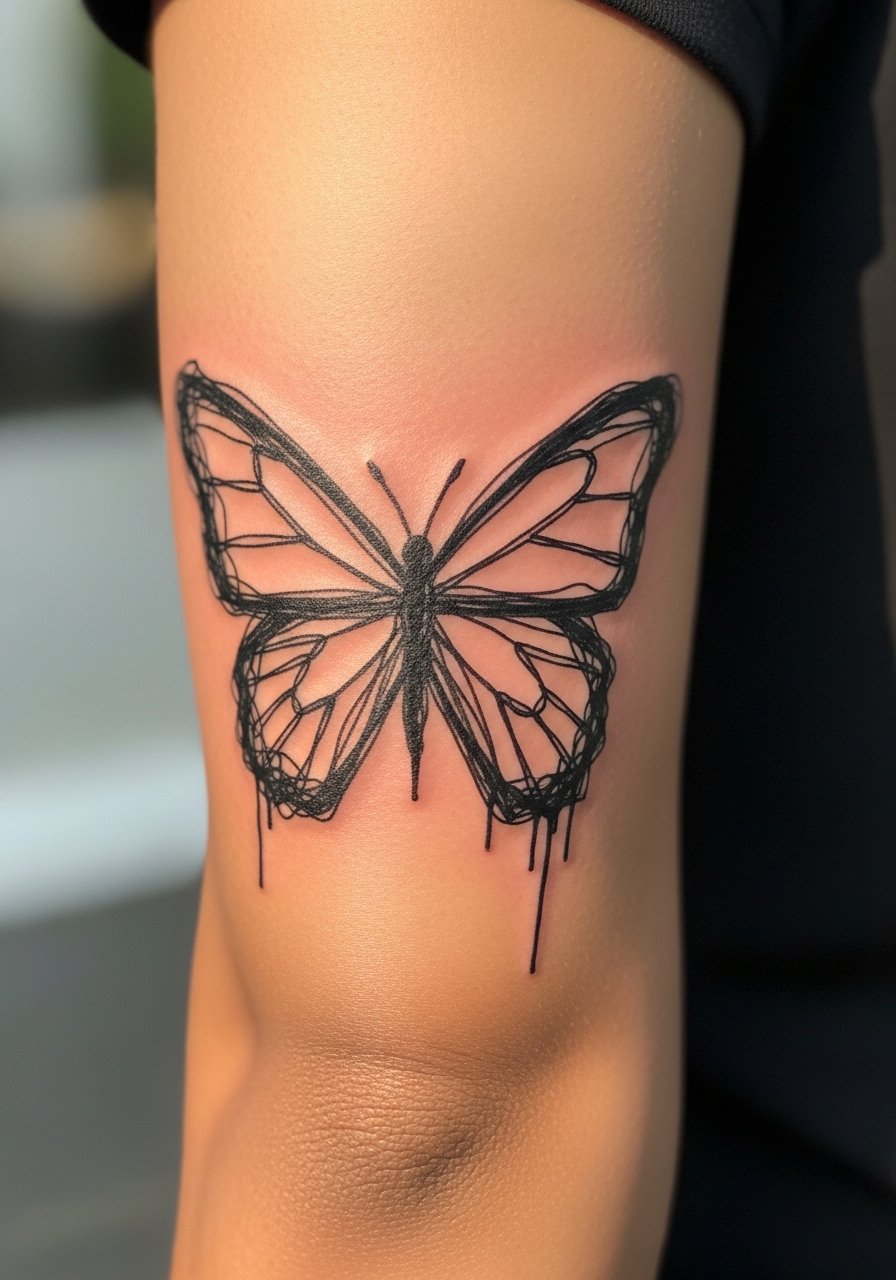
12. Ignorant-Style Sketch on the Inner Elbow
The inner elbow is a place that moves and creases, and an ignorant sketch vibe turns that into a feature. Expect a single short session for a 4 cm scribble-style piece and a sharp sting during inking. The biggest mistake is asking for excessively shallow black scribbles which can fade into gray smudges. This style benefits from intentional irregularity and slightly bolder anchoring strokes so the sketch character remains. For placement note, the inner elbow can blur faster and may need a touch-up at year two.
13. Micro Dotwork Behind the Ear
Session time is short and the result is quietly clever. Behind-ear tattoos are small, usually under 2 cm, with stipple shading that reads as texture rather than a distinct image from a distance. Pain is brief but sharp. Tell your artist you want dot spacing that avoids merging on raised cartilage. The common mistake is over-detailing. Too many dots lead to smudging as the area heals. This placement is easy to hide for work related reasons, and touch-ups are usually minor.
14. Cover-Up Butterfly That Incorporates Old Ink on the Upper Back
When someone brings in an old tattoo to replace, a butterfly with layered wings and lots of saturation can mask faded black without becoming a blob. Consultation is crucial. Bring the original piece and ask the artist for a plan that uses heavy color blocks and dark anchors over the old lines. Upper back placement gives a forgiving canvas and moderate pain. The mistake is trying to hide everything with thin linework. For successful cover-ups, thicker elements and strategic negative space are the practical choices. Expect a two-session process with a planned touch-up.
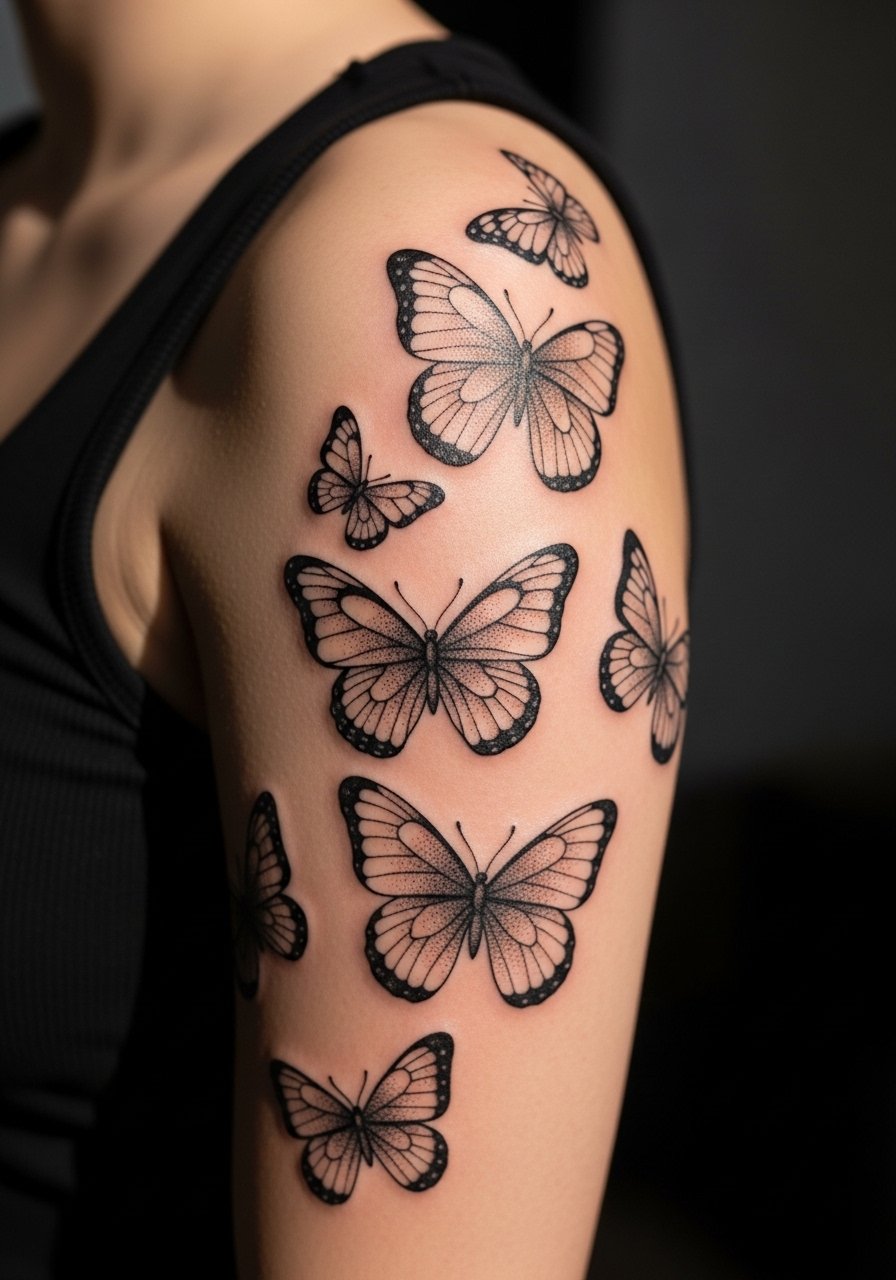
15. Stipple-Shaded Cluster Along the Shoulder and Upper Arm
There is a practical beauty in a small cluster of butterflies that follow shoulder anatomy. Stipple shading and whip shading give depth without heavy saturation. This is a one to two session piece depending on how many butterflies you include, each around 4 to 6 cm. Tell your artist you want clear breathing room between motifs so each butterfly ages on its own. A common mistake is compressing multiple motifs into a crowded band. For touch-ups, clusters often need only spot work after three years unless you get heavy sun.
Tattoo Prep and Aftercare Essentials
If you are choosing any of these styles for the first time, a quick prep and aftercare plan keeps the healed result close to your vision. I have spent time in five studios and learned a few reliable routines. Pre-appointment, hydrate and avoid alcohol for 24 hours. During healing, keep the area clean with a gentle cleanser and use a non-scented moisturizing balm until the skin is fully closed. For sun exposure, a high-SPF mineral sunscreen applied after full healing preserves saturation.
Shopping list
Healing and aftercare essentials
Fragrance-free moisturizing balm for tattoos. Use this after the initial scab stage to reduce tightness and to keep color from drying into flaky patches. Apply sparingly and reapply as the skin feels dry.
Medical-grade second skin bandage, small sheets. Useful for the first 24 to 48 hours if you want a low-friction barrier against clothing.
Aquaphor Healing Ointment, small tub. One mainstream option that many artists still recommend for short-term occlusion. Use only for the first few days and switch to a lighter balm after the skin closes.
Gentle antibacterial soap, fragrance-free. Clean the area twice daily for the first week with lukewarm water.
Silicone scar sheets, small size. If you have raised healing or keloid tendencies, these can help flatten areas after the skin has fully healed.
Pre-appointment prep
Lightweight, fragrance-free lotion for a week before appointment. Hydrated skin takes ink more uniformly.
Soft, non-abrasive clothing like loose cotton shirts. Not a product to buy on Amazon unless you need one for the appointment.
Long-term maintenance
Broad-spectrum mineral sunscreen SPF50, travel size. Apply daily after healing to keep saturation. Sunscreen is the number one thing every artist I know mentions for ink longevity.
Non-comedogenic body lotion for weekly maintenance. Keeps skin supple and helps color sit evenly over years.
Every tattoo is different. Always follow your artist's specific aftercare instructions. Consult a dermatologist if you have skin concerns or unusual healing issues.
Frequently Asked Questions
Q: Do watercolor-style butterflies need different aftercare than traditional ones?
A: Yes, from what I've seen watercolor pieces often rely on softer saturations and lighter anchors. That means keeping scabs minimal and avoiding heavy friction while the skin heals. Use a gentle cleanser and a light fragrance-free balm rather than thick occlusives after the initial covered phase.
Q: Will fine line finger tattoos blur faster than a similar design on the ankle?
A: They usually will. Fingers see more motion, washing, and friction. For a finger fine line expect touch-ups earlier than ankle placements. Ask your artist for slightly heavier anchors and spaced dot work to slow merging.
Q: Why do geometric mandalas sometimes fade on ribcages faster than on forearms?
A: The ribcage skin stretches and moves with breathing. That repeated motion can spread pigment slightly and soften precise radials. If you want a mandala on the ribs, ask for slightly larger geometry and more spacing so it keeps clarity as it heals.
Q: How should I approach cultural patterns in tribal butterfly wings?
A: There are two camps to consider. Some people see pattern borrowing as a way to reinterpret motifs. Others warn against using symbols tied to specific cultures without permission or understanding. A practical path is to ask your artist to adapt patterns in a way that honors source aesthetics without copying sacred iconography.
Q: What is a realistic touch-up timeline for a small watercolor wrist piece?
A: From what I have observed, expect color mellowing at six months and a likely small color boost around year two if you want brightness restored. That timeline depends heavily on sun exposure and how you protect the area after healing.
Q: Where should I look to find the right artist for a specific butterfly style?
A: Try style-specific hashtags, location tags for studios in your city, tattoo directories, and community threads on Reddit where people share session photos. Search for terms like the style name plus your city to find portfolios that match the exact technique you want.
