
Someone I know spent months bookmarking rose photos before realizing the real problem was picking a style that would still read like ink after a year of sun and life. I spent time in five shops across Brooklyn and at a weekend convention looking for designs that age well on different skin tones. These twelve dark rose takes keep showing up in artist chats and community threads, and each entry tells you when to go bold, when to go fine, and what to ask at your consultation.
1. Fine line single rose outline on wrist
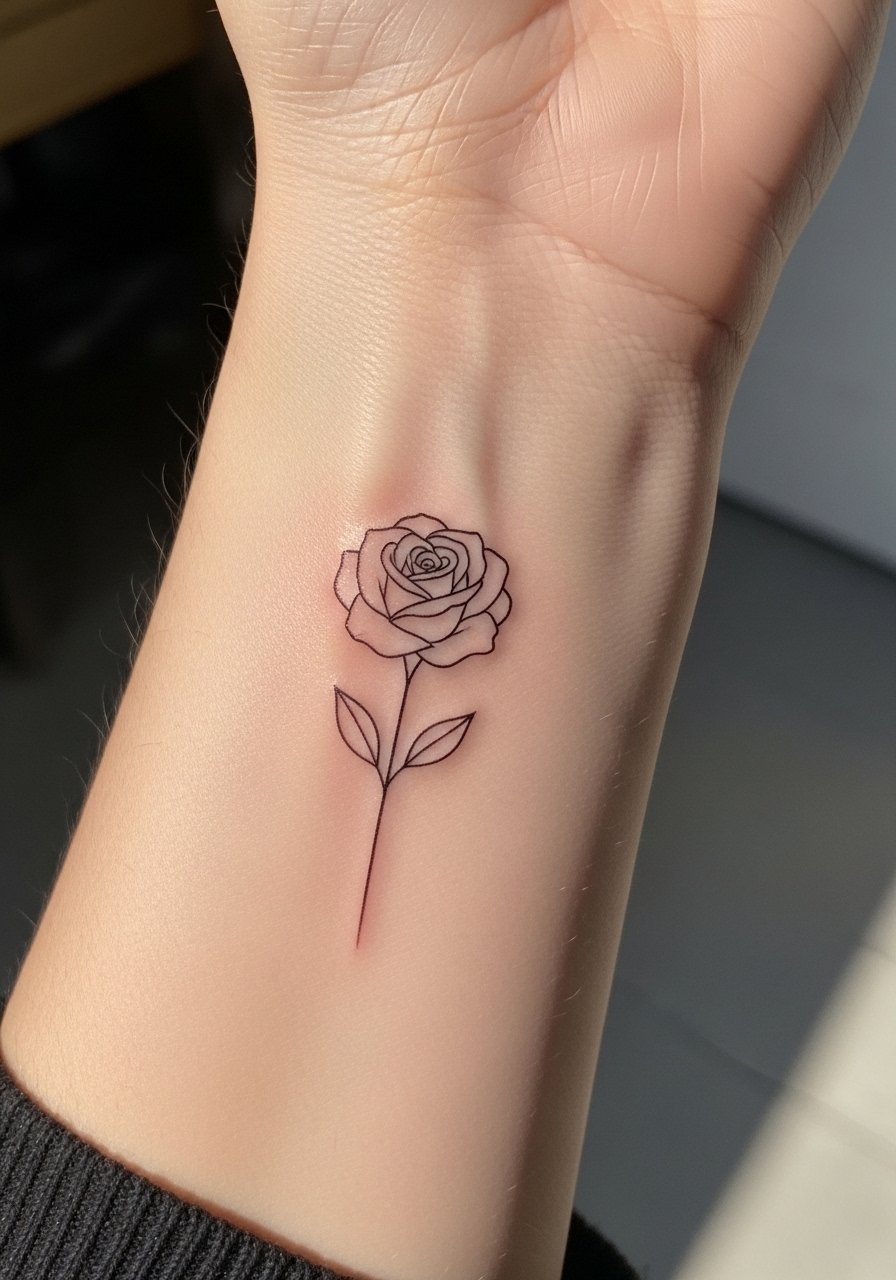
Someone I know got this on a weekday so it could hide under a watch for work. Pain is low for the wrist, and session time is usually a single short appointment. Tell your artist you want slightly thicker linework around the outer contour so the single-needle detail has room to breathe as it ages. The big debate here is fine line vs bold outlines. One camp accepts subtle fading as part of the look. The other camp argues for thicker contours so the rose still reads on medium and darker skin tones. Expect touch-up talk at year two if you keep it micro. A common mistake is making the bloom too small for the placement, which leads to blurring and unreadability.
2. Watercolor rose bouquet on forearm
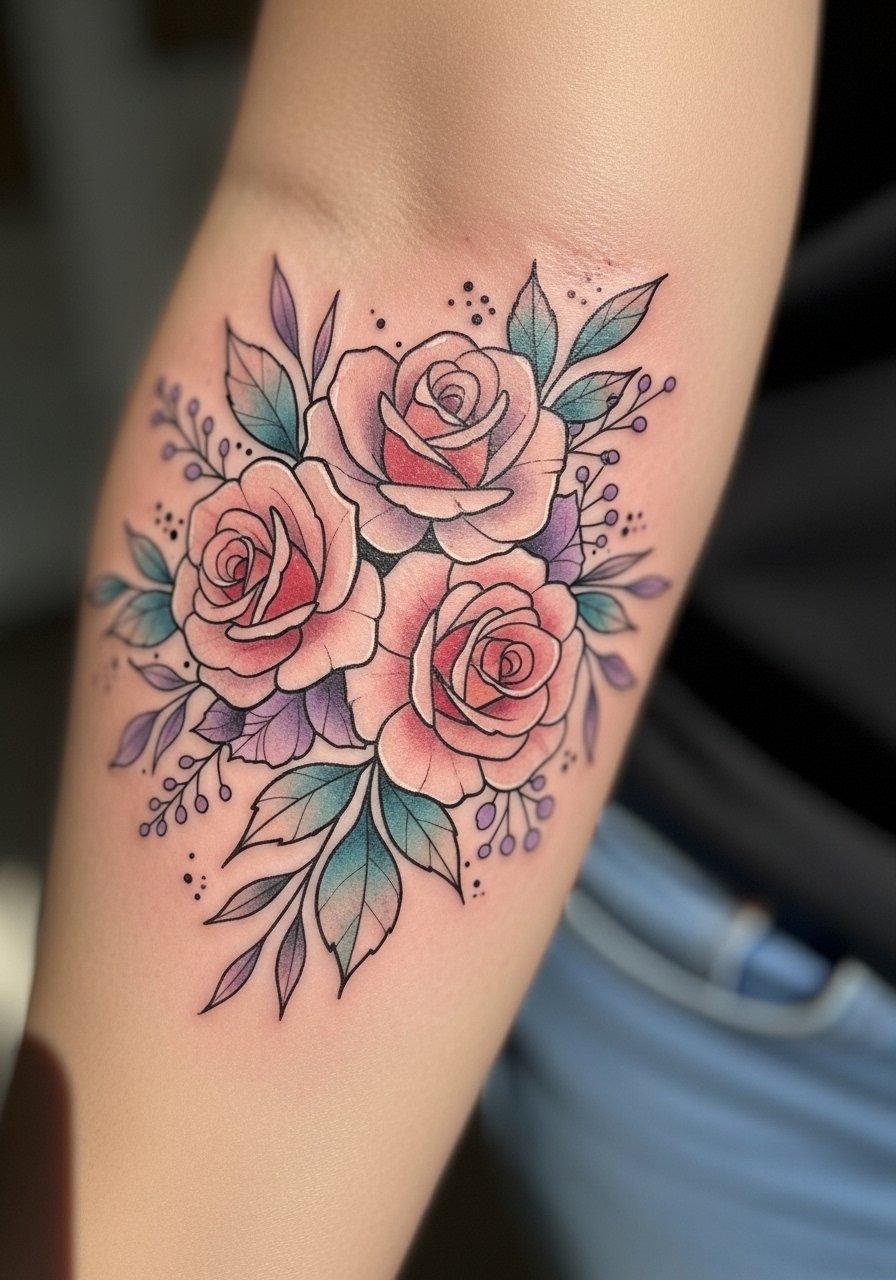
Forearm watercolor turns heads because it moves with the arm and photographs well. Session time is one to two sittings depending on saturation. In consultations ask for color layering shown in reference photos and request darker anchor points so the wash does not wash out over time. Many watercolor pieces from earlier trends faded into indistinct pinks, so this version mixes painterly washes with crisp black anchors for longevity. Expect medium fading at six months if you spend lots of time in the sun. Common mistakes include asking for ultra-faint washes that will lose definition on medium and dark skin tones.
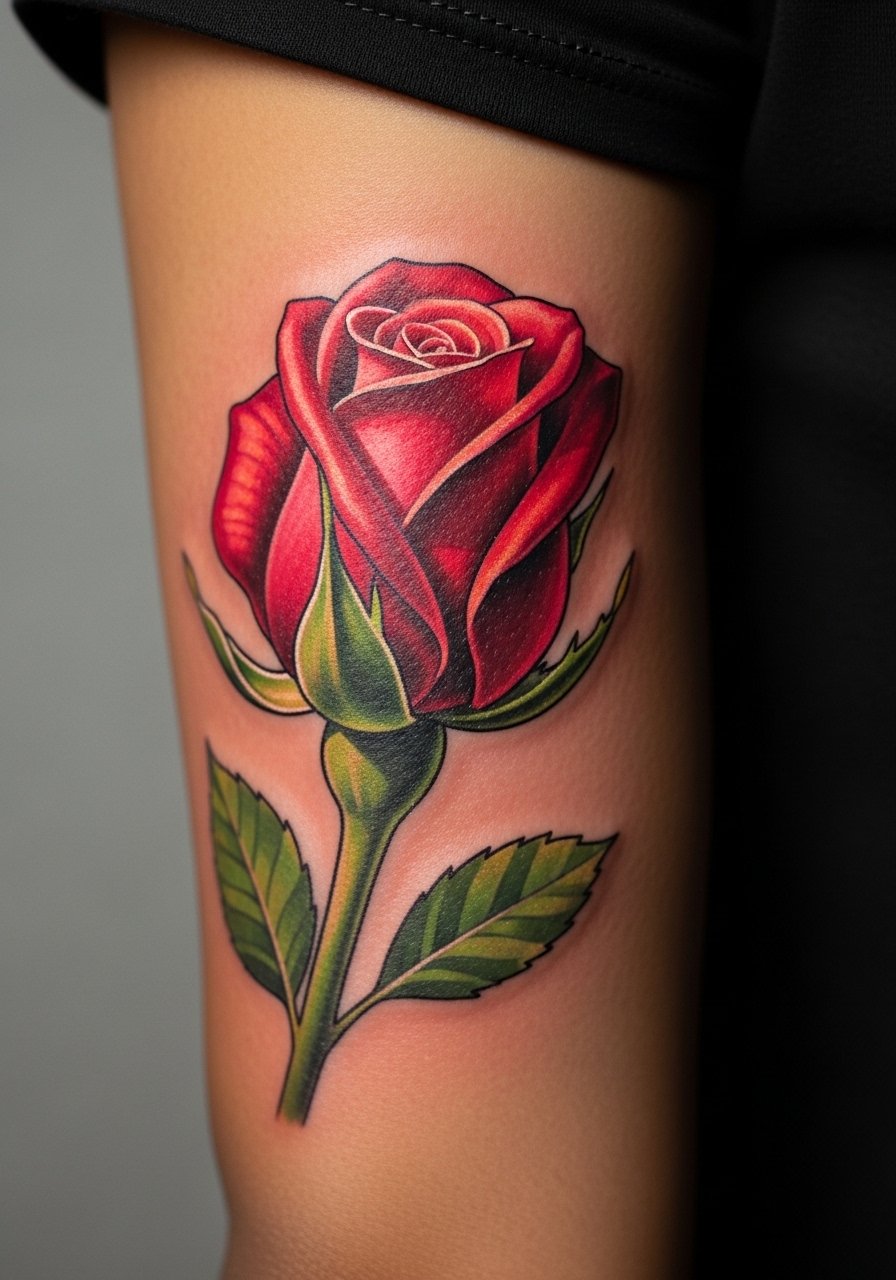
3. Neo-traditional rose with dagger on thigh
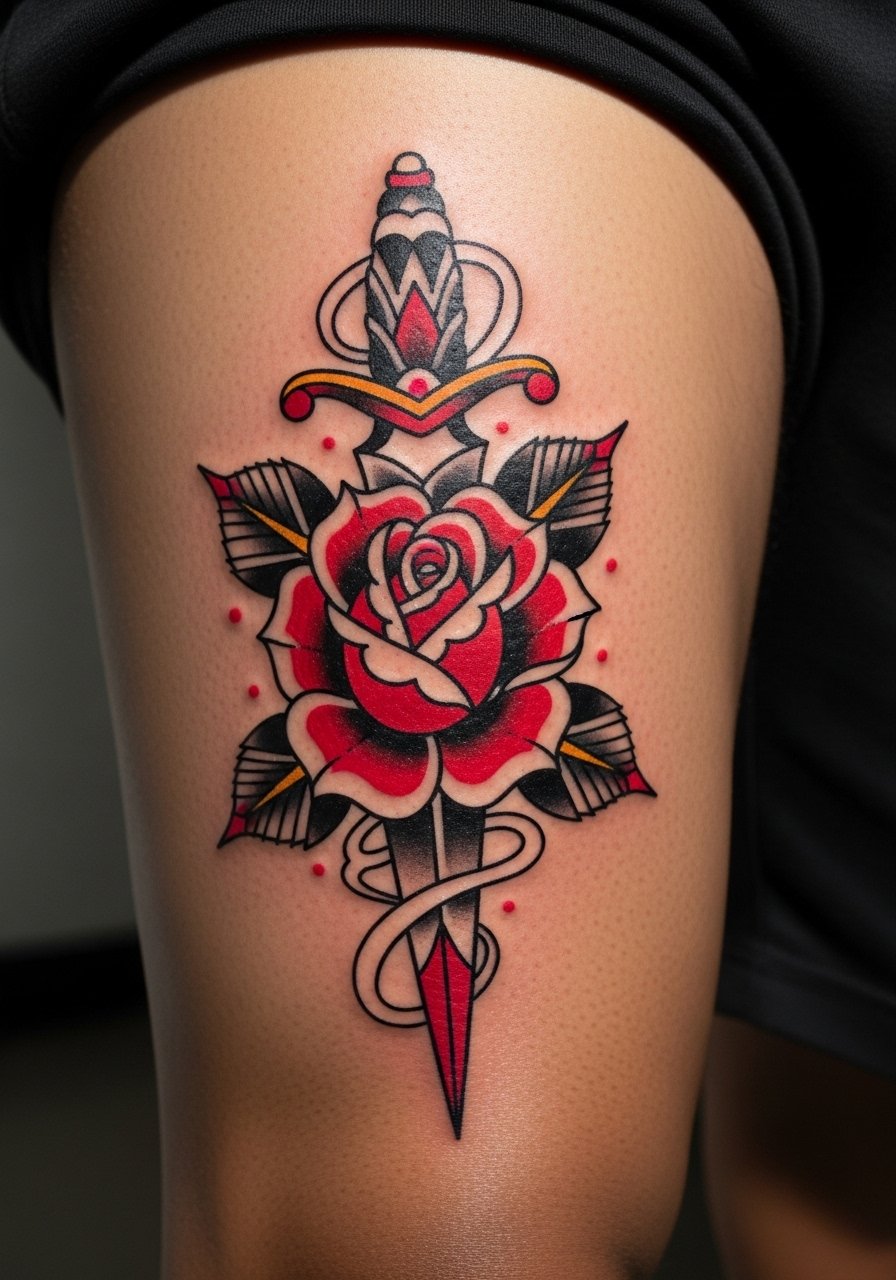
Fair warning: the thigh has low-to-moderate pain but gives the artist room for scale and saturation. This style benefits from bold outlines and solid saturation so the red stays vibrant on darker tones. Tell your artist you want layered shading and crisp banner edges if you plan to add lettering later. Many people choose neo-trad for symbolism, and it pairs well with daggers when you want an edge. A real mistake is shrinking the dagger too small for the rose, which flattens the motif visually. Plan for two sessions if you want heavy saturation.
4. Blackwork rose thorny vine wrapping the ribcage
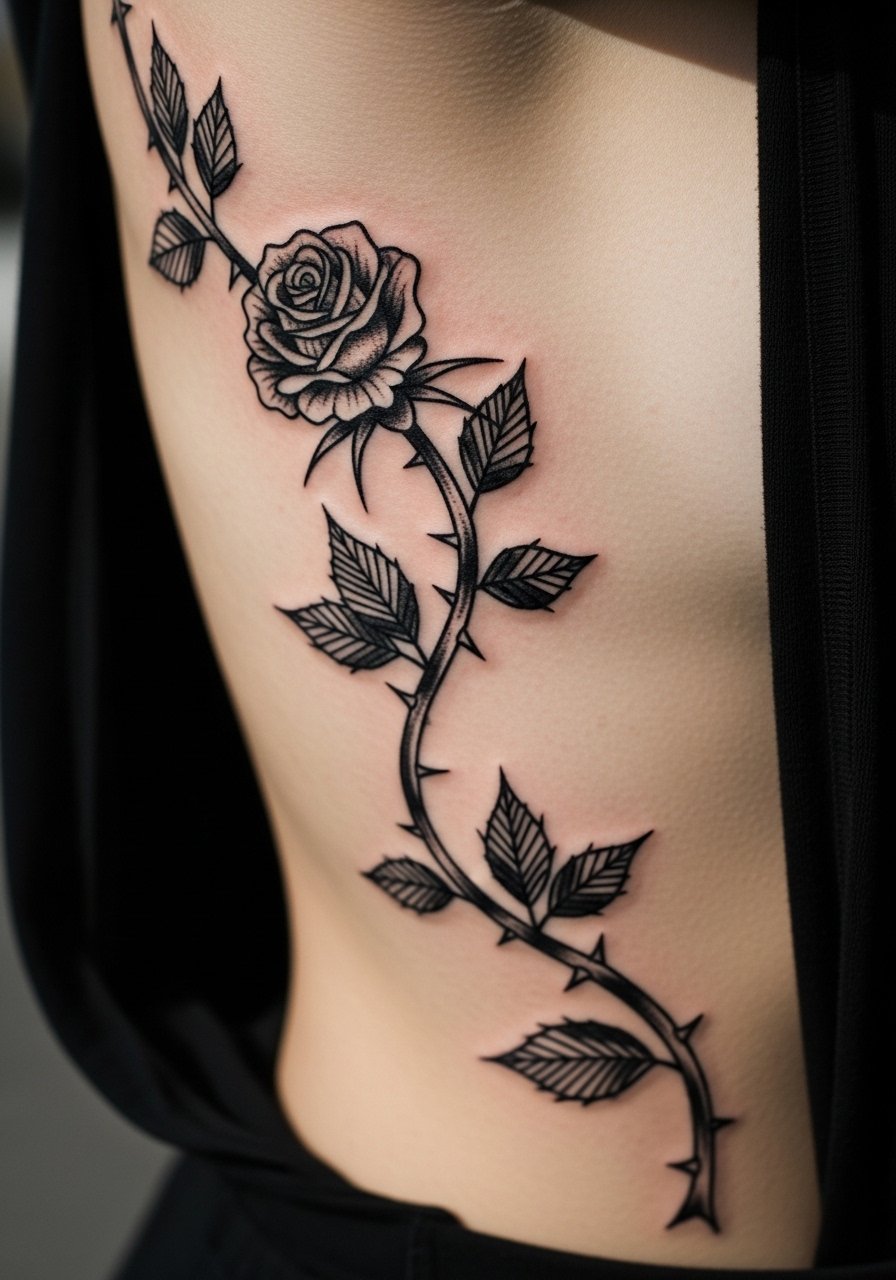
Fair warning: the ribcage rates high on most pain charts and sessions can be intense. I bring it up because the rib gives the vine a natural curve that flat areas do not offer. Ask your artist about spacing between thorns and stems to reduce blowout risk along the ribs. This one ages well when kept in pure black with solid saturation, though weight changes can distort long vines. A common mistake is requesting ultra-fine detail on a large rib wrap and expecting it to hold for years. If you plan heavy gym or weight changes, consider the forearm as a lower-movement alternative.
5. Micro-realism wilted rose cluster on collarbone
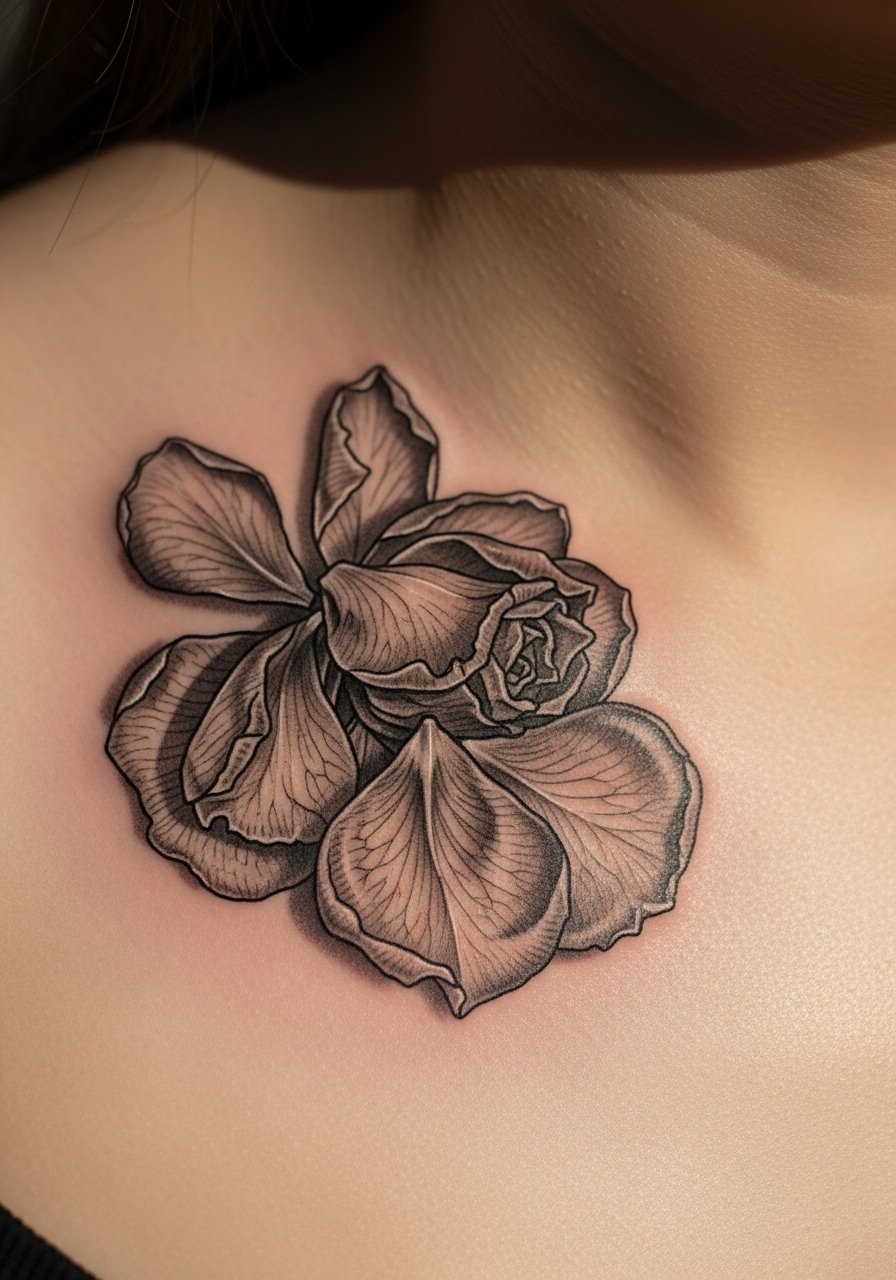
Collarbones are flattering but sit close to thin skin, so session comfort can vary. Micro-realism looks like a photograph at close range, and you should bring macro photos showing the exact petal texture you want. The trade-off is that ultra-fine shading can lose contrast on darker skin tones unless the artist plans heavier midtones. A frequent mistake is compressing too many tiny roses into a small collarbone area, which reads as a muddy cluster after a year. Expect a possible touch-up session at year two for crispness.
6. Traditional American rose with banner on shoulder

Shoulder caps are low pain and photographers love the way traditional pieces sit there. Tell your artist you want saturated core color and bold outlines, because that is what keeps old-school pieces readable across skin tones. One thing people miss is planning banner size before the session, which makes later text additions smoother. Traditional work holds up very well and usually only needs touch-ups years in when exposure has washed color. A common mistake is asking for tiny banner text that becomes illegible after healing.
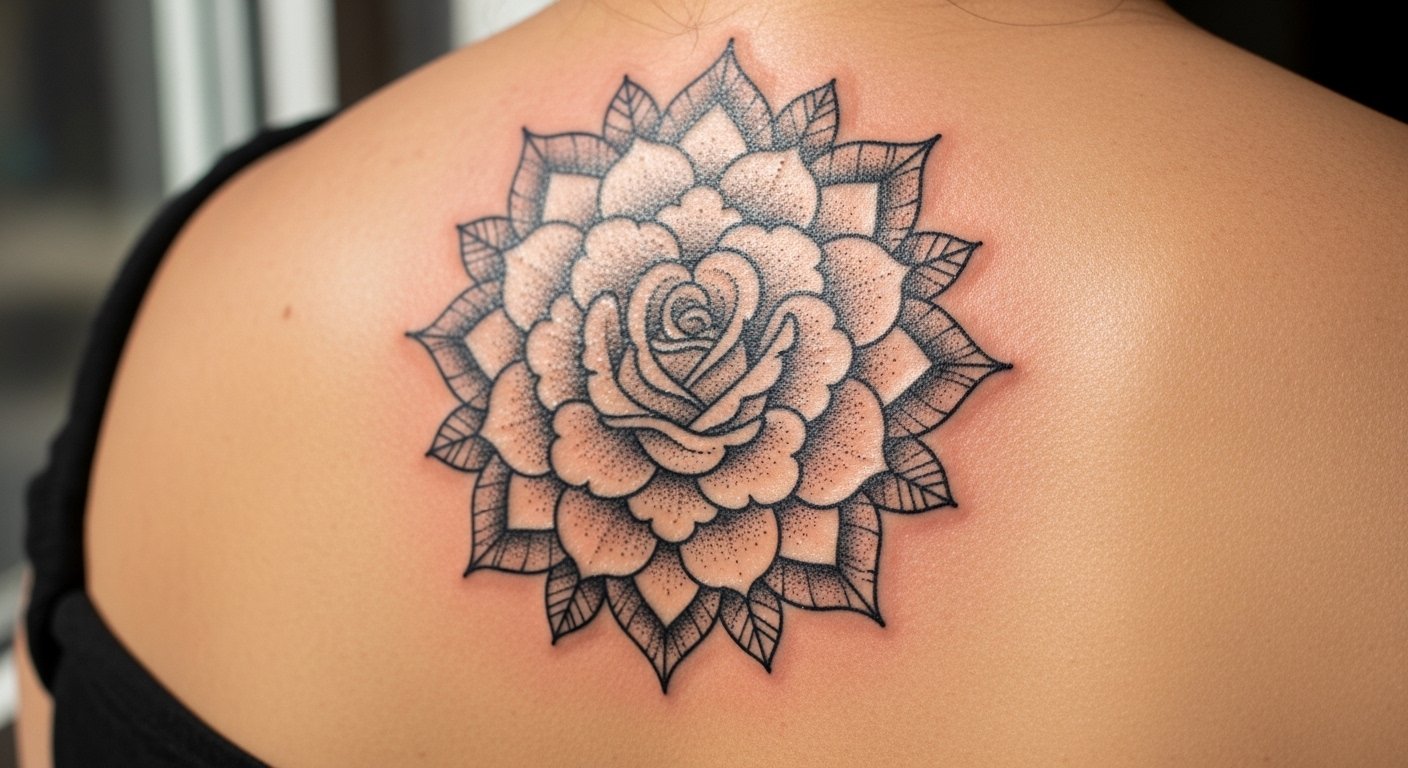
7. Ornamental rose mandala on upper back
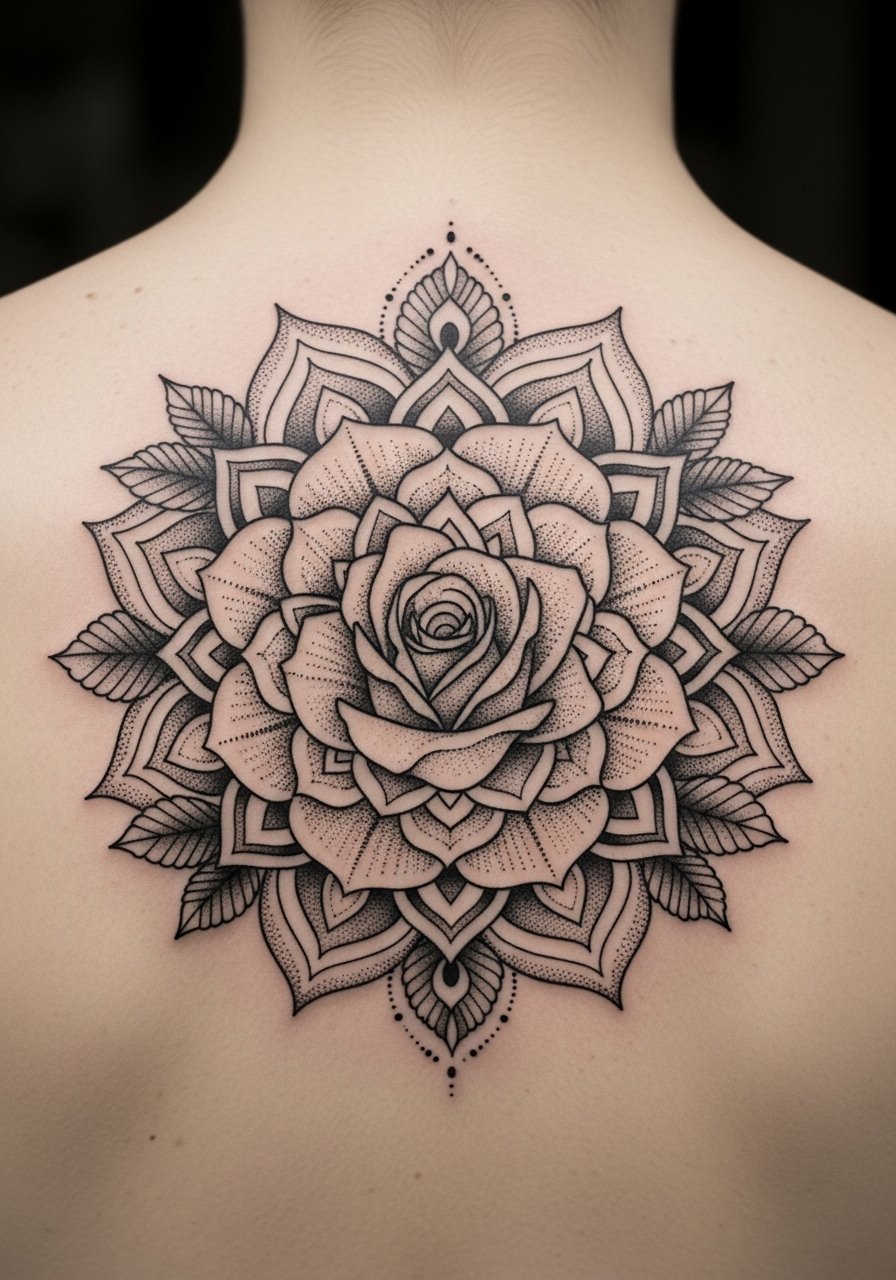
Upper back pieces let you play with symmetry and scale, and they work beautifully with stipple shading. Session time ranges from one to three appointments depending on detail. When you talk to your artist request mockups that follow the curve of your shoulders so the mandala stays centered when you move. A mistake I see is shrinking the mandala so tightly that the detailed dot work loses separation after healing. For people who want spiritual patterns I recommend subtle variations rather than direct cultural copies to show respect for origins.
8. Ignorant style loose rose sketch on ankle
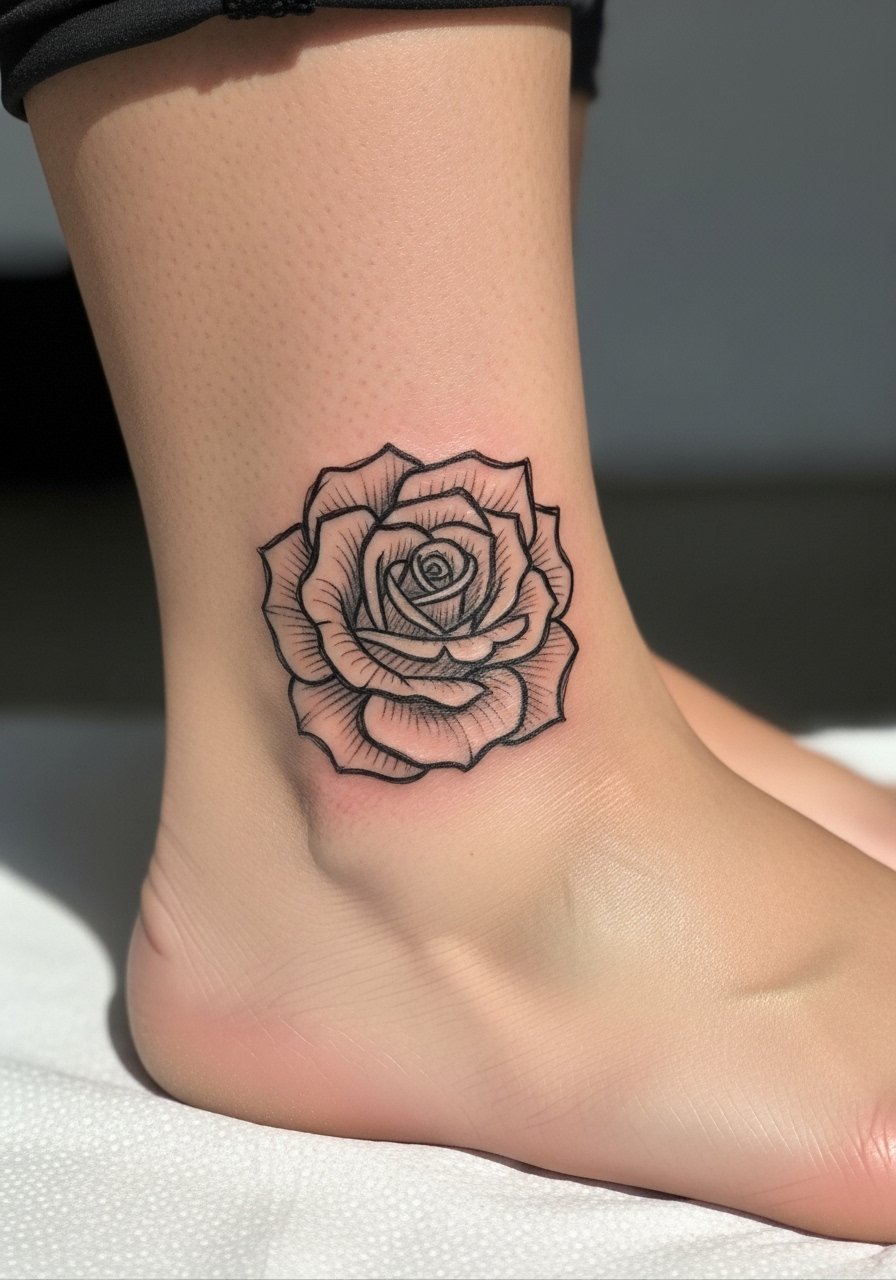
Ankle tattoos are small and can be sharp in pain because of bone proximity. This raw, hand-drawn vibe looks spontaneous and is often finished in one quick session. Tell your artist you want a deliberately messy outline with visible strokes so it does not read like a shaky attempt. The major mistake is asking for a micro version that the linework cannot support, which causes the scribble to blur. Ankles see lots of rubbing, so plan touch-ups sooner than you would for a forearm piece.
9. Photorealistic red rose bud on inner bicep
Inner biceps are a cozy canvas and the pain tends to be low to moderate. Photorealism needs layered color and expert shading to read as a true bud rather than a blotch. When you consult, bring close-up photos of lighting and reference angles so the artist can plan highlights. On darker skin tones artists often add deeper shadow contrast to maintain form over time. A common error is squeezing photoreal detail into a tiny space. Expect two sessions for full richness and plan for sun protection to keep reds lively.
10. Fine line rose with geometric frame on finger
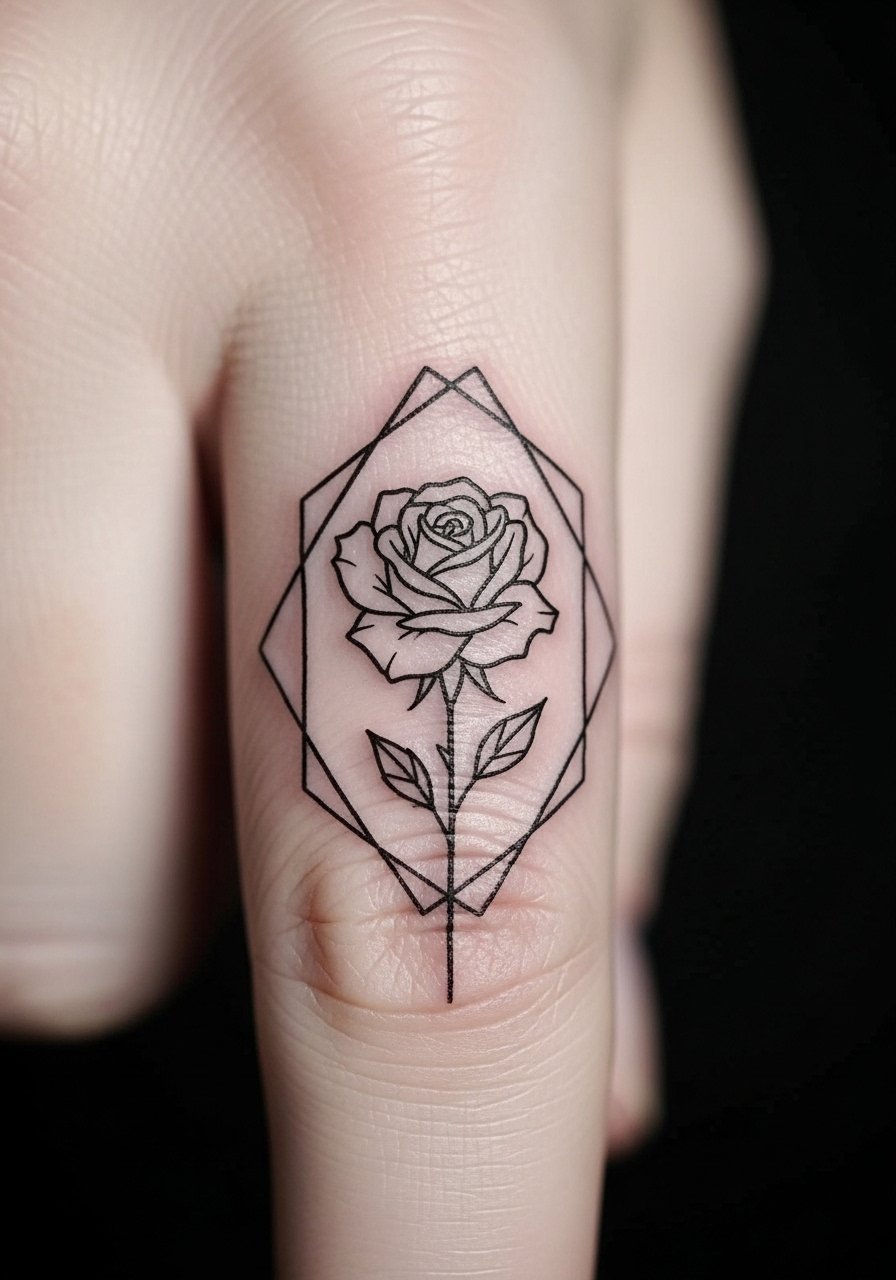
Finger tattoos are notorious for fast wear and touch-ups. The session is short, but expect more frequent follow-ups. If you want this to last, ask for a slightly bolder outer contour so the small geometry holds its shape. Finger ink tends to lose saturation first and can blur along joints, which is the most common complaint. A mistake is demanding micro-detail that cannot survive hand use. If you need discretion, place it on the side of the finger rather than the pad for longer life.
11. Black and gray rose bouquet sleeve start on elbow
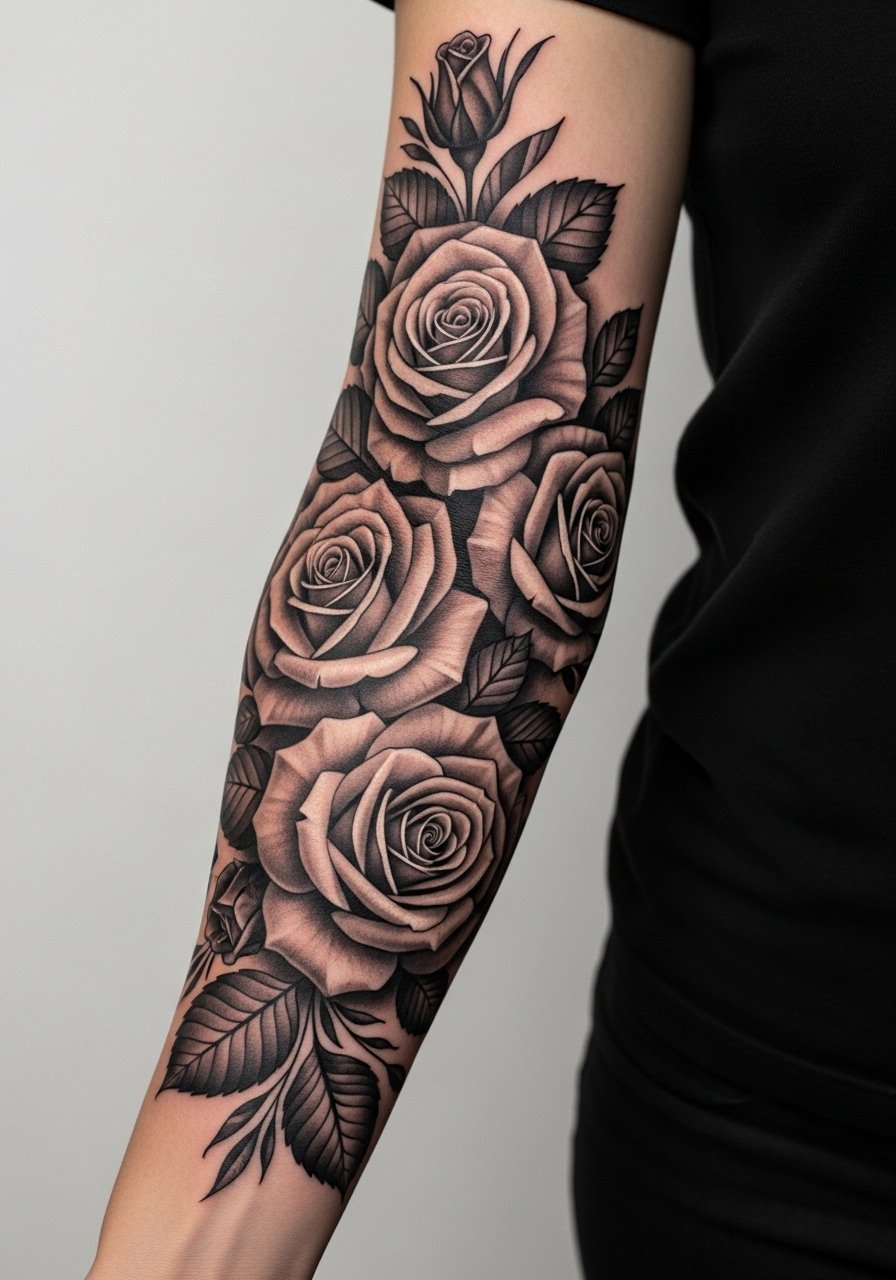
Building a sleeve is a commitment that pays off when you plan in stages. Elbow-to-forearm work can take three or more sessions and feels like low to medium pain pockets. During your consult explain future expansion plans so the artist uses transitional elements that let you add color or pieces down the line. The common mistake is doing a single disconnected piece without thinking about flow, which makes later fills awkward. Expect a multi-year timeline for a full sleeve and touch-ups to maintain saturation.
12. Minimalist rose thorn outline on neck
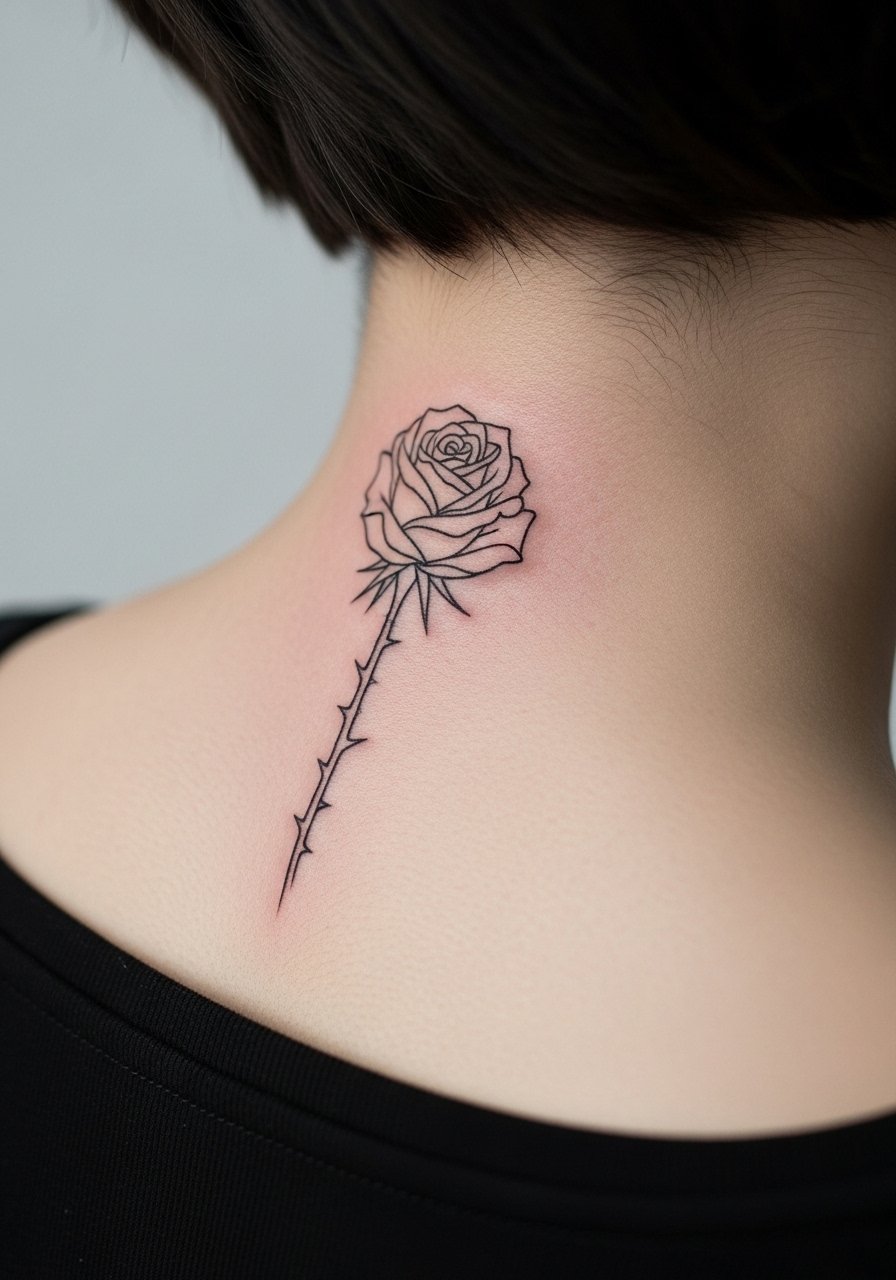
Neck tattoos are high-visibility placements and demand careful career considerations. The nape can be sensitive during the session and heals differently depending on hair and clothing contact. Ask for exact placement mockups and discuss how the lines will read when you wear different hairstyles. A mistake is placing the design too low or too small, which skews the visual balance. For neck work seek an artist experienced with head and neck anatomy because precision matters.
Tattoo Prep and Aftercare Essentials
I've seen the Saniderm vs dry healing debate split shop chairs. One camp prefers Saniderm because it reduces mess and can speed initial healing. The other camp argues dry healing lets the scab process happen naturally. Both sides make legit points, so ask your artist what they use and why. Also keep sun exposure minimal for fresh color pieces and plan touch-ups realistically, especially for fine line work.
Shopping list
Fragrance-free gentle foaming cleanser. Use for the first week to remove surface oils without stripping ink. Clean morning and night with lukewarm water and gentle motions.
Medical-grade second skin bandage, single-use sheets. Useful for overnight protection when you travel or if your artist recommends occlusive healing.
Lightweight fragrance-free balm for daily hydration. Apply thin layers after the initial healing film peels to prevent cracking and dryness.
Breathable cotton shirt or loose clothing for new tattoos. Prevents rubbing and irritation on fresh pieces during the first week.
Silicone scar strip or sheet, small size pack. Helpful for raised scars or areas that have uneven healing to improve texture during months two to six.
Aquaphor Healing Ointment. A classic occlusive some artists still recommend for short-term use to lock in moisture. Use sparingly and only if your artist agrees.
SPF 50 mineral sunscreen stick. Apply once the tattoo is fully healed to protect color from UV fade.
Breathable adhesive bandage roll for large placements. Useful for travel or covering long sessions while you rest.
Fragrance-free long-term moisturizer lotion. Keeps saturation happier over the years, especially for color pieces.
Every tattoo is different. Always follow your artist's specific aftercare instructions. Consult a dermatologist if you have skin concerns or unusual healing issues.
Frequently Asked Questions
Q: Will fine line wrist roses need touch-ups sooner than bold roses on the forearm?
A: In my experience fine line wrist pieces usually need attention earlier than bold forearm work because the wrist sees lots of movement and friction. Plan on a realistic touch-up window at around year one to two, and ask your artist about slightly stronger outer contours during the consult to extend clarity.
Q: Do watercolor-style roses require different aftercare than blackwork pieces?
A: Yes, color pieces benefit from extra sun protection during and after healing because UV exposure causes faster fade. Blackwork holds contrast longer, but both need gentle cleansing and thin moisturizing. If you want a product suggestion, the SPF 50 mineral sunscreen stick in the list is handy once the skin is fully healed.
Q: How should I decide between a thigh neo-trad rose and a rib blackwork vine if I care about pain and longevity?
A: The thigh gives easier healing and lower pain, while ribs are louder visually but harder to sit through and more prone to distortion with weight change. For long-term legibility choose the thigh and ask for solid outlines and saturated fills.
Q: Is a finger or ankle rose a good first tattoo if I am on a tight budget?
A: They can be cheaper up front but expect more touch-ups because hands and ankles wear faster. If budget matters, consider starting with a forearm or wrist piece that holds linework better and stretches over fewer sessions for touch-ups.
Q: What should I ask an artist about for a photorealistic red rose on darker skin tones?
A: Ask how they plan contrast and shadowing to maintain form over time, and request healed photos on similar skin tones. Also discuss session pacing for saturation so the reds do not get overworked and muddy.
Q: Will using Saniderm guarantee better healing than dry healing?
A: Not guaranteed. Some artists and clients prefer Saniderm for less mess and controlled protection. Others feel dry healing produces a more natural scab process. It depends on your skin, the placement, and your artist's protocol, so bring the question up before booking.
Q: How often do black and gray sleeve starts need touch-ups compared to color sleeves?
A: Black and gray sleeves generally need fewer color refreshes because black pigments hold contrast well. Color sleeves can need maintenance every few years depending on sun exposure and skin type. Build a plan with your artist for staged touch-ups so you do not need long single-session corrections.
