
Someone I know waited months to book a back piece because they could not tell which styles would still look good after a year of sun and movement. What they needed was a focused list that explains how each floral approach sits on the spine, how it heals, and what to say in the consult. The ten ideas below do exactly that, with practical notes on pain, touch-ups, and common mistakes so you can pick a floral back tattoo that actually works with your body.
1. Fine line spine floral vine that follows the vertebrae
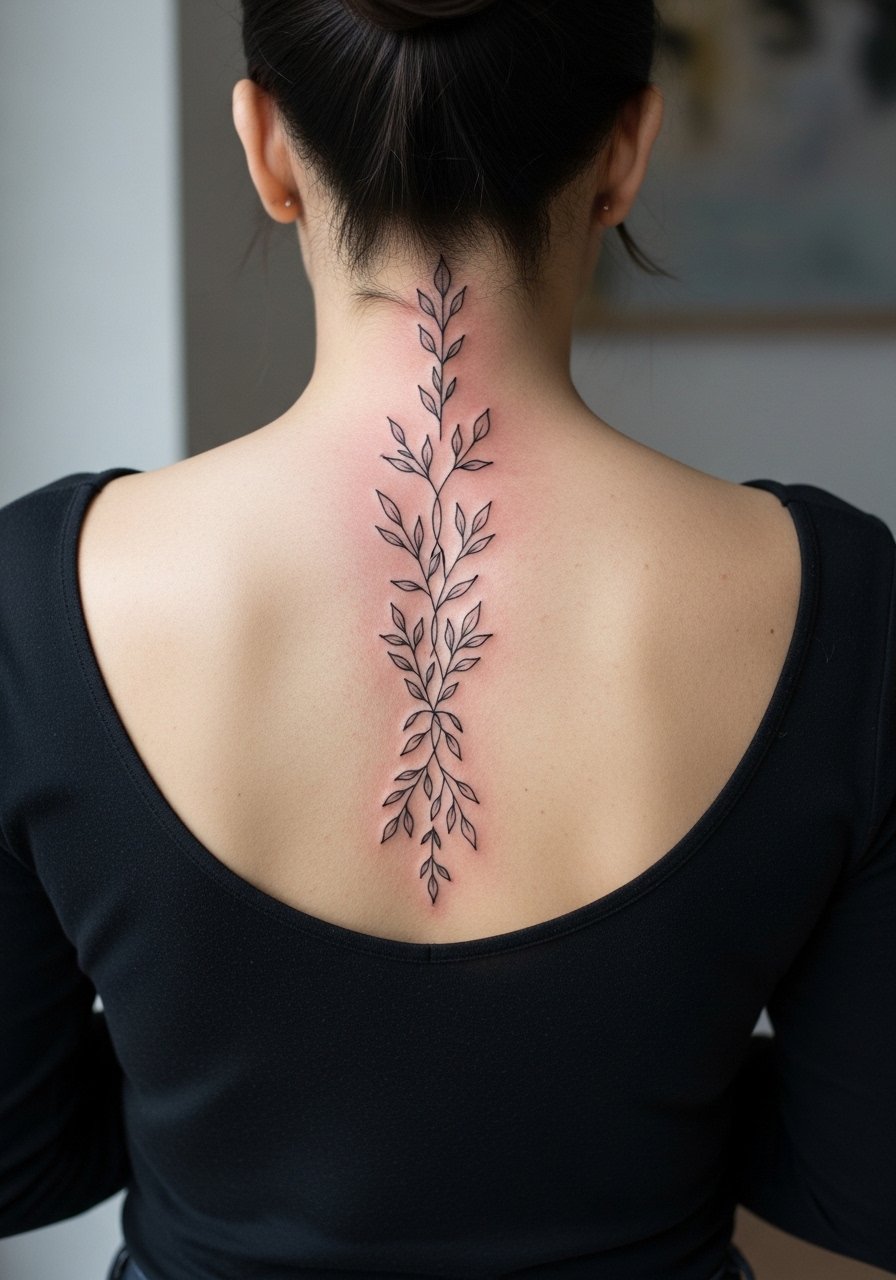
Fair warning: spine work reads sharp when you relax into the chair, and it can feel more intense than upper back work. I recommend this if you like long, elegant pieces and you are ok with touch-ups. Tell your artist you want slightly wider spacing between stems so the lines do not collapse as the ink settles. A common mistake is asking for ultra-thin lines too close together. The fine line camp acknowledges faster fading on large back canvases while the bold line camp says slight depth and spacing solves it. Expect one to two sessions under two hours each, with a likely touch-up at 12 months. Blowout risk is low if the artist keeps the needle shallow and moves with the spine.
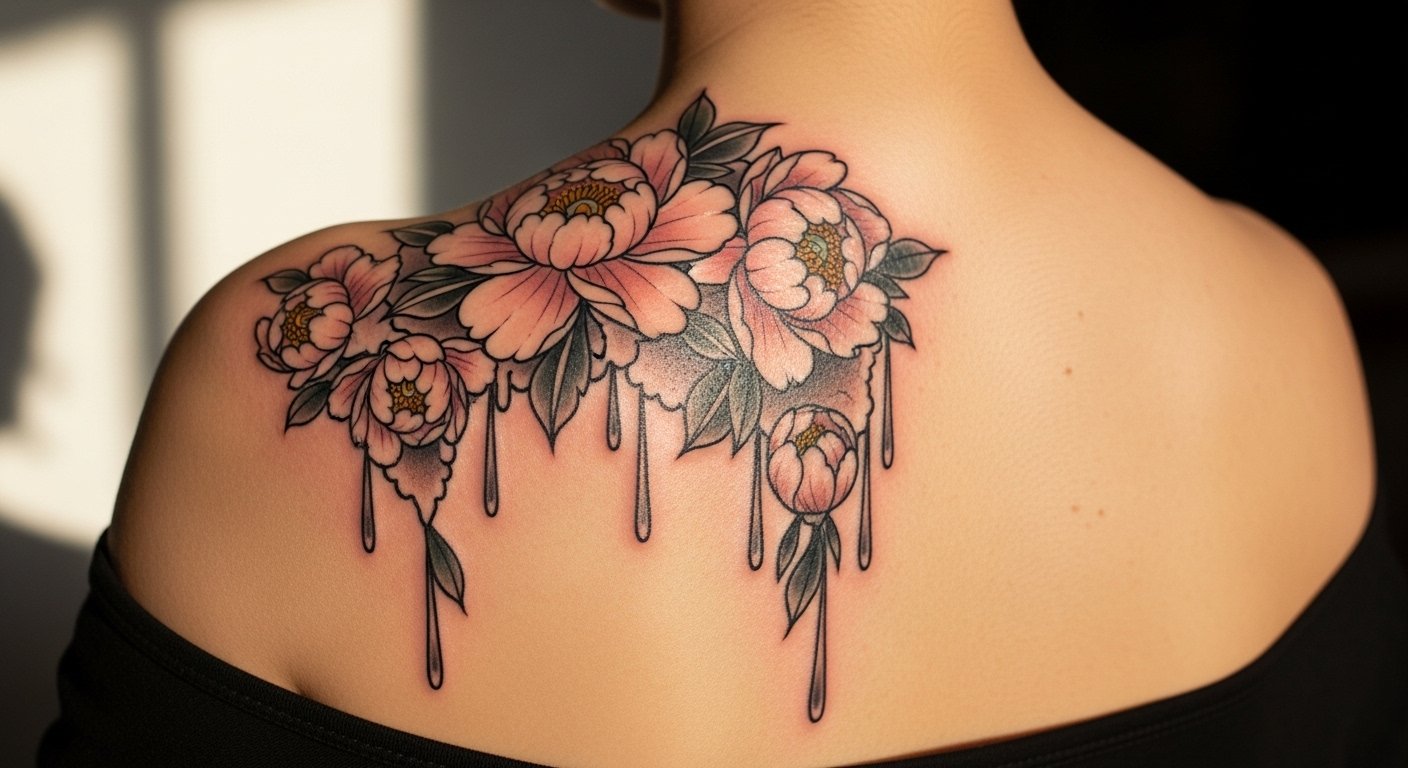
2. Neo-traditional peony and rose cascade across upper and mid back
There is real value in scale with neo-traditional blooms. I tell people who want long-lasting color to choose bold outlines and solid saturation rather than tiny petal details that fade. If you like color that still reads from across a room, ask for dense saturation and slightly larger petal shapes so the piece ages into a soft, readable silhouette. Sessions tend to be two to four depending on coverage, and pain sits around moderate because most work is on muscle rather than directly over bone. Watch for the common version that uses tiny detailing across the whole back. That one often looks muddy after a few years. Plan for a touch-up at year two if you live in a sunny climate.
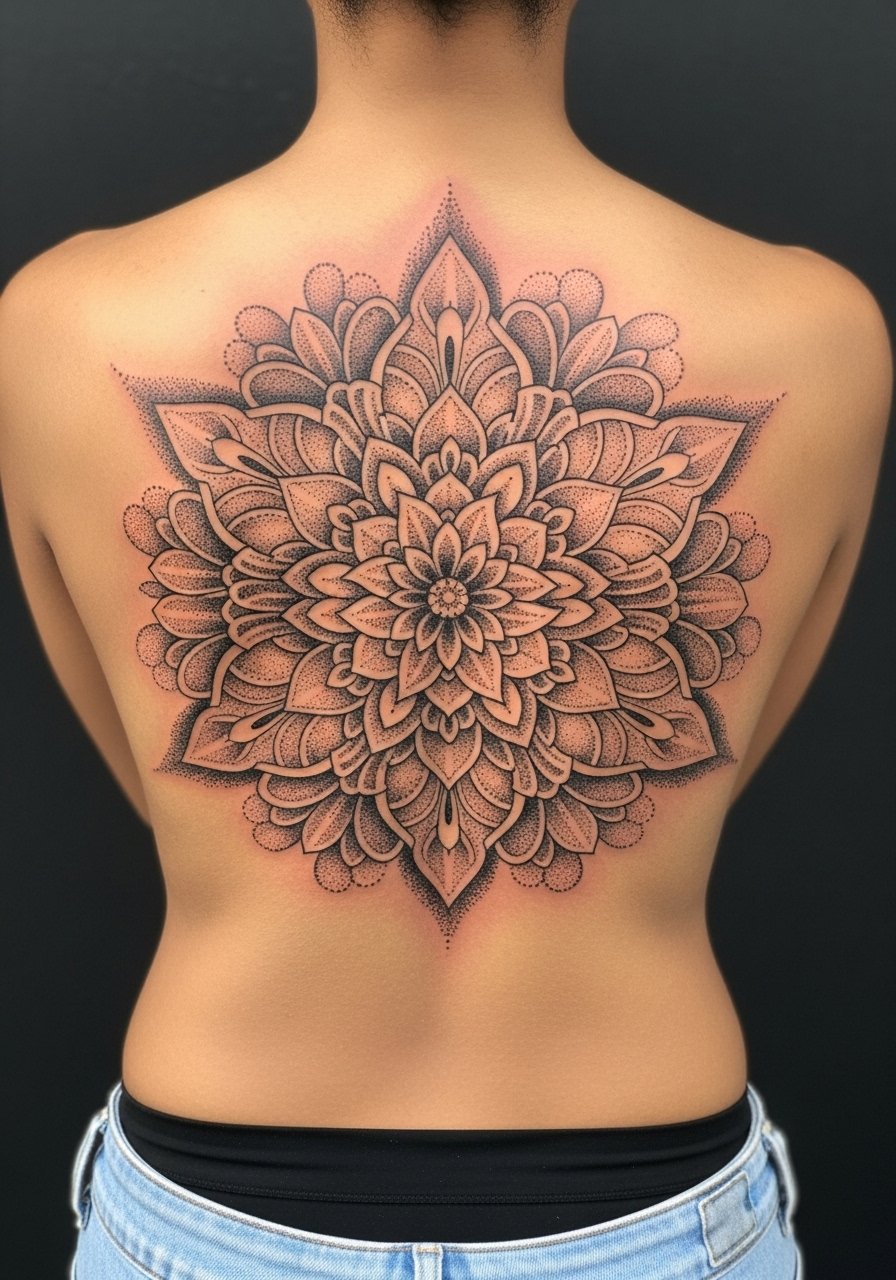
3. Blackwork botanical mandala centered between the shoulder blades
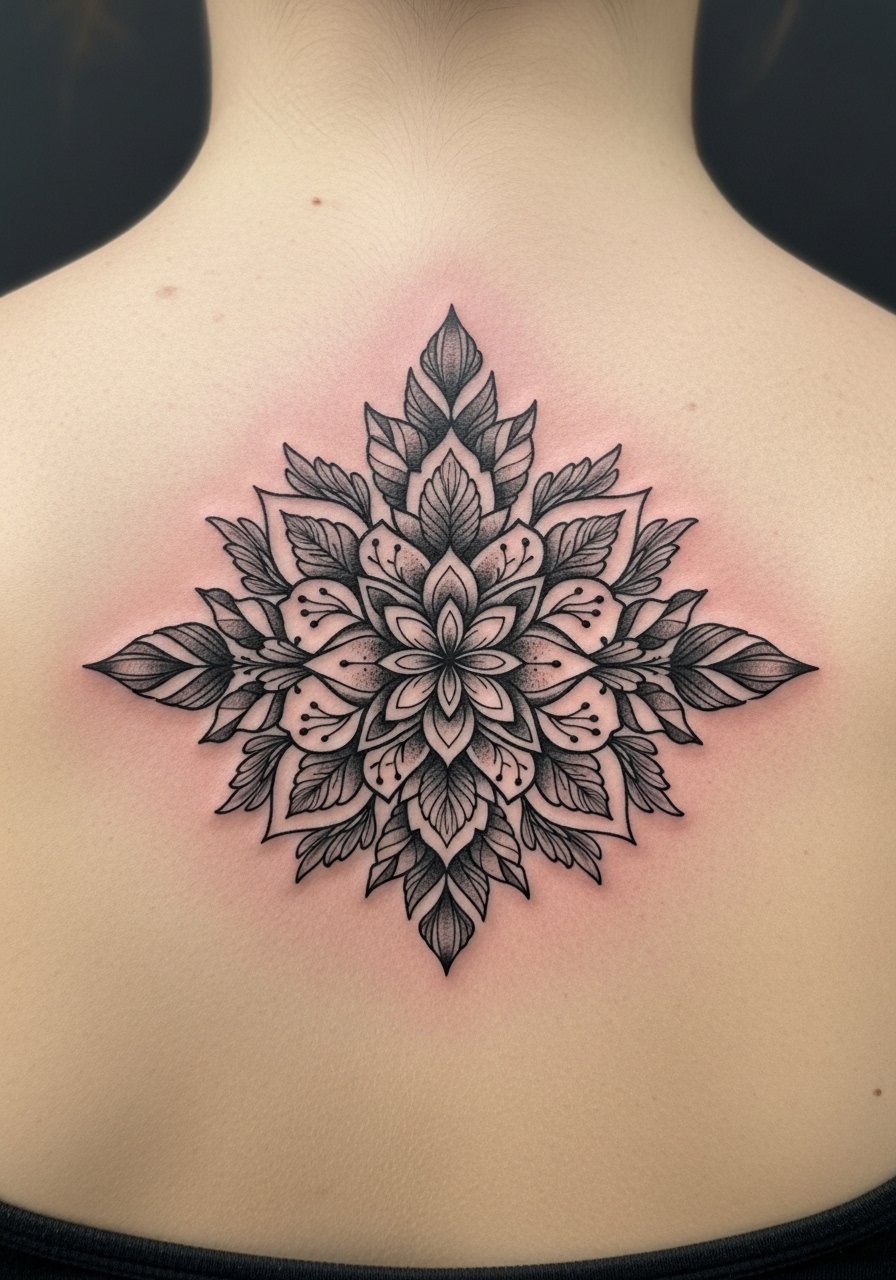
If symmetry is what draws you, this is the style to consider. Blackwork holds up well over time because saturation wears evenly. Tell your artist you want clear negative space around the petals so the mandala maintains shape as the skin moves. One mistake is compressing too many tiny shapes into the center. That creates a blur when healed. Sessions often total three with each lasting around two to three hours, and pain is steady but tolerable because the piece sits away from the spine edge. For origin respect, note that mandala patterns trace to meditative visual traditions, so many clients choose slight personal variations rather than direct replicas.
4. Watercolor lotus and cherry blossom half-back in soft pastels
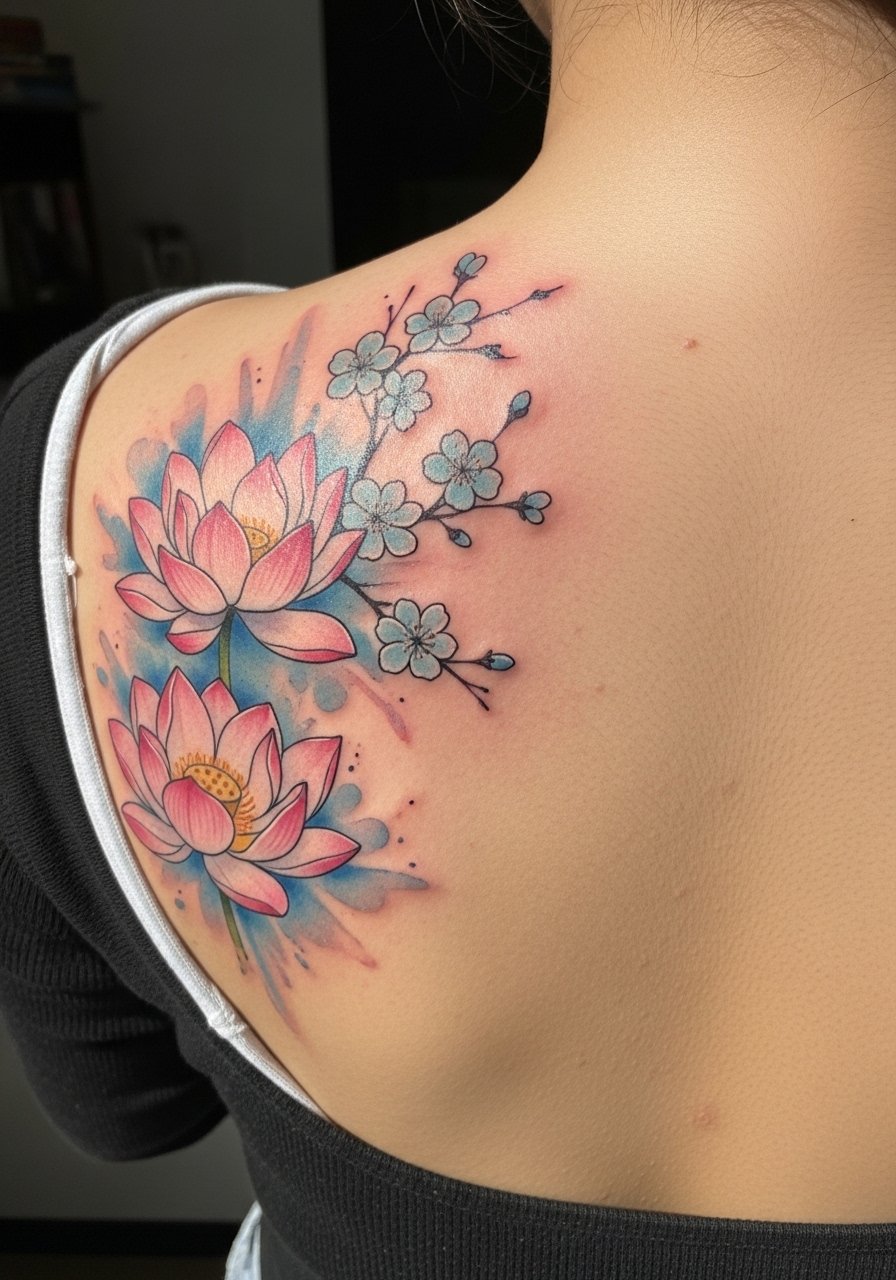
Most watercolor pieces from earlier trends lost their clarity quickly, and I say that because saturation and edge work matter more here than people expect. Ask for faint line anchors beneath washes so the colors have structure as they fade. This approach is lovely if you want a painterly look with less bold linework, but be honest about touch-ups. Expect two sessions totaling a few hours each. The common mistake is skipping anchoring lines because the fresh piece looks dreamy that way. At six months the washes will soften, and at two years expect more fading in high-sun regions unless you protect the area with SPF during exposure.
5. Ornamental vine and leaf frame around the shoulder blades
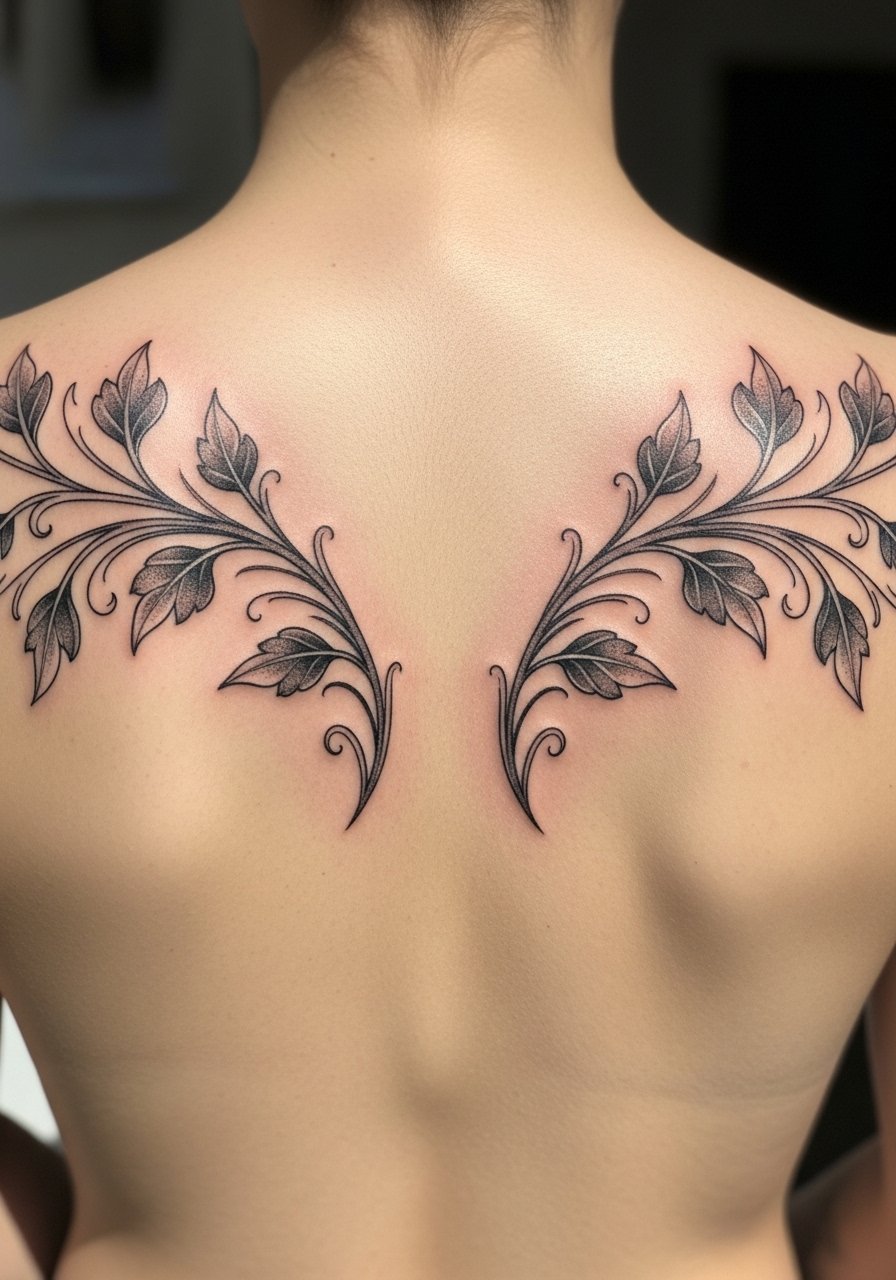
This idea reads like natural jewelry without committing to full coverage. I recommend it to people who want a framing piece that moves with clothing and posture. During consult, ask for a mockup that sits with your shoulder blades relaxed and raised so you see how it looks in motion. A common mistake is placing the frame too low which can intersect bras or waistbands. Single sessions often do this well, and pain is mild to moderate because most work is on soft tissue. Longevity is strong when shading uses stipple techniques rather than sheer washes.
6. Micro-realism single rose on the lower back near the lumbar dimple
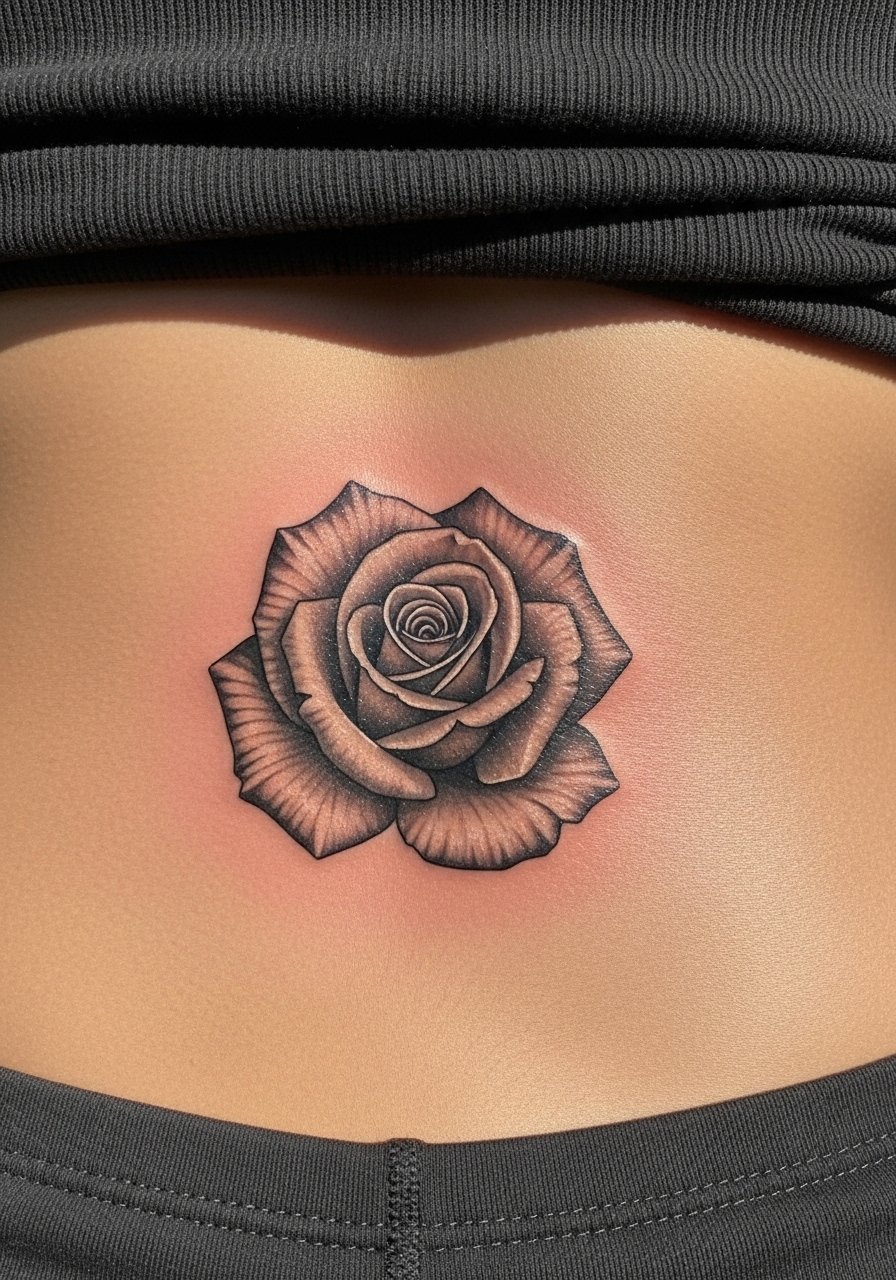
Lower back micro-realism can be gorgeous and subtle. I suggest this for clients who want a focused, standalone piece that can double as a cover-up for small old tattoos. Tell your artist you want contrast between petal edges and inner shading so the depth reads for years. The mistake I see most is asking for ultra-fine texture without strong contrast. That approach flattens quickly. Sessions are usually one to two hours and the pain varies with how close the work gets to bone. Expect possible distortion with major weight changes, so discuss placement if you anticipate fluctuations.
7. Ignorant style chaotic floral explosion across the full back
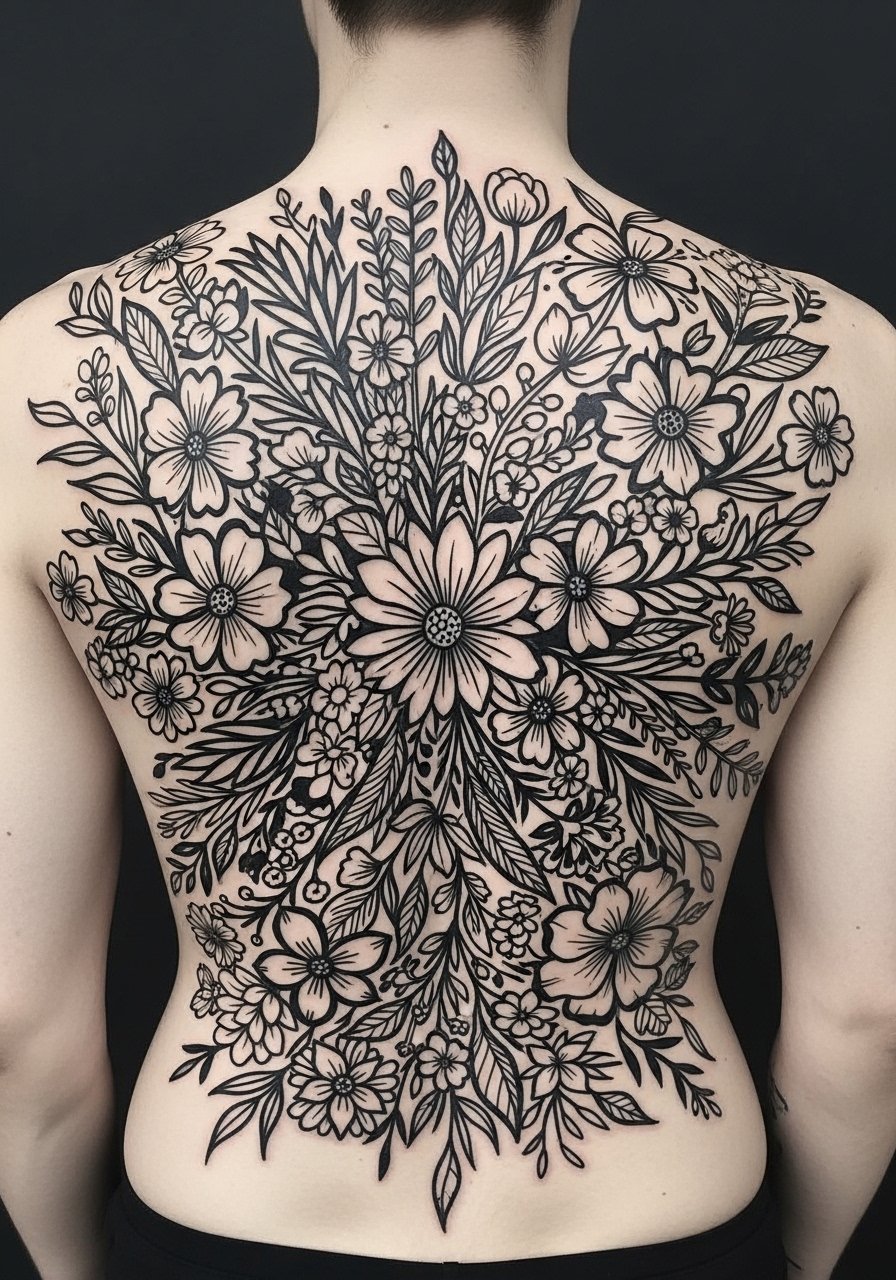
This raw, imperfect look is intentionally rough around the edges, and I like it for people who want expressive, large-scale work that reads as movement rather than tight realism. Tell your artist you want deliberate gaps and uneven stems so the chaos stays readable when healed. One common issue is overworking lines to make them "perfect" which defeats the aesthetic. Expect multiple long sessions and heavier pain near the spine. Because outlines are bold, longevity is strong but plan on touch-ups for areas that see friction from clothing. This style also helps if you want to build a patchwork over time.
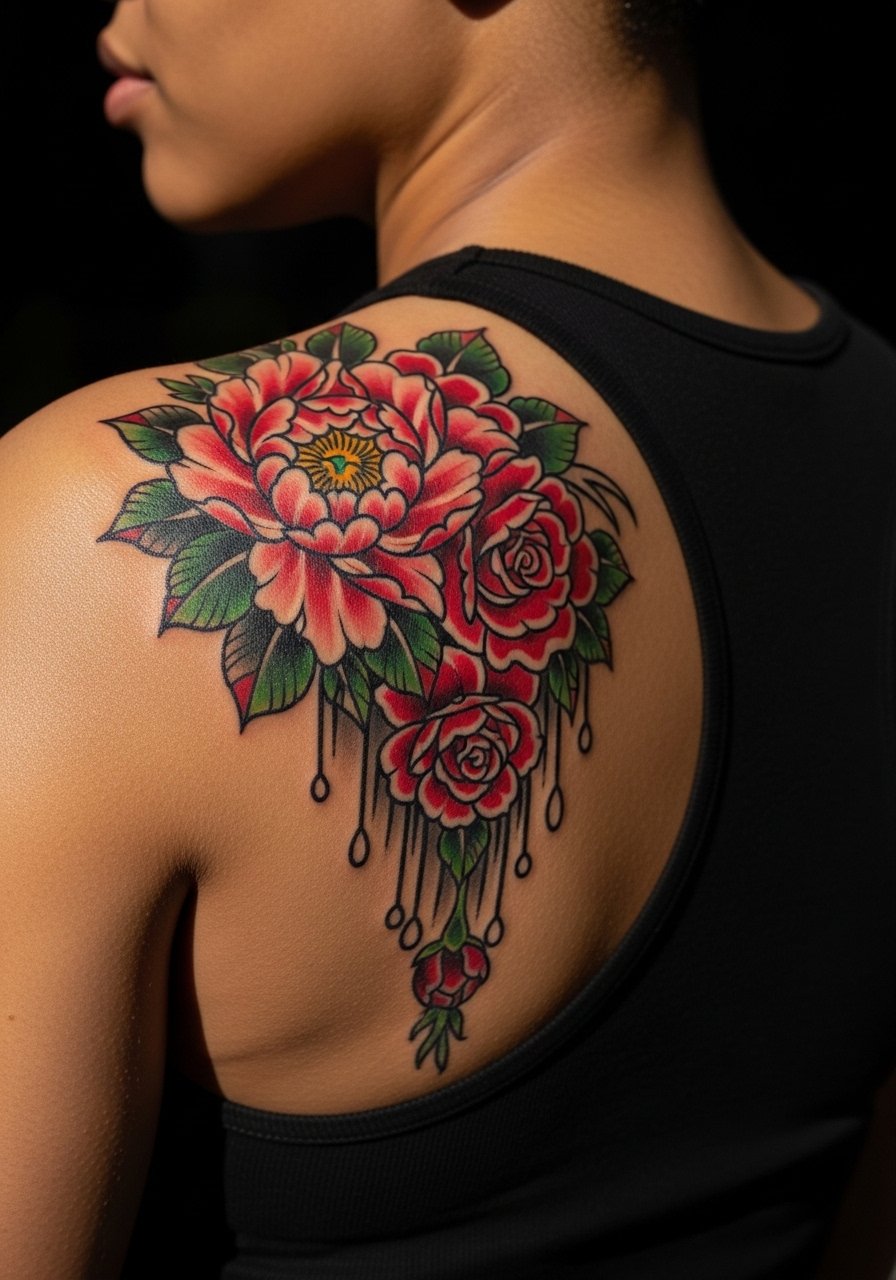
8. Traditional American rose bouquet across the trapezius and upper back
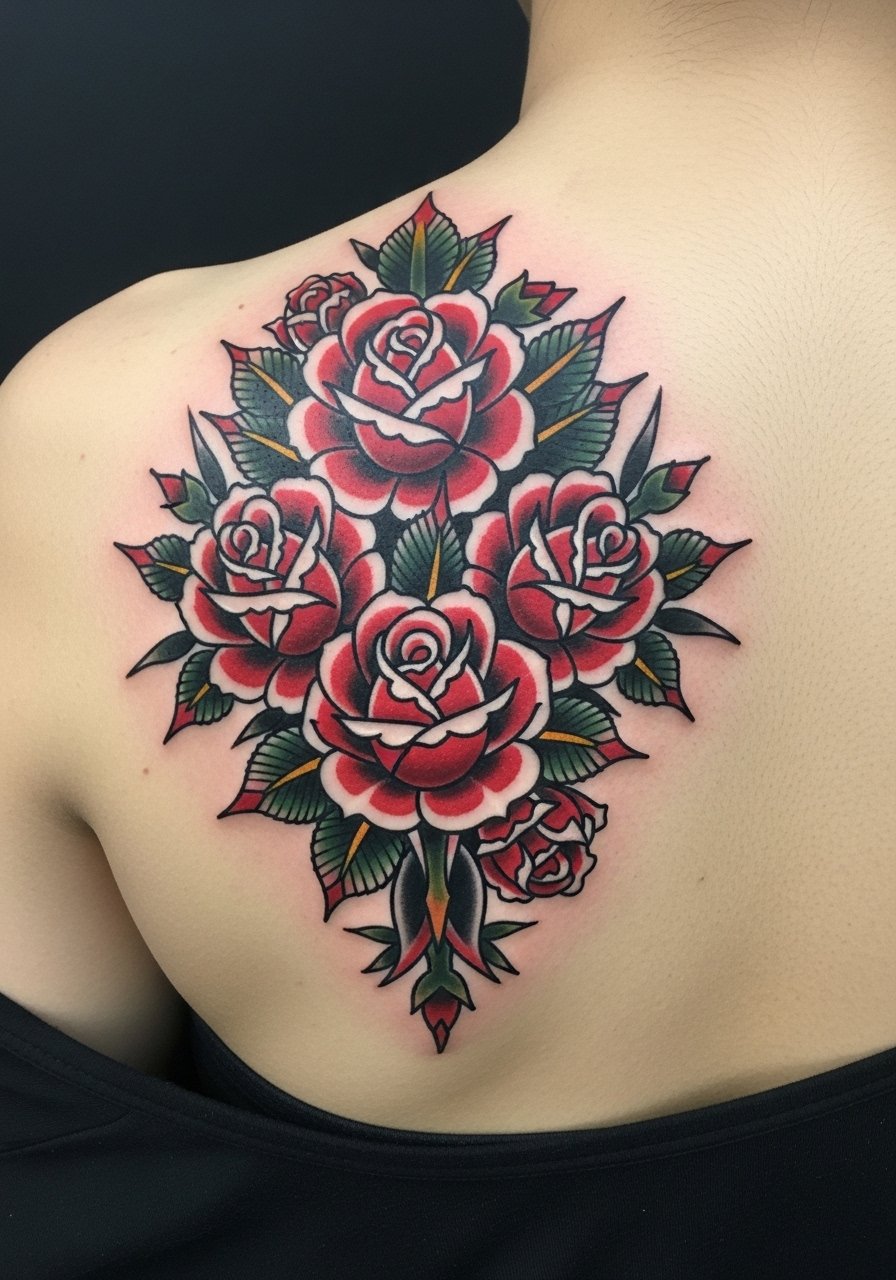
I recommend this for clients who want color that reads clearly in photos and resists early blurring. Ask for slightly larger rose heads and dense saturation so the bouquet keeps its silhouette as it ages. A frequent mistake is requesting tiny, detailed buds in the center of a large cluster. Those details often disappear and leave a muddy center. Sessions are typically two to three hours across two sittings. Pain is moderate because much of the work avoids direct spinous processes. If you travel to local guest spots or use directory filters, you can find artists who specialize in traditional palettes.
9. Patchwork floral quarters for an evolving back garden
This is the living-garden approach that lets you add pieces over years. I like recommending it to people who want flexibility and the option to switch styles later. During consults I tell clients to plan negative space between quarters so future pieces have breathing room. A common error is filling every inch in the first session which leaves no room for evolution. Expect multiple sessions over months or years. Pain and session time vary by the quarter being worked on. Use discovery pathways like #BackPatchwork on Instagram or directory searches to track guest spots and timing that match how you want to build this.
10. Dotwork floral sacred geometry centered on the mid-back
This one is for people who want a hypnotic, meditative center piece. I advise asking for a slightly larger diameter than the initial sketch so dots maintain negative space as they age. The mistake is cramming too many micro dots into a small radius which blurs into a gray patch. Sessions usually take two to three sittings focused on even stipple density, and pain is moderate because of proximity to the spine. For respectful context, many patterns draw from sacred geometry traditions, so a small variation or personal motif makes it more personal without copying a specific ritual symbol.
Tattoo Prep and Aftercare Essentials
Below are practical items I recommend for back tattoos, grouped by use. All links search Amazon so you can view options from indie makers and niche sellers. I included a mix of lesser-known solutions from community talk and a mainstream option once for those considering occlusive healing.
Indie vine stencil kit for back mapping. Useful for testing spine curvature at home. Apply a temporary stencil to check how the vine moves when you bend and twist.
Breathable bamboo aftercare sheets, large size. These help sweaty backs breathe better than plastic wrap during hot weather.
Medical-grade second skin bandage, 6-inch roll. Works as a lightweight barrier for the first 24 to 48 hours if your artist recommends occlusion.
Lightweight fragrance-free healing balm from indie brand. Use sparingly after initial crusting to keep skin supple without clogging pores.
Silicone scar-reduction strips. Helpful months after healing if raised scarring appears on dense saturation areas.
Gentle foaming cleanser, fragrance-free. Wash the area twice daily during the first two weeks to remove sweat and debris.
SPF 30+ mineral sunscreen stick for tattoos. Crucial for long-term color retention once the piece is healed.
Saniderm or similar medical-grade adhesive bandage pack. This is the one mainstream occlusive option here. Discuss with your artist because some prefer dry healing.
Every tattoo is different. Always follow your artist's specific aftercare instructions. Consult a dermatologist if you have skin concerns or unusual healing issues.
Frequently Asked Questions
Q: Will a fine line spine vine blur faster than a neo-traditional cascade on the upper back?
A: From what I've seen, fine line down the spine is more likely to soften faster than bold neo-traditional pieces because the lines are thinner and the area sees more movement. Ask your artist to space lines and add subtle anchors if you want the fine look to last longer. Expect a touch-up within a year or two depending on sun exposure.
Q: How should I choose between Saniderm-style occlusion and dry healing for a sweaty back in summer?
A: Artists split into two camps. One camp likes occlusive dressings because they protect against sweat and friction. The other camp prefers dry healing since scabs can form and peel naturally. In practice, I recommend starting with a breathable second-skin for the first 24 to 48 hours, then switching to gentle cleansing and a light balm, and adjusting if you notice excess moisture or irritation. Your artist's preference matters here.
Q: If I plan to do a patchwork back, what questions should I ask during consults to keep future options open?
A: Ask about negative space planning, consistent line weight choices, and a shared palette or scale for future pieces. Tell the artist you want quarters or panels left intentionally open. Also ask how they like to layer color over time so new work will blend without clashing.
Q: Do dotwork mandalas need different aftercare than watercolor florals?
A: The basics are similar, but dotwork relies on consistent stipple density so avoid peeling or picking at scabs. Watercolor pieces often need more sun protection early because washes can fade unevenly. In both cases follow a gentle cleanse, light balm use, and sunscreen once healed.
Q: How painful is a lower back micro-realism rose compared with an upper back mandala?
A: Pain varies by proximity to bone and the density of shading. Micro-realism near the lumbar dimple can hit bone edges and feel sharper during tight shading passes. An upper back mandala sits more on soft tissue and tends to be steadier. Expect both to be manageable with breaks and breathing techniques.
Q: Can I use temporary stencils at home to test placement and yoga movement before committing to a full-back design?
A: Yes. Temporary stencil kits and trial stickers are valuable for testing how a design behaves during movement like backbends. Try a few sessions of gentle stretching with the stencil on so you see distortion points, then bring those notes to your consult. Discovery paths like Etsy stencil searches and TikTok demos are good places to source these trial patterns.
