
Someone I know spent months narrowing designs only to realize the real problem was picking something that would age well on the lower back. Between pregnancy stretch, summer sweat, and the bone-line pain, the wrong shape can blur or migrate fast. I spent time in five shops across Brooklyn and saw which small lumbar pieces last. These ten small lower back tattoos lean into symmetry, vertical placement, or heavy linework so the design still reads after a few years.
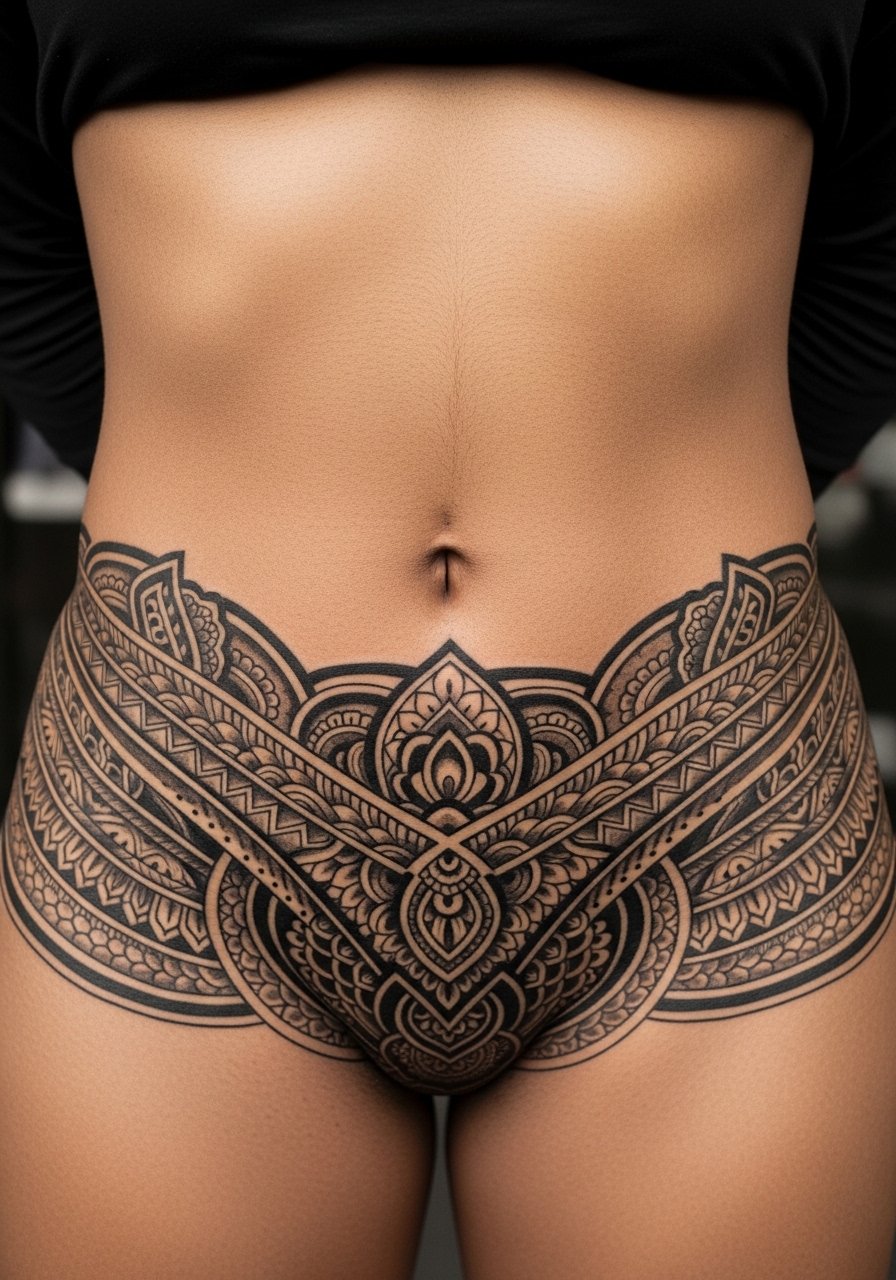
1. Ornamental Mandala Centered on Spine
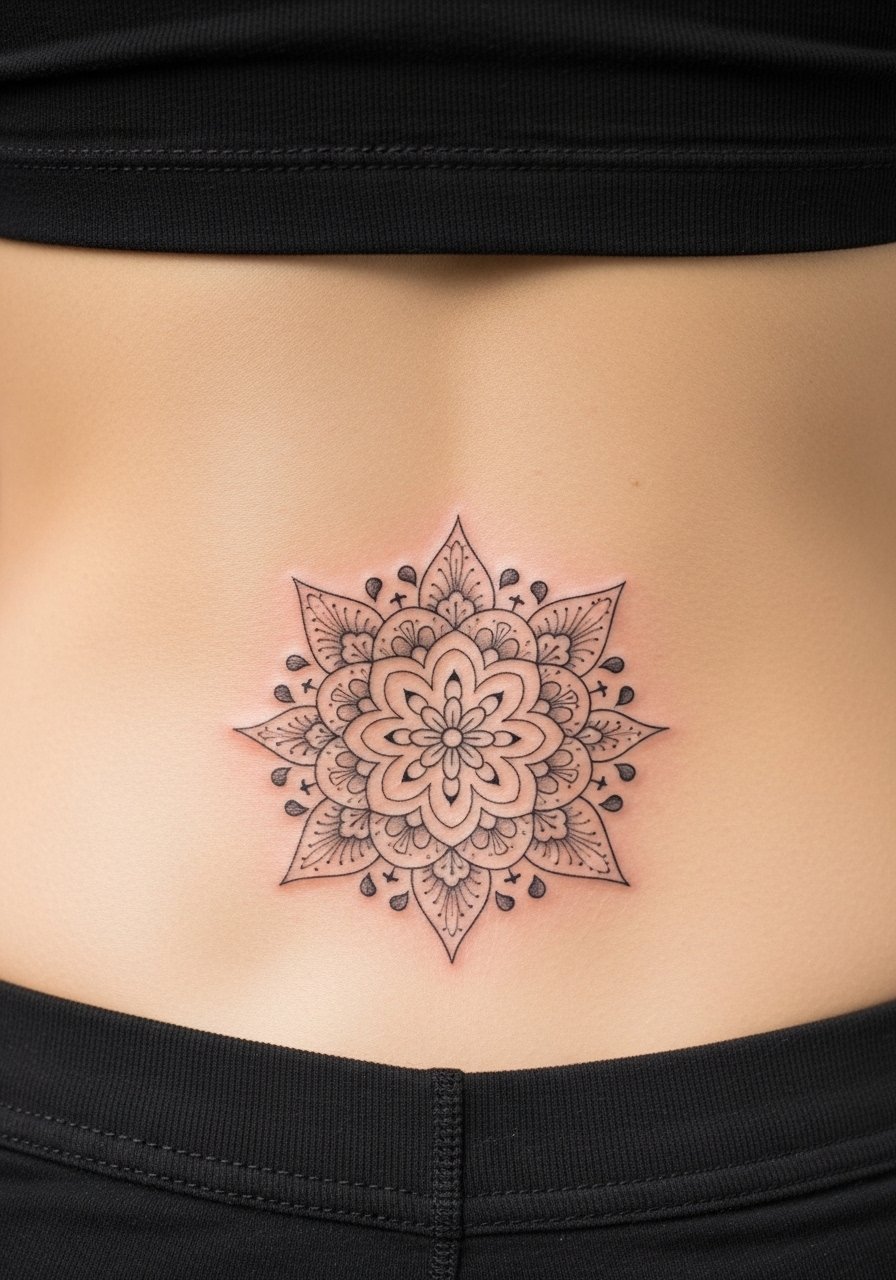
Most people choose a mandala for its symmetry and how it frames the lumbar curve. For a small lower back version ask your artist for slightly wider line spacing so dots and stipple shading do not bleed together over time. Fair warning: the area near the spine hits bone and can feel intense, so expect a session under two hours for a compact piece. A common mistake is packing too many tiny petals into a three-inch stencil. That will look crisp at first and then fuzz after a year. Tell your artist you want room between elements, and plan a touch-up once every two to three years if you want the crisp black and gray contrast to stay strong.
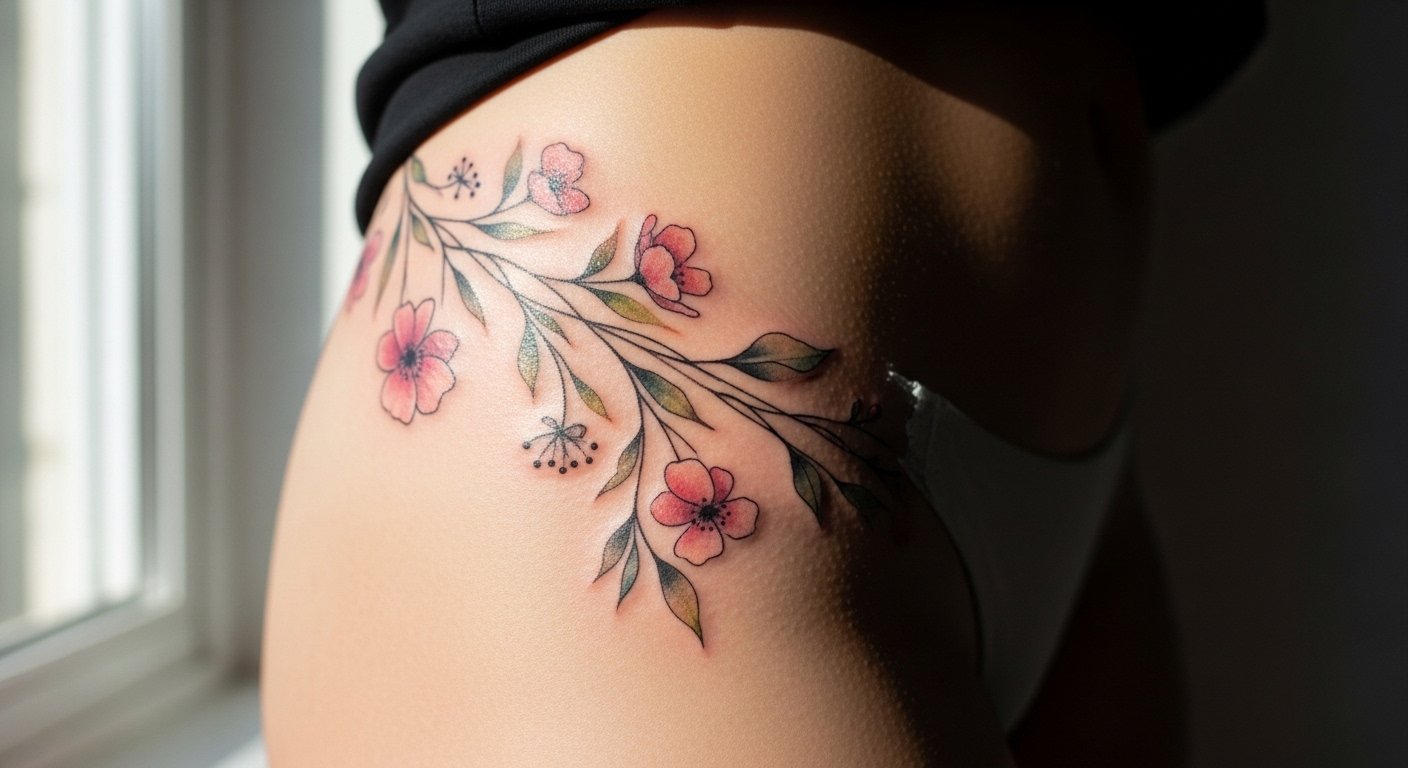
2. Symmetrical Butterfly Wings Flanking the Spine
Someone I know got wings that peek when she bends and the size made the piece playful without swallowing her back. For a small lower back butterfly request bilateral placement that follows the dimples beside the spine. Color accents look great but expect softer saturation over time on low-rise clothing friction. Pain is moderate because the ink sits over soft tissue on either side of the spine. A typical session runs under two hours. Avoid asking for ultra-fine veins in the wings. Those thin veins blur faster than the wing outline and create a smudgy look at year two. If you want longevity, prioritize strong linework with restrained color fills.
3. Fine Line Lotus Above the Tailbone
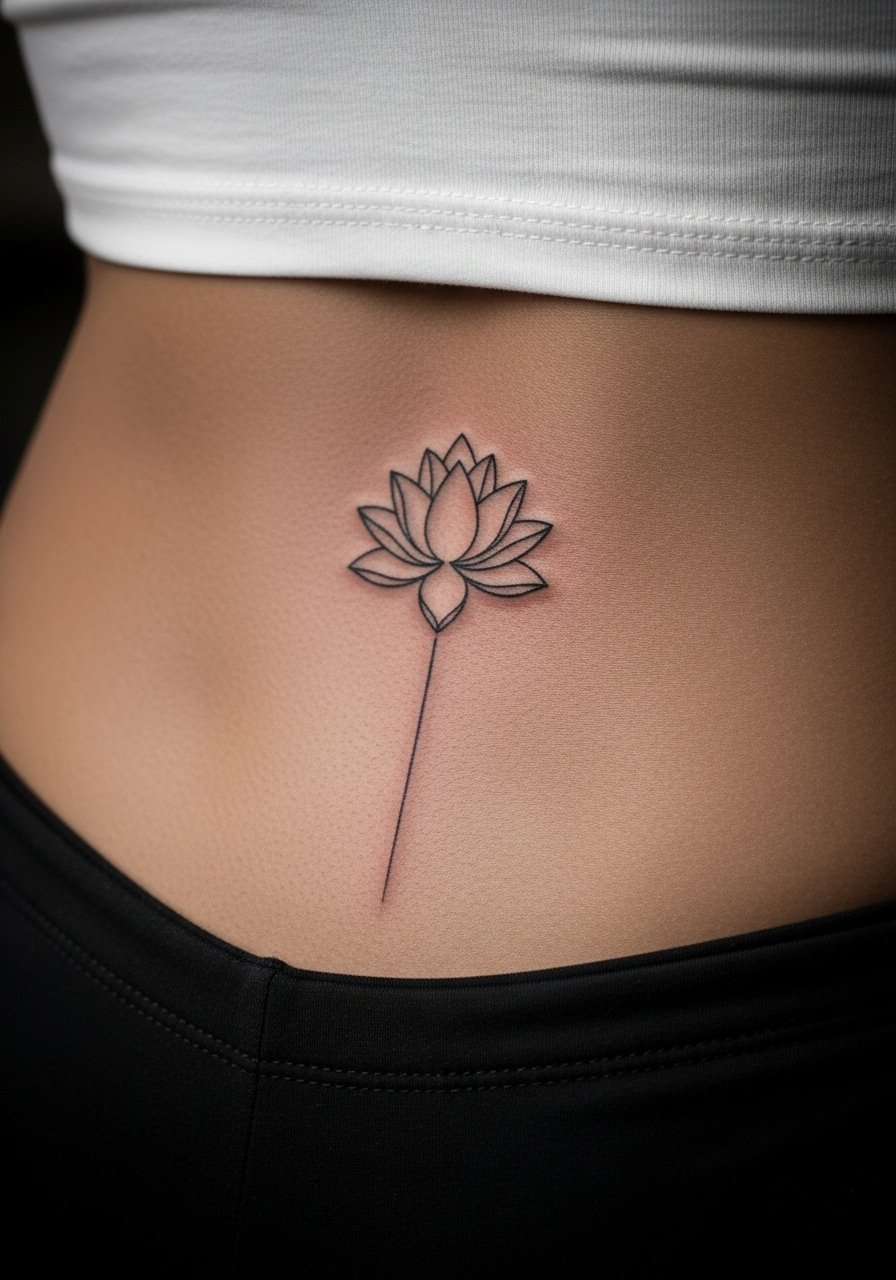
Fine line fans split into two camps here. One group says delicate lotus lines blur quickly on mobile skin and the piece looks fuzzy after a year. The other group says careful needle depth and spacing keeps the lotus readable for longer. The practical takeaway is to ask the artist about their fine line touch-up history before booking. For a small sacral lotus plan a single short session and expect pain to spike near the bone. The biggest mistake is shrinking the lotus too small. Tiny petals need breathing room. If you want subtlety that lasts, choose slightly bolder primary lines and keep inner detail light.
4. Micro-Realism Snake Coiled Along the Spine
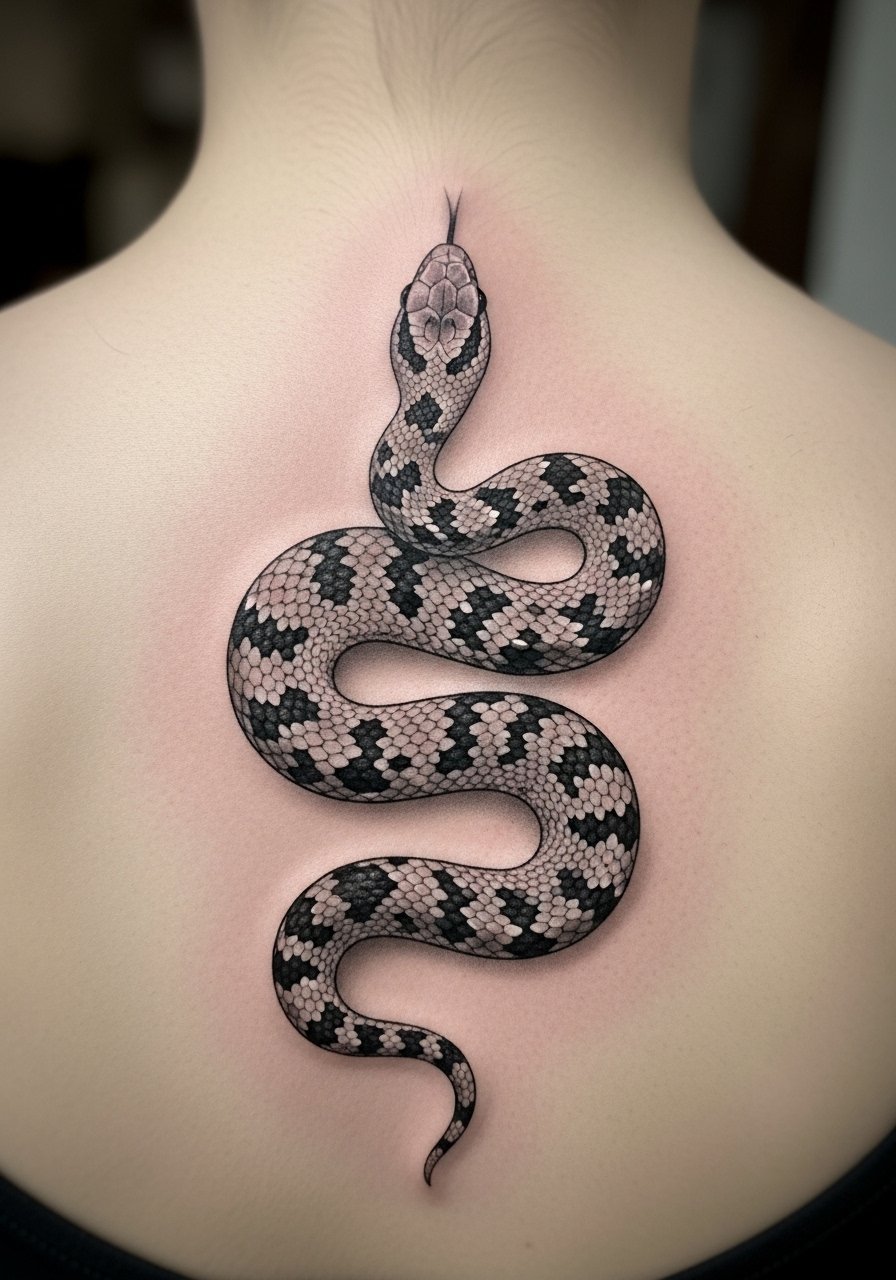
Visual impact lead works here because a coiled snake reads like a secret detail when you lean forward. Micro-realism trades large coverage for high detail, so ask for a tiny version that emphasizes silhouette and a few high-contrast scales. Expect focused pain on the vertebrae and a one-session tattoo that runs under an hour. A common error is asking for hyper-detailed scales in a 3-inch layout. That detail blurs and makes the snake look muddy after healing. Tell your artist you prefer contrast over small texture so the shape stays legible at six months and beyond. This style often needs a touch-up at year two if you want the shading to remain crisp.
5. Traditional Bow with Banner, Small and Centered
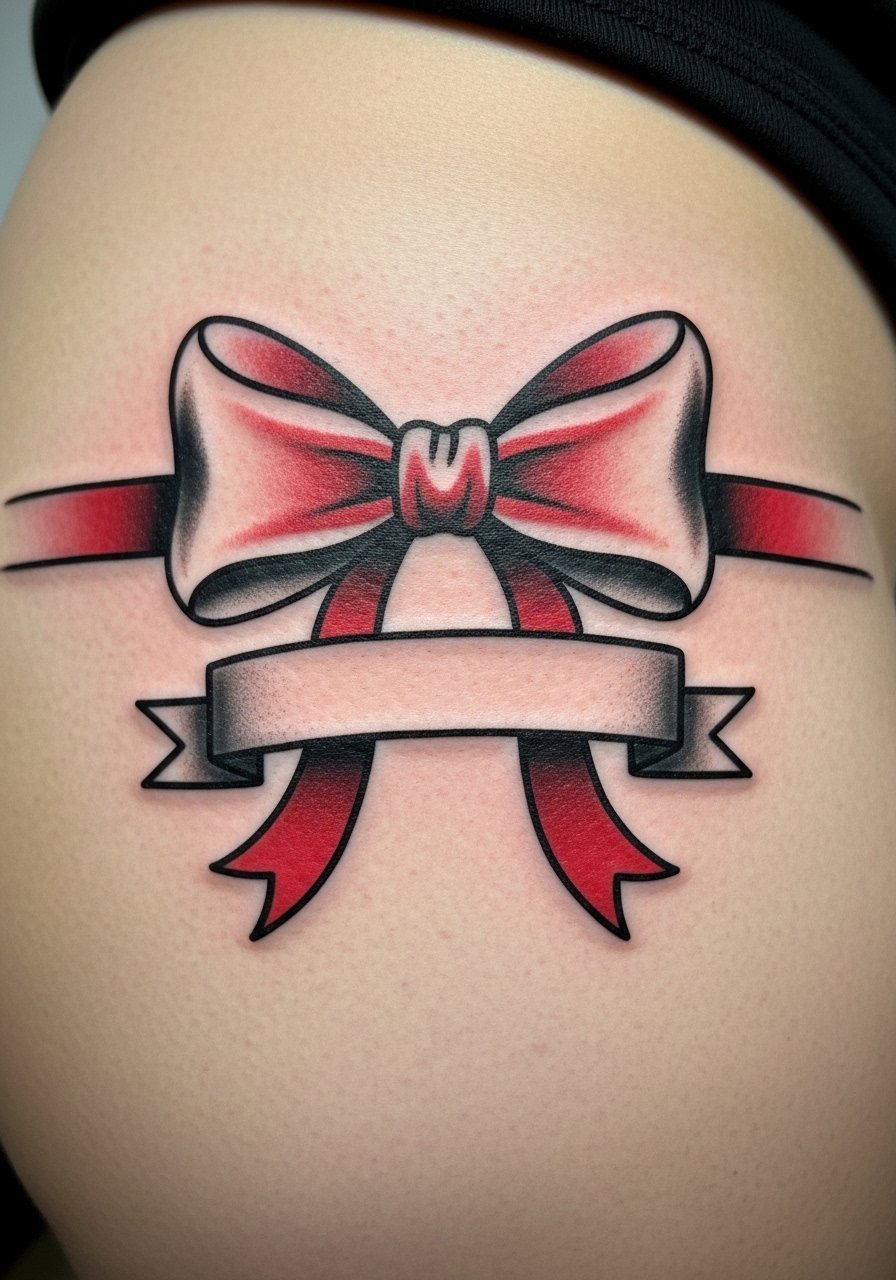
When you sit down with an artist for a retro bow, bring exact wording for the banner if you want lettering. The lower back suits short words or initials because the curve makes long text hard to read. Pain sits in the moderate range because the piece straddles soft tissue and the upper glute. One session will do for a small 3- to 4-inch bow. One frequent mistake is tiny script in the banner. Lettering needs space to avoid blurring into the ribbon. Ask for a bold banner outline and simple block letters for durability. For cultural sensitivity, avoid borrowed script styles as decorative elements without understanding their origin.
6. Ignorant Style Hearts and Daggers Cluster
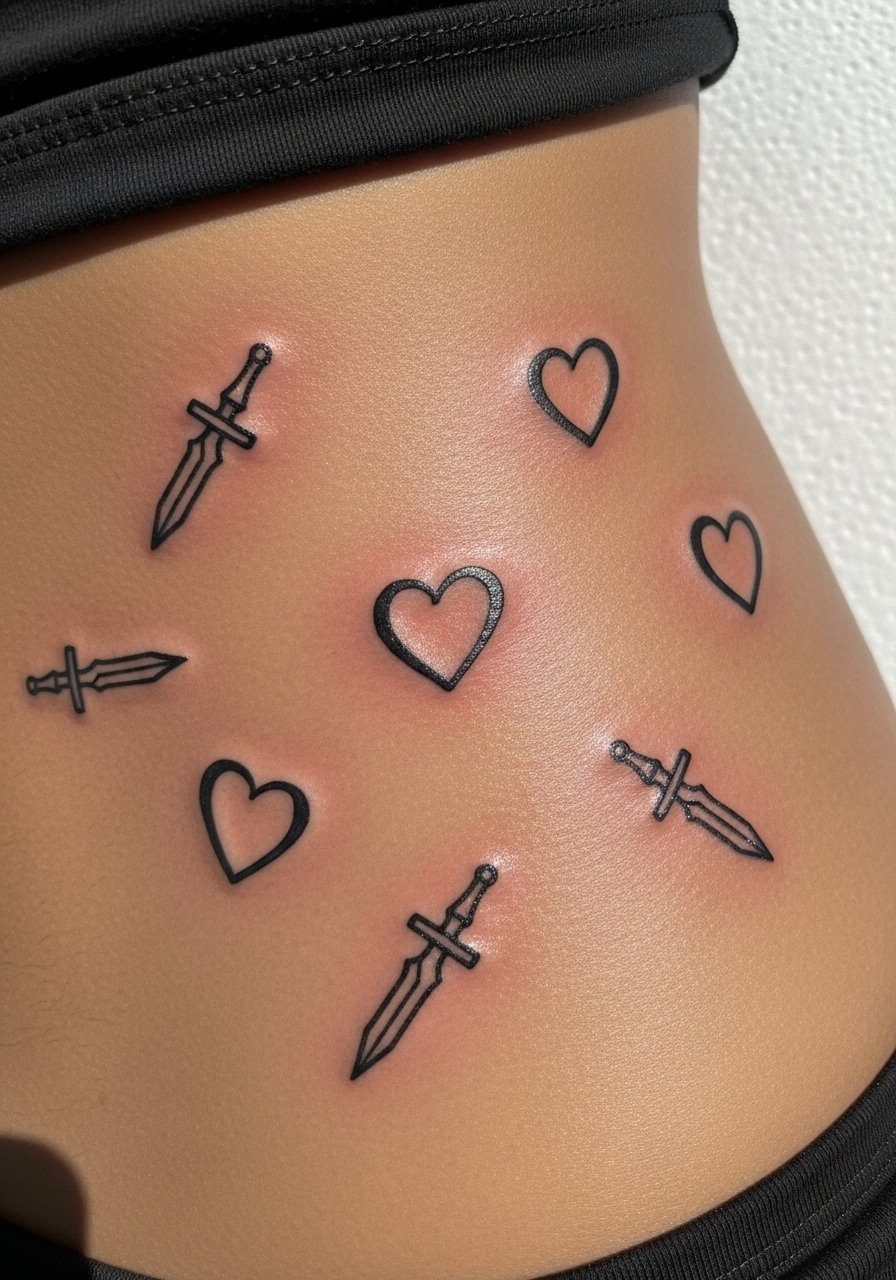
Mistake lead: the biggest error with playful ignorant style is asking for too much detail in a small cluster. The charm here is chunky lines and retro charm that age like classic tattoos. This style sits well on lower back soft tissue so pain is manageable and sessions are short. Tell your artist you want bold outlines and leave out tiny fill patterns. That keeps each motif readable as the skin moves and stretches. This approach works well for a first lower back tattoo because it is forgiving during healing and touch-ups are straightforward when needed.
7. Decorative Script Arch, Sacral Curve (example text: "Breathe")
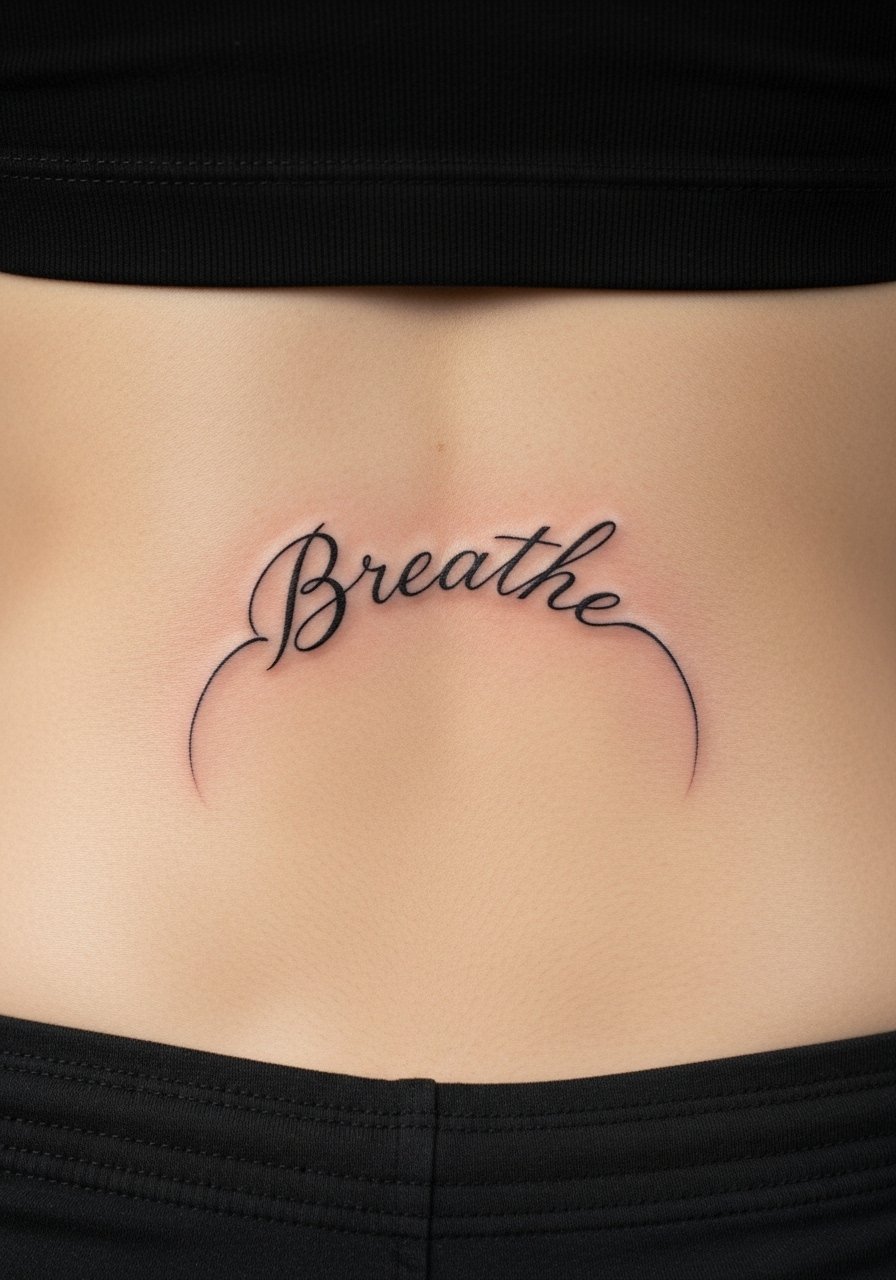
Consultation lead: when you want script across the sacral arch bring the exact wording and font examples. Because scripts follow the body's curve, prototype stencils with bending tests during the consult. Pain ranges from low to moderate depending on how close the ink sits to the tailbone. A common mistake is choosing an ornate, tightly packed font for a small arch. That clogs up as it heals. If the lettering references cultural calligraphy, acknowledge the origin and consider customized variations rather than copying traditional sacred texts. Expect a one-session job and a potential touch-up if any strokes soften in the first year.
8. Vertical Crescent and Dot Work to Dodge Stretch
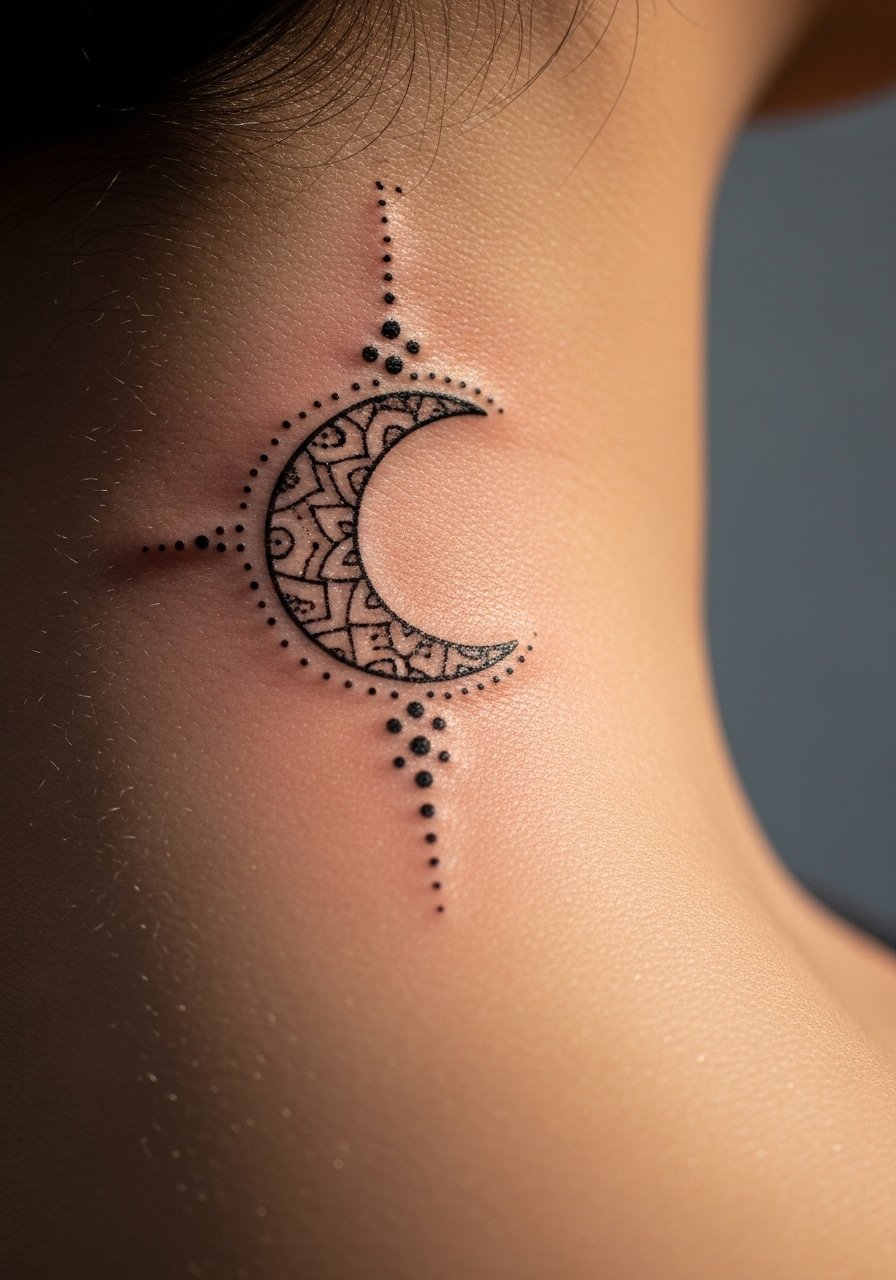
Aging and healing lead: vertical pieces like a crescent with dot work are ideal if you want something that handles weight changes and pregnancy better than horizontal bars. The vertical alignment lets the design sit with the spine so it stretches less across the gluteal plane. Tell your artist you want moderate dot spacing to avoid blowout in the stippling. Pain concentrates near the vertebrae, but a compact vertical piece typically finishes in under an hour. A mistake I often see is asking for extremely dense stipple in a small column. That density flattens over time. Keep dots airy and focus on strong primary contours.
9. Ornamental Cover-Up Overlay for Old Tribal Ink
Consultation lead plus unique angle: cover-ups on the lower back are a real gap in most galleries. The trick is designing a motif that uses symmetry and heavier saturation to mask old lines while following the spine. Expect a longer consult and sometimes two short sessions for successful masking. A common mistake is trying a light ornamental stencil over dense black tribal without enough contrast. That will not hide the old shapes. Tell your artist you need an overlay with strategic dark fills and flowing elements that wrap into the hips. If you want a more discreet route, consider a vertical element that redirects attention away from the previous markings.
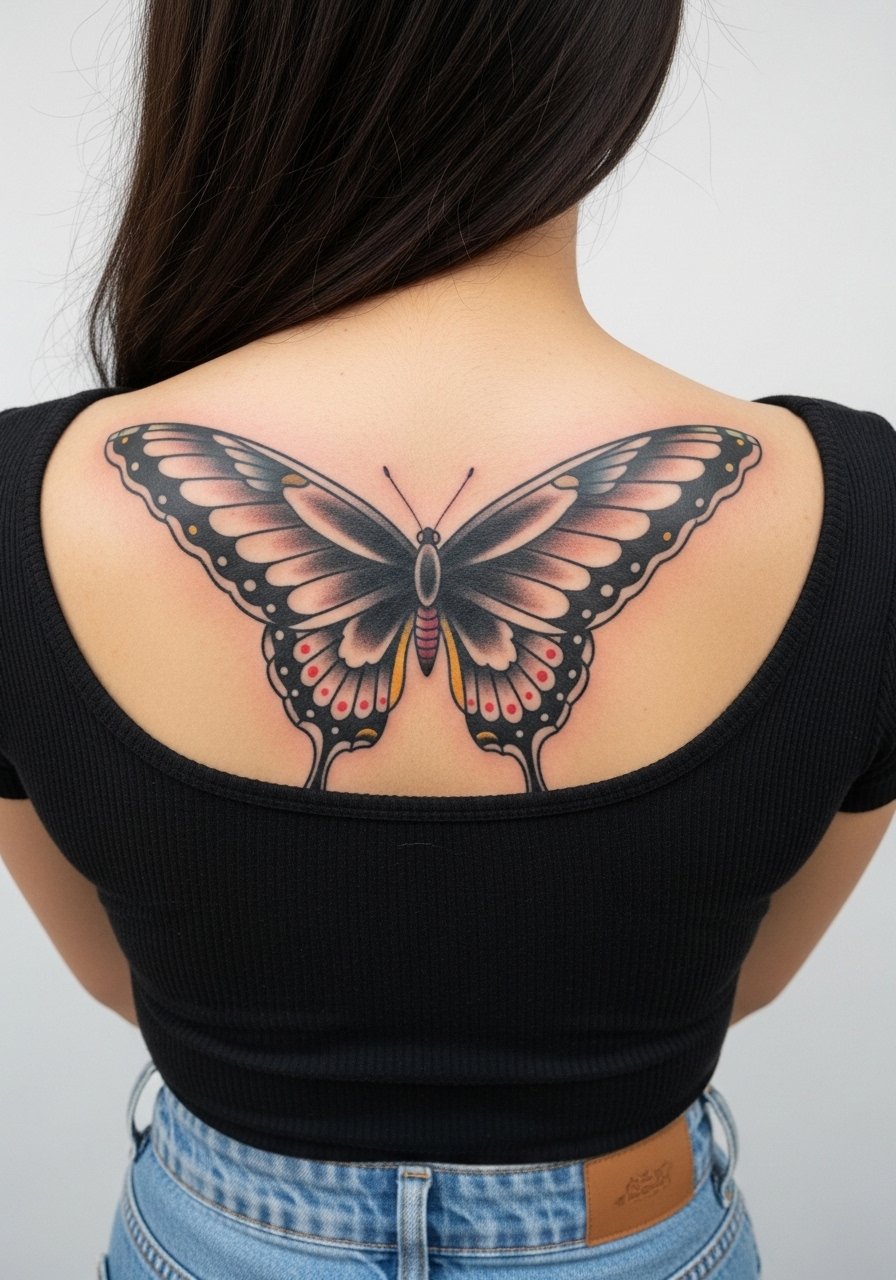
10. Small Blackwork Eagle Silhouette for High Wear Areas
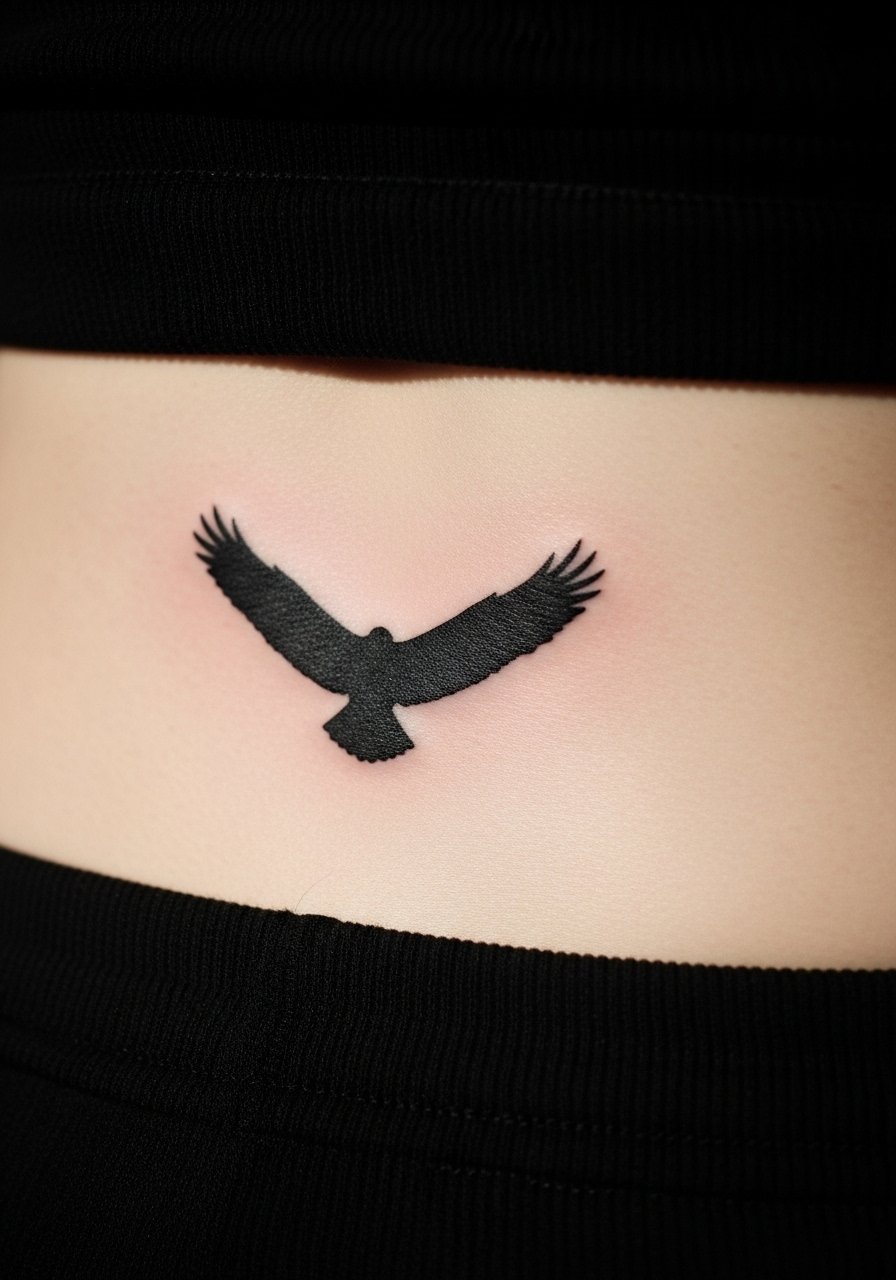
Visual impact lead: blackwork silhouettes survive friction and sun better than delicate color in low-rise clothing zones. For a compact eagle keep the wings stylized and the shape simple so the silhouette reads in motion. Pain is moderate because this sits across soft tissue and may graze hip points at the edges. One session usually covers a small silhouette. The error here is overcomplicating the interior with tiny feather details. Solid black holds up; tiny feather lines will degrade. Ask for saturated black and a clean edge so the eagle keeps its presence for years without frequent touch-ups.
Tattoo Prep and Aftercare Essentials
- Lush Lotus indie tattoo balm, lightweight non-greasy formula. Use after the initial scab phase if your skin gets sweaty. It absorbs quickly and leaves less residue under waistbands than heavier petroleum products.
- InkShield dry-healing spray, thin protective layer alternative. For hot months try a thin spray that mimics second skin without the bulk so your lower back can breathe while staying protected.
- HealRite ointment with tea tree, itch control formula. Helpful around bony spots where itch runs worst, use sparingly and follow your artist's timing.
- Fragrance-free lightweight balm, travel size. A good generic balm fills gaps when you cannot source indie brands and keeps moisture balanced without clogging pores.
- Medical-grade second skin bandage, 6-inch roll. Use for the first one to three days if your artist recommends occlusion to limit bedding-in and friction.
- Saniderm single-sheet starter pack. This is the mainstream occlusive choice some artists use, and it can be helpful in sweaty weather. Keep in mind artists and communities divide on occlusive versus dry healing.
- Gentle foaming fragrance-free cleanser, 8 oz. Use only while washing away ointment and aftercare residue during the first two weeks.
Every tattoo is different. Always follow your artist's specific aftercare instructions. Consult a dermatologist if you have skin concerns or unusual healing issues.
Frequently Asked Questions
Q: How much does a small lower back tattoo usually cost?
A: Expect session ranges between 200 and 1000 depending on the style, studio rate in your city, and whether you need a cover-up or multiple sessions. Small, simple blackwork or script tends toward the lower end. Complex micro-realism or multi-session cover-ups push toward the higher end. Always ask shops for a session estimate.
Q: Will a fine line lotus blur faster than a blackwork silhouette on the lower back?
A: In my experience fine line tends to soften sooner on mobile, thin-skinned areas. The blackwork silhouette holds sharper because it relies on contrast not tiny detail. If you want a delicate lotus, discuss slightly bolder primary lines and realistic touch-up expectations with your artist.
Q: Which aftercare approach should I pick for summer healing, Saniderm or dry healing?
A: The community splits into two camps. One group prefers Saniderm-style occlusion to keep things clean and reduce scabbing. The other group favors dry healing to encourage stable scab formation. Your choice depends on your sweat levels, the artist's protocol, and any past skin sensitivities. Talk through pros and cons with your artist before the session.
Q: Can a vertical spine-aligned piece survive pregnancy or major weight change better than a horizontal lower back design?
A: Yes, vertical designs generally move with the body's length axis and show less horizontal distortion when skin stretches. They are a practical pick if you expect major body changes. No guarantee exists, so plan design placement slightly higher on the sacrum when possible.
Q: How often will I need a touch-up for small lower back tattoos?
A: Plan for a first touch-up in the first 6 to 18 months for many small styles. After that, a maintenance touch-up every two to five years keeps linework crisp depending on sun exposure and clothing friction. Blackwork and bold outlines usually need less frequent refreshing than fine line or watercolor pieces.
Q: Where should I look to find artists who specialize in ornamental lower back work without naming anyone?
A: Search Instagram hashtags like #LowerBackTattoo and #OrnamentalBack, browse Tattoodo filters for lumbar placement, and check TikTok for "lower back tattoo healing" clips from local artists. r/tattoos threads and Booksy guest spots can surface artists who travel and take custom lumbar commissions.
Q: If I have an old tribal stamp I want covered, what is the best first step?
A: Bring clear photos of the current ink and a few overlay ideas to a consult. Ask for design mockups that map darker fills over the densest parts of the old work. Cover-ups often require more saturation and sometimes a two-session plan, so get a realistic timeline during the consult.
